Principle Loosely Coupled
http://www.tutorialsteacher.com/ioc/introduction
Inversion of Control
IoC is a design principle which recommends inversion of different kinds of controls in object oriented design to achieve loose coupling between the application classes. Here, the control means any additional responsibilities a class has other than its main responsibility, such as control over the flow of an application, control over the dependent object creation and binding (Remember SRP-Single Responsibility Principle). If you want to do TDD (Test Driven Development) then you must use IoC principle without which TDD is not possible.
Dependency of Inversion Principle
DIP principle also helps in achieving loose coupling between the classes. It is highly recommended to use DIP and IoC together in order to achieve loose coupling.
DIP suggests that high-level modules should not depend on low level modules. Both should depend on abstraction.
Dependency Injection
Dependency Injection (DI) is a design pattern which implements IoC principle to invert the creation of dependent objects.
IoC Container
The IoC container is a framework to manage automatic dependency injection throughout the application so that we as a programmer do not need to put more time and effort on it. There are various IoC Containers for .NET such as Unity, Ninject, StructureMap, Autofac etc.
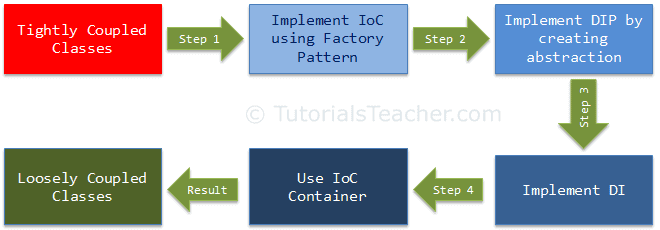
We cannot achieve loosely coupled classes by only using IoC. Along with IoC we also need to use DIP, DI and IoC container. The following figure illustrates how we are going to achieve loosely coupled design step by step

Inversion of Control (IoC) is a design principle (although, some people refer to it as a pattern). As the name suggests, it is used to invert different kinds of controls in object oriented design to achieve loose coupling. Here, the control means any additional responsibilities a class has other than its main responsibility, such as control over the flow of an application, control over the flow of an object creation or dependent object creation and binding.
IoC is all about inverting the control. To explain in layman's term, suppose you drive a car to your work place, it means you control the car. IoC principle suggests to invert the control, meaning instead of driving the car yourself, you hire a cab where another person will drive the car. Thus it is called inversion of the control from you to the cab driver. You don't have to drive a car yourself and let the driver do the driving so that you can focus on your main work.
IoC principle helps in designing loosely coupled classes which make them testable, maintainable and extensible.
IoC can also be applied in the way we create objects of dependent class. First of all, let's understand what we mean by dependency here.
Consider the following example.
public class A
{
    B b;

    public A()
    {
        b = new B();
    }

    public void Task1() {
        // do something here..
        b.SomeMethod();
        // do something here..
    }

}

public class B {

    public void SomeMethod() {
        //doing something..
    }
}
In the above example, class A calls b.SomeMethod() to complete its task1. Class A cannot complete its task without class B and so you can say "Class A is dependent on class B" or "class B is a dependency of class A".
In object oriented design approach, classes need to interact with each other in order to complete one or more functionalities of an application such as in the above classes A and B. Class A creates and manages the life time of an object of class B. Essentially it controls the creation and life time of objects of dependency class.
IoC principle suggests to invert the control, means separate the controlling stuff to another class. In other words, invert the dependency creation control from the class A to another class as shown below.
public class A
{
    B b;

    public A()
    {
        b = Factory.GetObjectOfB ();
    }

    public void Task1() {
        // do something here..
        b.SomeMethod();
        // do something here..
    }
}

public class Factory
{
    public static B GetObjectOfB()
    {
        return new B();
    }
}
As you can see above, class A uses Factory class to get an object of class B. Thus, we have inverted the dependent object creation from class A to Factory. The class A no longer creates an object of class B instead it uses Factory class to get the object of class B.
Let's understand this using a more practical example.
In an object oriented design, classes should be designed in loosely coupled way. Loosely coupled means changes in one class should not force other classes to change, so the whole application can become maintainable and extensible. Let's understand this by using typical n-tier architecture as depicted by the following figure.

In the typical n-tier architecture, the User Interface (UI) uses Service layer to retrieve or save the data. The service layer uses the BusinessLogic class to apply business rules on the data. The BusinessLogic class depends on the DataAccess class which retrieves or saves the data to the underlying database. This is simple n-tier architecture design. Let's focus on the BusinessLogic and DataAccess class to understand IoC.
The following is an example of BusinessLogic and DataAccess classes for customer.
public class CustomerBusinessLogic
{
    DataAccess _dataAccess;

    public CustomerBusinessLogic()
    {
        _dataAccess = new DataAccess();
    }

    public string GetCustomerName(int id)
    {
        return _dataAccess.GetCustomerName(id);
    }
}

public class DataAccess
{
    public DataAccess()
    {
    }

    public string GetCustomerName(int id) {
        return "Dummy Customer Name"; // get it from DB in real app
    }
}
As you can see in the above example, the CustomerBusinessLogic class depends on DataAccess class. It creates an object of the DataAccess class to get customer data.
Now, let's understand what's wrong with the above classes.
In the above example, CustomerBusinessLogic and DataAccess are tightly coupled classes because CustomerBusinessLogic class includes the reference of concrete DataAccess class. It also creates an object of DataAccess class and manages the lifetime of an object.
Problems in the above example classes:
- CustomerBusinessLogic and DataAccess classes are tightly coupled classes. So, changes in the DataAccess class will lead to changes in the CustomerBusinessLogic class. For example, if we add, remove or rename any method in DataAccess class then we need to change CustomerBusinessLogic class accordingly.
- Suppose, customer data comes from different databases or web service in future we may need to create different classes for so it leads to changes in CustomerBusinessLogic class.
- CustomerBusinessLogic class creates an object of DataAccess class using new keyword. There may be multiple classes which use DataAccess class and create its object. So if you change the name of the class, then you need to find all the places in your source code where you create objects of DataAccess and make the change throughout the code. This is repetitive code for creating an object of same class and maintaining its dependencies.
- Because CustomerBusinessLogic class creates an object of concrete DataAccess class, it cannot be tested independently (TDD). DataAccess class cannot be replaced with mock class.
So, to solve the above problems and get a loosely coupled design, we can use IoC and DIP principles together. Remember, IoC is a principle not a pattern. It just gives high level design guidelines but does not give implementation details. You are free to implement IoC principle the way you want.
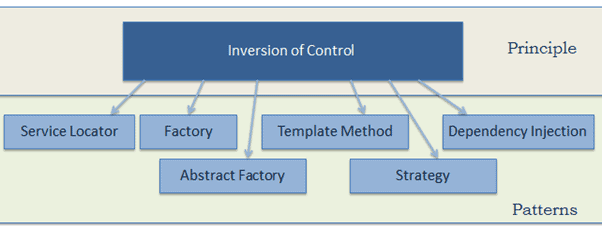
The following pattern (but not limited) implements IoC principle.
Let's use the Factory pattern to implement IoC in the above example as the first step towards attaining loosely coupled classes.
First, create a simple Factory class which returns an object of DataAccess class as shown below.
Example: DataAccess Factory public class DataAccessFactory { public static DataAccess GetDataAccessObj() { return new DataAccess(); } } Now, use this DataAccessFactory class in CustomerBusinessLogic class to get an object of DataAccess class.
`Example: Use Factory Class to Retrieve Object`
`public class CustomerBusinessLogic`
`{`
`
    public CustomerBusinessLogic()`
    {`
    }`

`    public string GetCustomerName(int id)`
`    {`
`        DataAccess _dataAccess =  DataAccessFactory.GetDataAccessObj();`
`
        return _dataAccess.GetCustomerName(id);`
    }`
}`
As you can see, CustomerBusinessLogic class uses DataAccessFactory.GetCustomerDataAccessObj() method to get an object of DataAccess class instead of creating it using new keyword. Thus, we have inverted the control of creating an object of dependent class from CustomerBusinessLogic class to DataAccessFactory class.
This is a simple implementation of IoC and the first step towards achieving fully loose coupled design. As mentioned in the previous chapter, we will not achieve complete loosely coupled classes by only using IoC. Along with IoC we also need to use DIP, Strategy pattern, and DI (Dependency Injection).
DIP is one of the SOLID object oriented principle invented by Robert Martin (a.k.a. Uncle Bob)
DIP Definition High-level modules should not depend on low-level modules. Both should depend on abstraction. Abstractions should not depend on details. Details should depend on abstractions. To understand DIP, let's take a previous example as shown below.
public class CustomerBusinessLogic
{
    public CustomerBusinessLogic()
    {
    }

    public string GetCustomerName(int id)
    {
        DataAccess _dataAccess = DataAccessFactory.GetDataAccessObj();

        return _dataAccess.GetCustomerName(id);
    }
}

public class DataAccessFactory
{
    public static DataAccess GetDataAccessObj()
    {
        return new DataAccess();
    }
}

public class DataAccess
{
    public DataAccess()
    {
    }

    public string GetCustomerName(int id) {
        return "Dummy Customer Name"; // get it from DB in real app
    }
}
In the above example, we implemented factory pattern to achieve IoC. But, CustomerBusinessLogic class uses concrete DataAccess class. So still it is tightly coupled even though we have inverted the dependent object creation to the factory class.
Let's use DIP on the CustomerBusinessLogic and DataAccess classes and make them more loosely coupled.
As per DIP definition, a high-level module should not depend on low-level modules. Both should depend on abstraction. So, first, decide which is the high-level module (class) and low-level module. High-level module is a module which depends on other modules. In our example, CustomerBusinessLogic depends on DataAccess class, so CustomerBusinessLogic is high-level module and DataAccess is low-level module. So, as per first rule of DIP, CustomerBusinessLogic should not depends on concrete DataAccess class, instead both classes depends on abstraction.
The second rule in DIP is "Abstractions should not depend on details. Details should depend on abstractions".
What is Abstraction? Abstraction and encapsulation are important principles of object-oriented programming. There are many different definitions from many people but let's understand abstraction using the above example.
In English, abstraction means something which is non-concrete. In programming terms, the above CustomerBusinessLogic and DataAccess are concrete classes, meaning we can create objects of it. So, abstraction in programming is to create an interface or abstract class which is non-concrete. This means we cannot create an object of interface or abstract class. As per DIP, CustomerBusinessLogic (high-level module) should not depend on concrete DataAccess (low-level module) class. Both classes depend on abstractions, meaning both classes should depend on interface or abstract class.
Now, what should be in interface (or in abstract class)? As you can see, CustomerBusinessLogic uses GetCustomerName() method of DataAccess class. (In real life, there will be many customer related methods in DataAccess class). So, let's declare GetCustomerName(int id) method in the interface as shown below.
public interface ICustomerDataAccess
{
    string GetCustomerName(int id);
}
Now, implement ICustomerDataAccess in CustomerDataAccess class as shown below. (So instead of DataAccess class, let's define new CustomerDataAccess class.)
public class CustomerDataAccess: ICustomerDataAccess
{
    public CustomerDataAccess()
    {
    }

    public string GetCustomerName(int id) {
        return "Dummy Customer Name";
    }
}
Now, we need to change our factory class which returns ICustomerDataAccess instead of concrete DataAccess class as shown below.
public class DataAccessFactory
{
    public static ICustomerDataAccess GetCustomerDataAccessObj()
    {
        return new CustomerDataAccess();
    }
}
Now, change the CustomerBusinessLogic class which uses ICustomerDataAccess instead of concrete DataAccess class as shown below.
public class CustomerBusinessLogic
{
    ICustomerDataAccess _custDataAccess;

    public CustomerBusinessLogic()
    {
        _custDataAccess = DataAccessFactory.GetCustomerDataAccessObj();
    }

    public string GetCustomerName(int id)
    {
        return _custDataAccess.GetCustomerName(id);
    }
}
Thus, we have implemented DIP in our example where high-level module (CustomerBusinessLogic) and low-level module (CustomerDataAccess) are depends on abstraction (ICustomerDataAccess). Also, abstraction (ICustomerDataAccess) does not depends on details (CustomerDataAccess) but details depend on abstraction.
The following is the complete DIP example discussed so far.
Example: DIP Implementation public interface ICustomerDataAccess { string GetCustomerName(int id); }
public class CustomerDataAccess: ICustomerDataAccess
{
    public CustomerDataAccess() {
    }

    public string GetCustomerName(int id) {
        return "Dummy Customer Name";
    }
}

public class DataAccessFactory
{
    public static ICustomerDataAccess GetCustomerDataAccessObj()
    {
        return new CustomerDataAccess();
    }
}

public class CustomerBusinessLogic
{
    ICustomerDataAccess _custDataAccess;

    public CustomerBusinessLogic()
    {
        _custDataAccess = DataAccessFactory.GetCustomerDataAccessObj();
    }

    public string GetCustomerName(int id)
    {
        return _custDataAccess.GetCustomerName(id);
    }
}
Advantages of implementing DIP in the above example is that CustomerBusinessLogic and CustomerDataAccess classes are loosely coupled classes because CustomerBusinessLogic does not depend on concrete DataAccess class, instead it includes reference of ICustomerDataAccess interface. So now, we can easily use another class which implements ICustomerDataAccess with different implementation.
Still, we have not achieved fully loosely coupled classes because CustomerBusinessLogic class includes Factory class to get the reference of ICustomerDataAccess. This is where Dependency Injection pattern helps us. In the next section, we will learn how to use DI and Strategy pattern using the above example.
Previously, we created and used abstraction to make the classes loosely coupled. Here, we are going to implement Dependency Injection and strategy pattern together to move the dependency object creation completely out of the class. This is our third step in making the classes completely loose coupled.

Dependency Injection (DI) is a design pattern used to implement IoC where it allows creation of dependent objects outside of a class and provides those objects to a class through different ways. Using DI, we move the creation and binding of the dependent objects outside of the class that depends on it.
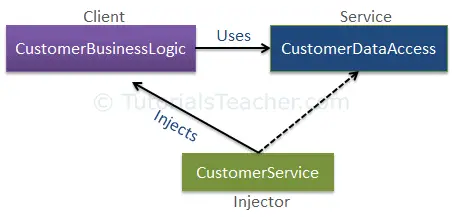
Dependency Injection pattern involves 3 types of classes.
- Client Class: The client class (dependent class) is a class which depends on the service class
- Service Class: The service class (dependency) is a class that provides service to the client class.
- Injector Class: The injector class injects service class object into the client class.
The following figure illustrates the relationship between these classes:
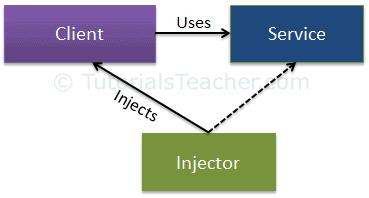
As you can see, injector class creates an object of service class, and injects that object to a client object. This way DI pattern separates the responsibility of creating an object of service class out of client class.
Types of Dependency Injection As you have learned above, the injector class injects the service (dependency) to the client (dependent). The injector class injects dependencies broadly in three ways: through constructor, through property, or through method.
Constructor Injection: In the constructor injection, injector supplies service (dependency) through the client class constructor.
Property Injection: In property injection (aka Setter Injection), injector supplies dependency through a public property of the client class.
Method Injection: In this type of injection, client class implements an interface which declares method(s) to supply dependency and the injector uses this interface to supply dependency to the client class.
Let's take an example from the previous chapter to maintain the continuity. In the previous section of DIP, we used Factory class inside CustomerBusinessLogic class to get an object of CustomerDataAccess object as shown below.
public interface ICustomerDataAccess
{
    string GetCustomerName(int id);
}

public class CustomerDataAccess: ICustomerDataAccess
{
    public CustomerDataAccess() {
    }

    public string GetCustomerName(int id) {
        return "Dummy Customer Name";
    }
}

public class DataAccessFactory
{
    public static ICustomerDataAccess GetCustomerDataAccessObj()
    {
        return new CustomerDataAccess();
    }
}

public class CustomerBusinessLogic
{
    ICustomerDataAccess _custDataAccess;

    public CustomerBusinessLogic()
    {
        _custDataAccess = DataAccessFactory.GetCustomerDataAccessObj();
    }

    public string GetCustomerName(int id)
    {
        return _custDataAccess.GetCustomerName(id);
    }
}
The problem with the above example is that we used DataAccessFactory inside CustomerBusinessLogic class. So, suppose there is another implementation of ICustomerDataAccess for some reason and we want to use that new class inside CustomerBusinessLogic. Then, we need to change the source code of CustomerBusinessLogic class also. Dependency injection pattern solves this problem by injecting dependent objects via constructor, property, or interface.
The following figure illustrates the DI pattern implementation for the above example.
As you see, CustomerService class becomes injector class which sets an object of service class (CustomerDataAccess) to the client class (CustomerBusinessLogic) either through constructor, property, or method to achieve loose coupling. Let's explore each of these options.
Constructor Injection As mentioned before, when we provide dependency through the constructor then it's constructor injection.
Consider the following example where we have implemented DI using constructor.
Example: Constructor Injection public class CustomerBusinessLogic { ICustomerDataAccess _dataAccess;
    public CustomerBusinessLogic(ICustomerDataAccess custDataAccess)
    {
        _dataAccess = custDataAccess;
    }

    public CustomerBusinessLogic()
    {
        _dataAccess = new CustomerDataAccess();
    }

    public string ProcessCustomerData(int id)
    {
        return _dataAccess.GetCustomerName(id);
    }
}

public interface ICustomerDataAccess
{
    string GetCustomerData(int id);
}

public class CustomerDataAccess: ICustomerDataAccess
{
    public CustomerDataAccess()
    {
    }

    public string GetCustomerName(int id)
    {
        //get the customer name from the db in real application
        return "Dummy Customer Name";
    }
}
In the above example, CustomerBusinessLogic includes constructor with one parameter of type ICustomerDataAccess. Now, the calling class must inject an object of ICustomerDataAccess.
Example: Inject Dependency public class CustomerService { CustomerBusinessLogic _customerBL;
    public CustomerService()
    {
        _customerBL = new CustomerBusinessLogic(new CustomerDataAccess());
    }

    public string GetCustomerName(int id) {
        return _customerBL.GetCustomerName(id);
    }
}
As you can see in the above example, CustomerService class creates and injects CustomerDataAccess object into CustomerBusinessLogic class. Thus, CustomerBusinessLogic class need not create an object of CustomerDataAccess using new keyword or using factory class. The calling class (CustomerService) creates and sets appropriate DataAccess class to the CustomerBusinessLogic class. This way CustomerBusinessLogic and CustomerDataAccess class become more loosely coupled classes.
Property Injection In the property injection, dependency is provided through public property. Consider the following example.
Example: Property Injection public class CustomerBusinessLogic { public CustomerBusinessLogic() { }
    public string GetCustomerName(int id)
    {
        return DataAccess.GetCustomerName(id);
    }

    public ICustomerDataAccess DataAccess { get; set; }
}

public class CustomerService
{
    CustomerBusinessLogic _customerBL;

    public CustomerService()
    {
        _customerBL = new CustomerBusinessLogic();
        _customerBL.DataAccess = new CustomerDataAccess();
    }

    public string GetCustomerName(int id) {
        return _customerBL.GetCustomerName(id);
    }
}
As you can see above, the CustomerBusinessLogic class includes public property named DataAccess where you set an instance of a class that has implanted ICustomerDataAccess. So, CustomerService class creates and sets CustomerDataAccess class using this public property.
Method Injection In the method injection, dependencies are provided through methods. This method can be a class method or interface method.
The following example demonstrates method injection using interface based method.
Example: Interface Injection interface IDataAccessDependency { void SetDependency(ICustomerDataAccess customerDataAccess); }
public class CustomerBusinessLogic : IDataAccessDependency
{
    ICustomerDataAccess _dataAccess;

    public CustomerBusinessLogic()
    {
    }

    public string GetCustomerName(int id)
    {
        return _dataAccess.GetCustomerName(id);
    }

    public void SetDependency(ICustomerDataAccess customerDataAccess)
    {
        _dataAccess = customerDataAccess;
    }
}

public class CustomerService
{
    CustomerBusinessLogic _customerBL;

    public CustomerService()
    {
        _customerBL = new CustomerBusinessLogic();
        ((IDataAccessDependency)_customerBL).SetDependency(new CustomerDataAccess());
    }

    public string GetCustomerName(int id) {
        return _customerBL.GetCustomerName(id);
    }
}
In the above example, CustomerBusinessLogic class implements IDataAccessDependency interface which includes method SetDependency. So the injector class (CustomerService) will now use this method to inject dependent class (CustomerDataAccess) to the client class.
Thus, you can use DI and strategy pattern to create loose coupled classes.
So far, we have used couple of principles and patterns to achieve loosely coupled classes. In professional projects, there would be many dependent classes and implementing these patterns would be time consuming. Here IoC Container (aka DI container) helps us.
Previously, we learned how to implement Dependency Injection pattern to achieve loose coupled classes. IoC Container (a.k.a. DI Container) is a framework for implementing automatic dependency injection. It manages object creating and its life time and also injects dependencies to the class.
IoC container creates an object of the specified class and also injects all the dependency objects through constructor, property or method at run time and disposes it at the appropriate time. This is done so that we don't have to create and manage objects manually.
All the containers must provide easy support for the following DI lifecycle.
- Register: The container must know which dependency to instantiate when it encounters a particular type. This process is called registration. Basically, it must include some way to register type-mapping.
- Resolve: When using IoC container, we don't need to create objects manually. Container does it for us. This is called resolution. Container must include some methods to resolve the specified type; container creates an object of specified type, injects required dependencies if any and returns it.
- Dispose: Container must manage the lifetime of dependent objects. Most IoC containers include different lifetimemanagers to manage an object's lifecycle and dispose it.
There are many open source or commercial containers available for .NET. Some are listed below.
Unity container is an open source IoC container for .NET applications supported by Microsoft. It is a lightweight and extensible IoC container.
Unity container source code is available at https://github.com/unitycontainer/unity.
Unity Container Features:
- Simplified type-mapping registration for interface type or base type.
- Supports registration of existing instance.
- Supports code-based registration as well as design time registration.
- Automatically injects registered type at runtime through constructor, property or method.
- Supports deferred resolution.
- Supports nested containers.
- Automatic disposing of instances based on lifetime managers such as hierarchical, per resolve, externally controlled, per request and per thread life time manager.
- Supports service location capability; this allows clients to store or cache the container
- Supports type interception and instance interception.
- Easy to extend unity container.
Here, we are going to install Unity container in Visual Studio using NuGet.
First of all, we need to create a project in order to use Unity. It can be any type of project such as class library, console, web, windows or any other C# or VB.NET project. We will create a Console Application to demo Unity container. So, click on New Project from the Start page of Visual Studio and select console application.
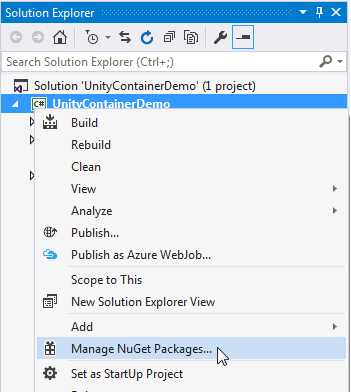
Now, we need to install Unity in this project because we want to dependency injection in our project. So, right click on the project node in the solution explorer and select Manage NuGet Packages as shown below.
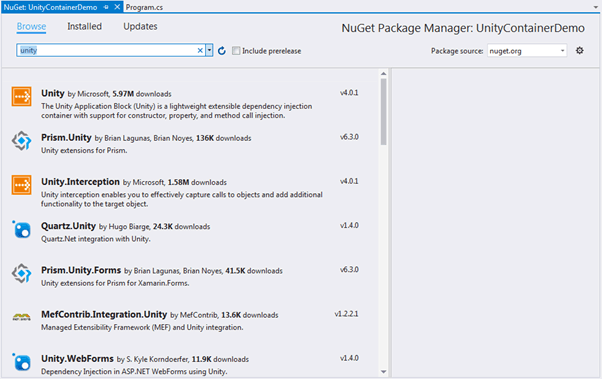
Now, we can search for unity from the browse tab of NuGet. Enter "unity" in the search box and it will list all the libraries or plugins which contains "unity" word as shown below.
Now, click on Install button in the right pane. This will add all the references of unity into your project as shown below.

So now, we are ready to use Unity to implement automatic dependency injection in our project.
In the previous section, we installed unity framework in our console project. Here, we will learn how to register type-mapping and resolve it using unity container.
As we learned in the IoC container chapter that every container must provide a way to register and resolve dependencies. Unity container provides RegisterType() and Resolve() methods for this.
We are going to use the following sample classes to demo registration and resolution of dependencies throughout this chapter.
public interface ICar
{
    int Run();
}

public class BMW : ICar
{
    private int _miles = 0;

    public int Run()
    {
        return ++_miles;
    }
}

public class Ford : ICar
{
    private int _miles = 0;

    public int Run()
    {
        return ++_miles;
    }
}

public class Audi : ICar
{
    private int _miles = 0;

    public int Run()
    {
        return ++_miles;
    }

}
public class Driver
{
    private ICar _car = null;

    public Driver(ICar car)
    {
        _car = car;
    }

    public void RunCar()
    {
        Console.WriteLine("Running {0} - {1} mile ", _car.GetType().Name, _car.Run());
    }
}
As you can see sample classes, Driver class depends on ICar interface. So, when we instantiate the Driver class object then we will have to pass an instance of a class which implement ICar interface such as BMW, Audi or Ford class as shown below.
Driver driver = new Driver(new BMW());

driver.RunCar();
Output: Running BMW - 1 mile
In the above example, we created and passed an object of BMW while creating an object of Driver class. Thus, we injected dependency of Driver class manually. Now, use unity container and understand different ways to register and resolve dependencies.
Using UnityContainer. In order to use unity container, we first need to create an object of it. You can use any class which implements IUnityContainer interface. Unity container includes UnityContainer class in Microsoft.Practices.Unity namespace that implements IUnityContainer interface. If you need to extend the container then you can create your own custom class and implement IUnityContainer interface as per your need.
Example: Instantiate UnityContainer using Microsoft.Practices.Unity;
IUnityContainer container = new UnityContainer();
//or
var container = new UnityContainer();
Now, we need to register type-mapping next.
Register
Before unity resolve dependencies, we first need to register the type-mapping with the container, so that it can create the correct object for the given type. Use RegisterType() method to register a type mapping. Basically, it configures which class to instantiate, for which interface or base class. For example, if we want unity container to create and supply an object of BMW class whenever it needs to supply dependency of ICar interface, then you first need to register it as below.
Example: Register Type with Unity
IUnityContainer container = new UnityContainer();

container.RegisterType<ICar, BMW>();
The container.RegisterType<ICar, BMW>() asks unity that whenever you need to inject an object of ICar, then create an object of BMW class and inject it through a constructor by default.
The RegisterType method includes many overloads.
So now, after registration, we can resolve it using Resolve() method.
Resolve Unity creates an object of the specified class and automatically injects dependencies using resolve() method. We have registered BMW with ICar above. Now, we can instantiate the Driver class using unity container without using new keyword as shown below.
Example: Resolve IUnityContainer container = new UnityContainer(); container.RegisterType<ICar, BMW>();// Map ICar with BMW
//Resolves dependencies and returns Driver object
Driver drv = container.Resolve<Driver>();
drv.RunCar();
Output: Running BMW - 1 mile
In the above example, unity container creates an object of a class Driver using container.Resolve<driver>() method. The Driver class is a dependent on ICar. So, container.Resolve<Driver>() returns an object of Driver class by automatically creating and injecting BMW object in it. All this is behind the scene. It creates and injects BMW object because we register BMW type with ICar.
Unity container will create new object and inject it every time whenever we resolve the same type.
var container = new UnityContainer();
container.RegisterType<ICar, BMW>();

Driver driver1 = container.Resolve<Driver>();
driver1.RunCar();

Driver driver2 = container.Resolve<Driver>();
driver2.RunCar();
Output: Running BMW - 1 mile Running BMW - 1 mile
In the above example, container injects BMW object whenever it resolves Driver class e.g. driver1 and driver2 both has a reference of separate BMW objects.
Thus, you can create an object of the specified type using unity container.
Multiple Registration Unity container will inject last registered type if you register multiple mappings of the same type.
IUnityContainer container = new UnityContainer();
container.RegisterType<ICar, BMW>();
container.RegisterType<ICar, Audi>();

Driver driver = container.Resolve<Driver>();
driver.RunCar();
Output: Running Audi - 1 Mile
In the above example, ICar is mapped to both BMW and Audi. But, unity will inject Audi every time because it has been registered last.
Register Named Type You can register a type-mapping with a name which you can use with Resolve method.
Example: Register Named Type IUnityContainer container = new UnityContainer(); container.RegisterType<ICar, BMW>(); container.RegisterType<ICar, Audi>("LuxuryCar");
ICar bmw = container.Resolve<ICar>();  // return BMW object
ICar audi = container.Resolve<ICar>("LuxuryCar"); // return Audi object
As you can see above, we have mapped ICar with both BMW and Audi class. However, we have given a name "LuxuryCar" to ICar-Audi mapping. So now, Resolve() method will return an object of Audi if we specify the mapping name.
Now, consider the following example.
var container = new UnityContainer();
container.RegisterType<ICar, BMW>();
container.RegisterType<ICar, Audi>("LuxuryCar");

// Register Driver type
container.RegisterType<Driver>("LuxuryCarDriver",
                new InjectionConstructor(container.Resolve<ICar>("LuxuryCar")));

Driver driver1 = container.Resolve<Driver>();// injects BMW
driver1.RunCar();

Driver driver2 = container.Resolve<Driver>("LuxuryCarDriver");// injects Audi
driver2.RunCar();
Output: Running BMW - 1 Mile Running Audi - 1 Mile
In the above example, we registered Driver class with the name "LuxuryCarDriver" and specified an object of InjectionConstructor. The new InjectionConstructor(container.Resolve<ICar>("LuxuryCar")) specifies a construction injection for Driver class which passes an object of Audi because container.Resolve("LuxuryCar") returns Audi object. So now, we can use container.Resolve<Driver>("LuxuryCarDriver") to resolve Driver with Audi even if ICar is registered with BMW by default.
Register Instance Unity container allows us to register an existing instance using RegisterInstance() method. So, unity container will not create a new instance for the registered type and will use the same instance every time.
var container = new UnityContainer();
ICar audi = new Audi();
container.RegisterInstance<ICar>(audi);

Driver driver1 = container.Resolve<Driver>();
driver1.RunCar();
driver1.RunCar();

Driver driver2 = container.Resolve<Driver>();
driver2.RunCar();
Output: Running Audi - 1 Mile Running Audi - 2 Mile Running Audi - 3 Mile
Thus, we can register and resolve different types using Unity container.
In the previous section, we learned about registering and resolving types using unity. Here, you will learn how unity container performs constructor injection.
Construction injection is a type of Dependency Injection where dependencies are provided through a constructor.
By default, Resolve<T>() performs construction injection to inject dependencies and returns an object of specified type. Let's take the same examples from the previous section.
public interface ICar
{
    int Run();
}

public class BMW : ICar
{
    private int _miles = 0;

    public int Run()
    {
        return ++_miles;
    }
}

public class Ford : ICar
{
    private int _miles = 0;
    public int Run()
    {
        return ++_miles;
    }
}

public class Audi : ICar
{
    private int _miles = 0;

    public int Run()
    {
        return ++_miles;
    }

}
public class Driver
{
    private ICar _car = null;

    public Driver(ICar car)
    {
        _car = car;
    }

    public void RunCar()
    {
        Console.WriteLine("Running {0} - {1} mile ", _car.GetType().Name, _car.Run());
    }
}
As you can see above, the Driver class accepts an object of type ICar in the constructor. So, the unity container will inject dependencies via constructor as shown below.
Example: Construction Injection using Unity Container var container = new UnityContainer(); container.RegisterType<ICar, BMW>();
var driver = container.Resolve<Driver>();
driver.RunCar();
Output: Running BMW - 1 mile
In the above example, container.RegisterType<ICar, BMW>() maps ICar to BMW. It means whenever unity container needs to inject an object of type ICar, it will create and inject an object of BMW class. The container.Resolve<driver>() method will create and return an object of Driver class by passing an object of ICar into the constructor. As we mapped ICar to BMW, it will create and inject BMW object to a constructor of Driver class and return an object of Driver class.
Thus, the Resolve() method by default performs constructor injection while resolving types.
Multiple Parameters You can also inject multiple parameters in the constructor. Consider the following example.
public interface ICarKey {

}

public class BMWKey : ICarKey
{

}

public class AudiKey : ICarKey
{

}

public class FordKey : ICarKey
{

}

public class Driver
{
    private ICar _car = null;
    private ICarKey _key = null;

    public Driver(ICar car, ICarKey key)
    {
        _car = car;
        _key = key;
    }

    public void RunCar()
    {
        Console.WriteLine("Running {0} with {1} - {2} mile ", _car.GetType().Name , _key.GetType().Name,  _car.Run());
    }
}
So now, you can register ICar and ICarKey with unity and inject both the parameters as shown below.
Example: Constructor Injection for Multiple Parameters var container = new UnityContainer();
container.RegisterType<ICar, Audi>();
container.RegisterType<ICarKey, AudiKey>();

var driver = container.Resolve<Driver>();
driver.RunCar();
Output: Running Audi with AudiKey - 1 mile
Multiple Constructors If a class includes multiple constructors then use InjectionConstructor attribute to indicate which constructor to use for construction injection.
public class Driver
{
    private ICar _car = null;

    [InjectionConstructor]
    public Driver(ICar car)
    {
        _car = car;
    }

    public Driver(string name)
    {
    }

    public void RunCar()
    {
        Console.WriteLine("Running {0} - {1} mile ", _car.GetType().Name, _car.Run());
    }
}
As you can see, Driver class includes two constructors. So, we have used InjectionConstructor attribute to indicate which constructor to call when resolving the Driver class.
You can configure the same thing as above at run time instead of applying InjectionConstructor attribute by passing InjectionConstructor in the RegisterType() method as shown below.
container.RegisterType<Driver>(new InjectionConstructor(new Ford()));

//or

container.RegisterType<ICar, Ford>();
container.RegisterType<Driver>(new InjectionConstructor(container.Resolve<ICar>()));
Primitive Type Parameter Unity also injects primitive type parameter in the constructor. Consider the following Driver class with primitive type parameter in the constructor.
public class Driver
{
    private ICar _car = null;
    private string _name = string.Empty;

    public Driver(ICar car, string driverName)
    {
        _car = car;
        _name = driverName;
    }

    public void RunCar()
    {
        Console.WriteLine("{0} is running {1} - {2} mile ",
                        _name, _car.GetType().Name, _car.Run());
    }
}
Use InjectionConstructor class to configure constructor's parameters values. Pass an object of InjectionConstructor class in the RegisterType() method to specify a multiple parameters values.
var container = new UnityContainer();

container.RegisterType<Driver>(new InjectionConstructor(new object[] { new Audi(), "Steve" }));

var driver = container.Resolve<Driver>(); // Injects Audi and Steve
driver.RunCar();
Output: Steve is running Audi - 1 mile
Property injection is a type of dependency injection where dependencies are provided through properties.
Let understand how we can perform property injection using unity container. Consider the following example classes.
public interface ICar
{
    int Run();
}

public class BMW : ICar
{
    private int _miles = 0;

    public int Run()
    {
        return ++_miles;
    }
}

public class Ford : ICar
{
    private int _miles = 0;

    public int Run()
    {
        return ++_miles;
    }
}

public class Audi : ICar
{
    private int _miles = 0;

    public int Run()
    {
        return ++_miles;
    }

}
public class Driver
{
    public Driver()
    {
    }

    [Dependency]
    public ICar Car { get; set; }

    public void RunCar()
    {
        Console.WriteLine("Running {0} - {1} mile ",
                            this.Car.GetType().Name, this.Car.Run());
    }
}
As you can see in the above sample classes, the Driver class is dependent on a property of type ICar. So, we need to set an object of a class that implements ICar to the Car property using unity container.
Property injection in unity container can be implemented in two ways:
- Using Dependency attribute
- Run-time configuration
Dependency Attribute For the property injection, we first tell the unity container which property to inject. So, we need to decorate the dependent properties with the Dependency attribute as shown in the following Driver class.
Example: Apply Dependency Attribute public class Driver {
    public Driver()
    {
    }

    [Dependency]
    public ICar Car { get; set; }

    public void RunCar()
    {
        Console.WriteLine("Running {0} - {1} mile ", this.Car.GetType().Name, this.Car.Run());
    }
}
Now, we can register ICar type and resolve it as shown below.
Example: Property Injection using Unity Container var container = new UnityContainer(); container.RegisterType<ICar, BMW>();
var driver = container.Resolve<Driver>();
driver.RunCar();
Output: Running BMW - 1 mile
Named Mapping We can specify a name in the Dependency("name") attribute, which can then be used to set property value.
public class Driver
{
    public Driver()
    {
    }

    [Dependency("LuxuryCar")]
    public ICar Car { get; set; }

    public void RunCar()
    {
        Console.WriteLine("Running {0} - {1} mile ", this.Car.GetType().Name, this.Car.Run());
    }
}
So now, we can resolve it as below.
Example: Property Injection using Unity Container var container = new UnityContainer(); container.RegisterType<ICar, BMW>(); container.RegisterType<ICar, Audi>("LuxuryCar");
var driver = container.Resolve<Driver>();
driver.RunCar();
Output: Running Audi - 1 mile
Run-time Configuration Unity container allows us to configure a property injection with RegisterType() method if a method is not marked with Dependency attribute. Pass an object of InjectionProperty class in the RegisterType() method to specify a property name and parameter value.
var container = new UnityContainer();

//run-time configuration
container.RegisterType<Driver>(new InjectionProperty("Car", new BMW()));

var driver = container.Resolve<Driver>();
driver.RunCar();
Output: Running BMW - 1 Mile As you can see in the above example, container.RegisterType<driver>(new InjectionProperty("Car", new BMW())) registers Driver class by passing an object of InjectionProperty that specifies the property name "Car" and the BMW object as a value. So, unity container will set an object of BMW to the Car property when we resolve it using container.Resolve<Driver>().
In the method injection, dependencies are provided through method parameters. Visit Dependency Injection chapter to learn more about method injection.
Let's understand how we can perform method injection using unity container. Consider the following example classes.
public interface ICar
{
    int Run();
}

public class BMW : ICar
{
    private int _miles = 0;

    public int Run()
    {
        return ++_miles;
    }
}

public class Ford : ICar
{
    private int _miles = 0;

    public int Run()
    {
        return ++_miles;
    }
}

public class Audi : ICar
{
    private int _miles = 0;

    public int Run()
    {
        return ++_miles;
    }

}
public class Driver
{
    private ICar _car = null;

    public Driver()
    {
    }

    public void UseCar(ICar car) {
        _car = car;
    }

    public void RunCar()
    {
        Console.WriteLine("Running {0} - {1} mile ", _car.GetType().Name, _car.Run());
    }
}
As you can see in the above sample classes, the Driver class includes method UseCar() to set the object of type ICar. Here, we have taken a simple method example. However, you can also use interface based method injection explained in Dependency Injection chapter.
Method injection in unity can be implemented in two ways:
- Using InjectionMethod attribute
- Run-time configuration
InjectionMethod Attribute For the method injection, we need to tell the unity container which method should be used for dependency injection. So, we need to decorate a method with the InjectionMethod attribute as shown in the following Driver class.
Example: Method Injection public class Driver { private ICar _car = null;
    public Driver()
    {
    }
    [InjectionMethod]
    public void UseCar(ICar car) {
        _car = car;
    }

    public void RunCar()
    {
        Console.WriteLine("Running {0} - {1} mile ", _car.GetType().Name, _car.Run());
    }
}
We can implement method injection in unity container as shown below.
Example: Method Injection var container = new UnityContainer(); container.RegisterType<ICar, BMW>();
var driver = container.Resolve<Driver>();
driver.RunCar();
Output: Running BMW - 1 mile
Run-time Configuration Unity container allows us to configure method injection with RegisterType() method if a method is not marked with InjectionMethod attribute. Pass an object of InjectionMethod class in the RegisterType() method to specify a method name and parameter value.
var container = new UnityContainer();

//run-time configuration
container.RegisterType<Driver>(new InjectionMethod("UseCar", new Audi()));

//to specify multiple parameters values
container.RegisterType<Driver>(new InjectionMethod("UseCar", new object[] { new Audi() }));

var driver = container.Resolve<Driver>();
driver.RunCar();
Output: Running Audi - 1 Mile
As you can see in the above example, container.RegisterType<driver>(new InjectionMethod("UseCar", new Audi())) registers Driver class by passing an object of InjectionMethod that specifies the method name and parameter value. So, unity container will inject an object of Audi when we resolve it using container.Resolve<Driver>().
We have seen in the previous sections that the unity container injects registered type by default every time we resolve the specified type. But, what if we want to inject different types other than the registered type?
Unity container allows us to override registered type by using ResolverOverride. ResolverOverride is an abstract class that provides implementation for overriding registration. There are three important classes which inherit ResolverOverride:
- ParameterOverride: Used to override constructor parameters.
- PropertyOverride: Used to override the value of specified property.
- DependencyOverride: Used to override the type of dependency and its value.
Let's understand each override using the following example classes.
public interface ICar
{
    int Run();
}

public class BMW : ICar
{
    private int _miles = 0;

    public int Run()
    {
        return ++_miles;
    }
}

public class Ford : ICar
{
    private int _miles = 0;

    public int Run()
    {
        return ++_miles;
    }
}

public class Audi : ICar
{
    private int _miles = 0;

    public int Run()
    {
        return ++_miles;
    }

}
public class Driver
{
    private ICar _car = null;

    public Driver(ICar car)
    {
        _car = car;
    }

    public void RunCar()
    {
        Console.WriteLine("Running {0} - {1} mile ", _car.GetType().Name, _car.Run());
    }
}
ParameterOverride The ParameterOverride can be used to override registered construction parameter values.
The following example demonstrates overriding constructor parameter.
Example: ParameterOverride var container = new UnityContainer() .RegisterType<ICar, BMW>();
var driver1 = container.Resolve<Driver>(); // Injects registered ICar type
driver1.RunCar();

// Override registered ICar type
var driver2 = container.Resolve<Driver>(new ParameterOverride("car", new Ford()));
driver2.RunCar();
Output: Running BMW - 1 Mile Running Ford - 1 Mile
In the above example, unity container injects BMW in driver1 which is default mapping. However, we override default mapping and specify a different mapping for driver2 by passing new ParameterOverride("car", new Ford()) into Resolve() method. The first parameter is the name of the constructor parameter and second is the value of a parameter. So, driver2 includes an object of Ford class instead of BMW class.
If a constructor includes multiple parameters then we can override them by passing an array of ResolverOverride as shown below.
Example: Override Multiple Parameters var container = new UnityContainer() .RegisterType<ICar, BMW>();
var driver1 = container.Resolve<Driver>();
driver1.RunCar();

var driver2 = container.Resolve<Driver>( new ResolverOverride[] {
        new ParameterOverride("car1", new Ford()),
        new ParameterOverride("car2", new BMW()),
        new ParameterOverride("car3", new Audi())
});
driver2.RunCar();
PropertyOverride We learned about Property Injection in the previous chapter. Here, we will learn how to override the registered value of the specified property using PropertyOverride.
You can override registered property injection and provide different property value when you resolve it.
Example: PropertyOverride var container = new UnityContainer();
//Configure default value of Car property
container.RegisterType<Driver>(new InjectionProperty("Car", new BMW()));

var driver1 = container.Resolve<Driver>();
driver1.RunCar();

//Override default value of Car property
var driver2 = container.Resolve<Driver>(
    new PropertyOverride("Car", new Audi()
);

driver2.RunCar();
Output: BMW - 1 mile Audi - 1 mile
DependencyOverride The DependencyOverride class can be used to override the type of dependency and its value, irrespective of whether dependencies are provided through constructor, property or a method.
You can override registered method injection and provide different parameter value when you resolve it. Consider the following example.
Example: DependencyOverride var container = new UnityContainer() .RegisterType<ICar, BMW>();
var driver1 = container.Resolve<Driver>();
driver1.RunCar();

//Override dependency
var driver2 = container.Resolve<Driver>(new DependencyOverride<ICar>(new Audi())
driver2.RunCar();
Output: Running BMW - 1 mile Running Audi - 1 mile
The unity container manages the lifetime of objects of all the dependencies that it resolves using lifetime managers.
Unity container includes different lifetime managers for different purposes. You can specify lifetime manager in RegisterType() method at the time of registering type-mapping. For example, the following code snippet shows registering a type-mapping with TransientLifetimeManager.
var container = new UnityContainer()
                   .RegisterType<ICar, BMW>(new TransientLifetimeManager());
The following lists all the lifetime managers:
- TransientLifetimeManager: Creates a new object of requested type every time you call Resolve or ResolveAll method.
- ContainerControlledLifetimeManager: Creates a singleton object first time you call Resolve or ResolveAll method and then returns the same object on subsequent Resolve or ResolveAll call.
- HierarchicalLifetimeManager: Same as ContainerControlledLifetimeManager, the only difference is that child container can create its own singleton object. Parent and child container do not share singleton object.
- PerResolveLifetimeManager: Similar to TransientLifetimeManager but it reuses the same object of registered type in the recursive object graph.
- PerThreadLifetimeManager: Creates singleton object per thread basis. It returns different objects from the container on different threads.
- ExternallyControlledLifetimeManager: It maintains only weak reference of objects it creates when you call Resolve or ResolveAll method. It does not maintain the lifetime of strong objects it creates and allow you or garbage collector to control the lifetime. It enables you to create your own custom lifetime manager
Let's understand each lifetime manager using the following example classes.
public interface ICar
{
    int Run();
}

public class BMW : ICar
{
    private int _miles = 0;

    public int Run()
    {
        return ++_miles;
    }
}

public class Ford : ICar
{
    private int _miles = 0;
    public int Run()
    {
        return ++_miles;
    }
}

public class Audi : ICar
{
    private int _miles = 0;

    public int Run()
    {
        return ++_miles;
    }
}

public class Driver
{
    private ICar _car = null;

    public Driver(ICar car)
    {
        _car = car;
    }

    public void RunCar()
    {
        Console.WriteLine("Running {0} - {1} mile ", _car.GetType().Name, _car.Run());
    }
}
TransientLifetimeManager TransientLifetimeManager is the default lifetime manager. It creates a new object of requested type every time you call Resolve() or ResolveAll() method.
var container = new UnityContainer()
                   .RegisterType<ICar, BMW>();

var driver1 = container.Resolve<Driver>();
driver1.RunCar();

var driver2 = container.Resolve<Driver>();
driver2.RunCar();
Output: Running BMW - 1 Mile Running BMW - 1 Mile
In the above example, unity container will create two new instances of BMW class and injects into driver1 and driver2 object. This is because the default lifetime manager is TransientLifetimeManager which creates new dependent object every time you call Resolve or ResolveAll method. You can specify the lifetime manager at the time of registering type using RegisterType() method.
The following example will display same output as above example because TransientLifetimeManager is the default manager if not specified.
var container = new UnityContainer()
                   .RegisterType<ICar, BMW>(new TransientLifetimeManager());

var driver1 = container.Resolve<Driver>();
driver1.RunCar();

var driver2 = container.Resolve<Driver>();
driver2.RunCar();
Output: Running BMW - 1 Mile Running BMW - 1 Mile
ContainerControlledLifetimeManager Use ContainerControlledLifetimeManager when you want to create a singleton instance.
var container = new UnityContainer()
                   .RegisterType<ICar, BMW>(new ContainerControlledLifetimeManager());

var driver1 = container.Resolve<Driver>();
driver1.RunCar();

var driver2 = container.Resolve<Driver>();
driver2.RunCar();
Output: Running BMW - 1 mile Running BMW - 2 mile
In the above example, we specified ContainerControlledLifetimeManager in RegisterType() method. So unity container will create a single instance of BMW class and inject it in all the instances of Driver.
HierarchicalLifetimeManager The HierarchicalLifetimeManager is the same as ContainerControlledLifetimeManager except that if you create a child container then it will create its own singleton instance of registered type and will not share instance with parent container.
var container = new UnityContainer()
                   .RegisterType<ICar, BMW>(new HierarchicalLifetimeManager());

var childContainer = container.CreateChildContainer();

var driver1 = container.Resolve<Driver>();
driver1.RunCar();

var driver2 = container.Resolve<Driver>();
driver2.RunCar();

var driver3 = childContainer.Resolve<Driver>();
driver3.RunCar();

var driver4 = childContainer.Resolve<Driver>();
driver4.RunCar();
Output: Running BMW - 1 mile Running BMW - 2 mile Running BMW - 1 Mile Running BMW - 2 Mile As you can see, container and childContainer have their own singleton instance of BMW.