In this challenge, we want to be able to scan objects on Mars and have the computer be able to identify them.
In this challenge, we will implement a camera control in our application and send the taken photo to the Microsoft Computer Vision API. The CV API is part of the Microsoft Cognitive Services, a set of easy-to-use APIs which expose artificial intelligence and machine learning. The CV API allows us to detect what's in an image.
Although the CV API is a web service which requires HTTP requests and responses to work, it has a .NET library which will allow us photo simply call methods within our application. This means that we won't need to manually structure our HTTP requests and handle JSON files.
There are 2 steps to this mission:
- Implement a camera function (guided)
- Send the captured image to the Computer Vision API and get a result
There are 2 Nugets which we want to install in our project:
- Xamarin Media Plugin
- For camera controls
- Computer Vision Client library
- To work with the Computer Vision API
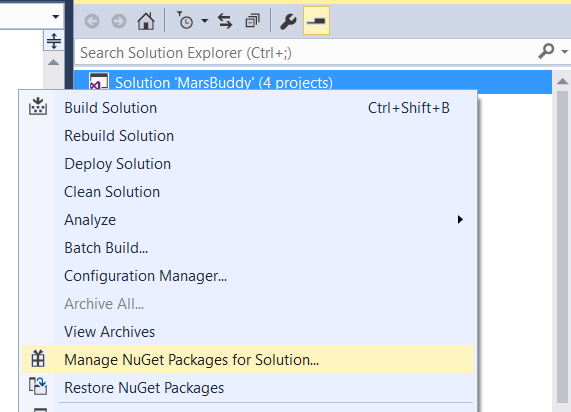
- Right-click on the solution and click "Manage NuGet packages for solution".
- Click on the "Browse" tab
- Search for
Xam.Plugin.Media - Tick all the boxes on the right for the 3 platforms
- Click install
Repeat the above steps and install Microsoft.ProjectOxford.Vision as well.
Xamarin.Forms doesn't natively provide the ability to access camera APIs,
but the Xam.Plugin.Media plugin helps us to access the camera APIs on each native platform in shared code.
In this lab, we will be testing the application in UWP, since only the UWP application runs on your computer natively and will be able to access your webcam.
We need to enable the webcam permission on the UWP project for testing.
- Open
Package.appxmanifestin your UWP project. - Click the Capabilities tab
- Tick the Webcam checkbox
- Done!
Next, we need to initialize the plugin in code. Open MainPage.xaml.cs and add the plugin namespace, initializing it in the constructor:
using Plugin.Media;

public MainPage()
{
    InitializeComponent();

    //Bind the ListView to the ObservableCollection
    MessageListView.ItemsSource = messageList;

    //Start listening to messages
    Task.Run(() => connection.GetMessagesAsync(messageList));

    //Initialize camera plugin
    CrossMedia.Current.Initialize();
}
Done! Now we can call the plugin in other parts of the code and it will be able to access the camera in UWP.
We want to make it so that the camera opens on a button click. Let's first define a button in our MainPage.xaml
below the Entry box.
<StackLayout Spacing="10" Padding="10" HorizontalOptions="Fill" VerticalOptions="Fill" Orientation="Vertical">
        <ListView x:Name="MessageListView"
                        VerticalOptions="StartAndExpand"
                        HorizontalOptions="Fill"
                        >
            <ListView.ItemTemplate>
              <DataTemplate>
                <TextCell Text="{Binding Text}" Detail="{Binding Sender}" />
              </DataTemplate>
            </ListView.ItemTemplate>
        </ListView>

        <Entry Placeholder="Message"
                VerticalOptions="End"
                HorizontalOptions="Fill"
                HorizontalTextAlignment="End"
                />

        <Button Text="Take Picture"
          VerticalOptions="End"
          HorizontalOptions="Fill"
          Clicked="TakePic"
          />
</StackLayout>
In the XAML, we defined that when we click the button, we should execute the TakePic() method.
Let's define our method in MainPage.xaml.cs to open the camera.
public async void TakePic(object sender, EventArgs args)
{
    //Check if camera is available
    if (CrossMedia.Current.IsCameraAvailable && CrossMedia.Current.IsTakePhotoSupported)
    {
        //Supply media options for saving our photo after it's taken.
        var mediaOptions = new Plugin.Media.Abstractions.StoreCameraMediaOptions
        {
            Directory = "Receipts",
            Name = $"{DateTime.UtcNow}.jpg"
        };

        //Get taken picture
        var file = await CrossMedia.Current.TakePhotoAsync(mediaOptions);
    }
}
Using the Xamarin Media Plugin makes it simple to call the camera on any platform. After checking for camera availability and specifying the format which we want to save the picture, we can get the picture taken in a variable.
Now that we have the camera setup and can get the captured picture from it, we need to pass it into the Computer Vision API.
Try figuring out how to pass the taken picture into the Computer Vision API and display the result as an alert.
You can find a tutorial for Computer Vision here:
After getting the result, you need to display it to the user:
https://developer.xamarin.com/guides/xamarin-forms/user-interface/navigation/pop-ups/
You should be able to open the camera from the UWP app and take a picture and the application will send the picture to the Computer Vision API, displaying the result on an alert.
