| title | tags | use | languages | dependences |
|---|---|---|---|---|
Lab 4 - Smiley |
programação, cs50 |
Exercise |
C |
CS50 |
Table of Contents
- Learn how to work with images
- Practice manipulating pixels
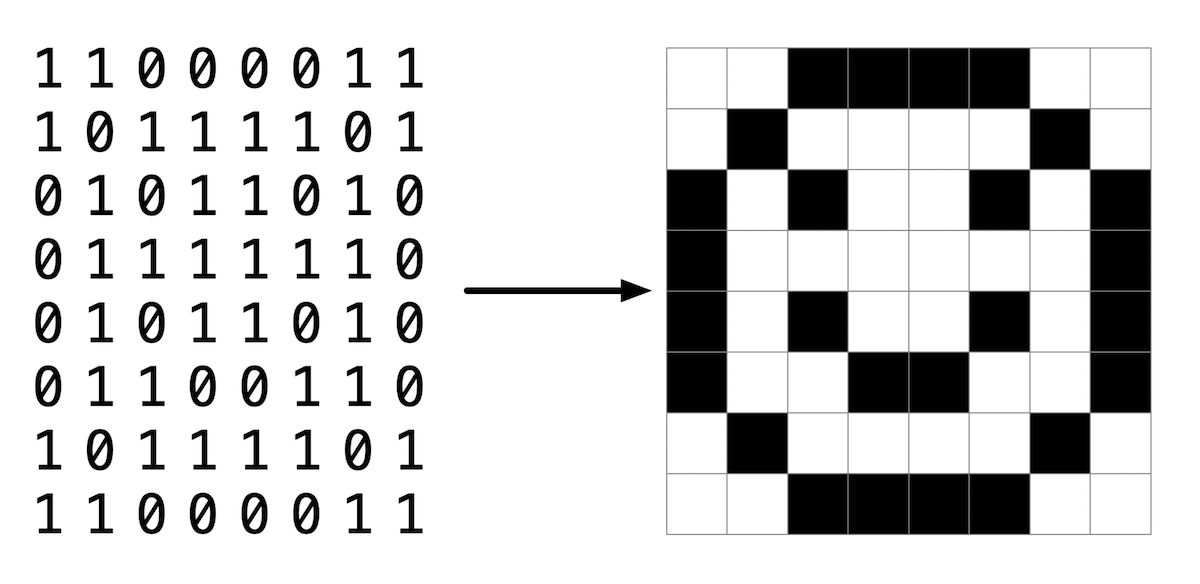
You’ve seen in lecture a bit about how images are stored on a computer. In this lab, you’ll practice working with a BMP file, actually the smiley face pictured here, and change all the black pixels to a color of your choosing.
However, the smiley face you’ll be working with is not just made of of 0’s and 1’s, or black and white pixels, but consists of 24 bits per pixel. It uses eight bits to represent red values, eight bits for green and eight bits for blue. Since each color uses eight bits or one byte, we can use a number in the range of 0 to 255 to represent its color value. In hexadecimal, this is represented by 0x00 to 0xff. By mixing together these red, green and blue values, we can create millions of possible colors.
If you look at bmp.h, one of the the helper files in the distribution code, you’ll see how each RGB triple is represented by a struct like:
typedef struct
{
    BYTE rgbtBlue;
    BYTE rgbtGreen;
    BYTE rgbtRed;
}
RGBTRIPLE;
where BYTE is defined as an 8-bit integer.
You’ll notice several files provided in the distribution code to handle the reading and writing of an image file, as well as handling the image’s metadata or “headers”. You’ll be completing the function colorize in helpers.c, which already has as input parameters, the image’s height, width, and a two-dimensional array of RGBTRIPLE’s which create the image itself.
- Hints
- If we were to save the first pixel as
RGBTRIPLE pixel = image[0][0]we could then access each of the individual colors ofpixelaspixel.rgbtBlue,pixel.rgbtGreen, andpixel.rgbtRed.
- If we were to save the first pixel as
Open VS Code.
Start by clicking inside your terminal window, then execute cd by itself. You should find that its “prompt” resembles the below.
$Click inside of that terminal window and then execute
wget https://cdn.cs50.net/2022/fall/labs/4/smiley.zipfollowed by Enter in order to download a ZIP called smiley.zip in your codespace. Take care not to overlook the space between wget and the following URL, or any other character for that matter!
Now execute
unzip smiley.zipto create a folder called smiley. You no longer need the ZIP file, so you can execute
rm smiley.zipand respond with “y” followed by Enter at the prompt to remove the ZIP file you downloaded.
Now type
cd smileyfollowed by Enter to move yourself into (i.e., open) that directory. Your prompt should now resemble the below.
smiley/ $If all was successful, you should execute
lsand you should see
bmp.h,colorize.c,helpers.c,helpers.h,Makefile, andsmiley.bmp.
If you run into any trouble, follow these same steps again and see if you can determine where you went wrong!
Open up helpers.c and notice that the colorize function is incomplete. Note that the image’s height, width and a two-dimensional array of pixels is set up as the input parameters for this function. You are to implement this function to change all the black pixels in the image to a color of your choosing.
You can compile your code by simply typing make at the $ prompt.
You then execute the program by typing:
./colorize smiley.bmp outfile.bmpwhere outfile.bmp is the name of the new bmp you are creating.
- How do you think you represent a black pixel when using a 24-bit color BMP file?
rgb(0,0,0) - Is this the same or different when mixing paints to repesent various colors?
Is just the same, it's like a pot that I'll add each color and mix to have the desired value
Your program should behave per the examples below.
smiley/ $ ./colorize smiley.bmp smiley_out.bmpWhen your program is working correctly, you should see a new file, smiley_out.bmp in your smiley directory. Open it up and see if the black pixels are now the color you’ve specified.
You can check your code using check50, a program that CS50 will use to test your code when you submit, by typing in the following at the $ prompt. But be sure to test it yourself as well!
check50 cs50/labs/2023/x/smileyTo evaluate that the style of your code (indentations and spacing) is correct, type in the following at the $ prompt.
style50 helpers.cIn your terminal, execute the below to submit your work.
submit50 cs50/labs/2023/x/smileyWant to see the staff's solution?
#include "helpers.h"

void colorize(int height, int width, RGBTRIPLE image[height][width])
{
    for (int i = 0; i < height; i++)
    {
        for (int j = 0; j < width; j++)
        {
            // Make black pixels turn red
            if (image[i][j].rgbtRed == 0x00 && image[i][j].rgbtGreen == 0x00 && image[i][j].rgbtBlue == 0x00)
            {
                image[i][j].rgbtRed = 0xff;
            }
        }
    }
}Full code here
I've looked in the "staff solution" (after all, it's there on purpose) but didn't find in the colorize.c file and even in the function itself a parameter that receives the color chosed by users input. So I've picked one, the Pau-Brasil wood color (of course, for historical reasons).
color.rgbtRed = 172;
color.rgbtGreen = 0;
color.rgbtBlue = 47;
smiley/ $ check50 cs50/labs/2023/x/smiley
Connecting......
Authenticating...
Verifying......
Preparing.....
Uploading.......
Waiting for results...................
Results for cs50/labs/2023/x/smiley generated by check50 v3.3.7'
:) helpers.c exists
:) colorize compiles
:) colorize creates an image
:) colorize changes image colors
'To see the results in your browser go to https://submit.cs50.io/check50/smiley/ $ style50 helpers.c
Results generated by style50 v2.7.5
Looks good!I've got a problem with a pending commit on the .devcontainer.json file and this messed with the terminal log, so just contider it was sent all good.
As in the exercise asks only to finish a function, if you want to know what each file does, you can se below (leveraging some of the documentation provided by CS50)
The following data types are used in BMP (Bitmap) files and are based on Microsoft's own specifications. These types provide a convenient way to represent the various elements of a BMP file in C/C++ programs.
The data types in this section are essentially aliases for C/C++ primitive data types. They are adapted from Microsoft's documentation and rely on the stdint.h header file. For more information on stdint.h, you can refer to Wikipedia.
BYTE: An 8-bit unsigned integer.DWORD: A 32-bit unsigned integer.LONG: A 32-bit signed integer.WORD: A 16-bit unsigned integer.
The
__attribute__((__packed__))is a compiler-specific attribute in C that informs the compiler to pack the structure tightly without any padding between its members. In the given code, it is applied to thestructstructure.When a structure is defined in C, the compiler may add padding bytes between the members to ensure proper alignment and improve memory access efficiency. However, in some cases, it is necessary to have a tightly packed structure, especially when dealing with file formats or binary data.
By using
__attribute__((__packed__)), the structure members are packed together without any padding bytes. This ensures that the structure size matches the expected size and layout defined by the file format or data specification.
The BITMAPFILEHEADER structure contains information about the type, size, and layout of a file that contains a DIB (device-independent bitmap). It is adapted from Microsoft's documentation.
typedef struct
{
    WORD   bfType;
    DWORD  bfSize;
    WORD   bfReserved1;
    WORD   bfReserved2;
    DWORD  bfOffBits;
} __attribute__((__packed__)) BITMAPFILEHEADER;bfType: The file type; must be set to "BM" (0x4D42) for a BMP file.bfSize: The size, in bytes, of the BMP file.bfReserved1andbfReserved2: Reserved fields; must be set to zero.bfOffBits: The offset, in bytes, from the beginning of the file to the bitmap data.
The BITMAPINFOHEADER structure contains information about the dimensions and color format of a DIB (device-independent bitmap). It is adapted from Microsoft's documentation.
typedef struct
{
    DWORD  biSize;
    LONG   biWidth;
    LONG   biHeight;
    WORD   biPlanes;
    WORD   biBitCount;
    DWORD  biCompression;
    DWORD  biSizeImage;
    LONG   biXPelsPerMeter;
    LONG   biYPelsPerMeter;
    DWORD  biClrUsed;
    DWORD  biClrImportant;
} __attribute__((__packed__)) BITMAPINFOHEADER;biSize: The size, in bytes, of theBITMAPINFOHEADERstructure.biWidth: The width of the bitmap, in pixels.biHeight: The height of the bitmap, in pixels. Positive values indicate a bottom-up bitmap, while negative values indicate a top-down bitmap.biPlanes: The number of color planes; must be set to 1.biBitCount: The number of bits per pixel.biCompression: The type of compression used (if any).biSizeImage: The size, in bytes, of the image data.biXPelsPerMeterandbiYPelsPerMeter: The horizontal and vertical resolution of the target device, in pixels per meter.biClrUsed: The number of color indexes in the color table that are actually used by the bitmap.biClrImportant: The number of color indexes that are considered important for displaying the bitmap.
The RGBTRIPLE structure describes a color consisting of relative intensities of red, green, and blue. It is adapted from Microsoft's documentation.
typedef struct
{
    BYTE  rgbtBlue;
    BYTE  rgbtGreen;
    BYTE  rgbtRed;
} __attribute__((__packed__)) RGBTRIPLE;rgbtBlue: The intensity of blue.rgbtGreen: The intensity of green.rgbtRed: The intensity of red.
These data types and structures provide the necessary definitions to work with BMP files in C/C++ programs.
This code is responsible for reading an input BMP (Bitmap) file, applying a colorization algorithm, and writing the colorized image to an output BMP file.
The colorize program takes two command-line arguments: infile and outfile. It can be executed using the following command:
./colorize infile outfileThe code in colorize.c performs the following steps:
- Argument Validation: It checks if the program is executed with the correct number of command-line arguments (2 arguments:
infileandoutfile). If the number of arguments is incorrect, it displays a usage message and returns an error code. - File Opening: It opens the input file (
infile) in read mode usingfopen(). If the file cannot be opened, it displays an error message and returns an error code. It also opens the output file (outfile) in write mode usingfopen(). If the file cannot be created, it displays an error message, closes the input file, and returns an error code. - Reading Bitmap Headers: It reads the BITMAPFILEHEADER and BITMAPINFOHEADER structures from the input file using
fread(). These structures contain information about the bitmap file format. If the file format is unsupported (not a 24-bit uncompressed BMP 4.0), it displays an error message, closes the input and output files, and returns an error code. - Memory Allocation: It allocates memory for storing the image pixels. The image dimensions (height and width) are obtained from the BITMAPINFOHEADER structure. If there is insufficient memory, it displays an error message, closes the input and output files, and returns an error code.
- Padding Calculation: It calculates the padding required for each scanline of the image. BMP files have a row alignment requirement of 4 bytes, so extra bytes (padding) are added to ensure each row's size is a multiple of 4 bytes.
- Reading Image Data: It iterates over the input file's scanlines and reads the pixel data into the
imagearray usingfread(). It also skips over the padding bytes usingfseek(). - Colorization: It calls the
colorize()function to apply the colorization algorithm to theimagearray. Thecolorize()function is defined in thehelpers.hheader file, which is included at the beginning of the code. - Writing Headers: It writes the BITMAPFILEHEADER and BITMAPINFOHEADER structures to the output file using
fwrite(). - Writing Image Data: It iterates over the
imagearray and writes the colorized pixels to the output file usingfwrite(). It also writes the padding bytes at the end of each row. - Memory Deallocation: It frees the dynamically allocated memory for the
imagearray usingfree(). - File Closing: It closes the input and output files using
fclose(). - Successful Execution: If the program reaches this point, it indicates successful execution, and the main function returns 0.
It is important to note that the code relies on external functions and data types defined in the helpers.h header file, which should be included for successful compilation and execution.
The code in colorize.c depends on the following header files:
stdio.h: Provides input/output functionality.stdlib.h: Provides memory allocation and deallocation functions.
It also relies on the helpers.h header file, which contains additional helper functions and data types used in the colorization process.
Here is an example of how to use the colorize program:
./colorize input.bmp output.bmpThis command reads the input.bmp file, applies the colorization algorithm, and writes the colorized image to output.bmp.
Note: The specific implementation of the colorization algorithm is not included in the provided code snippet and is assumed to be implemented in the colorize() function.
This file prototypes the colorize() function which has do be built by us.
height: An integer representing the height (number of rows) of the image.width: An integer representing the width (number of columns) of the image.image: A 2D array ofRGBTRIPLEstructures representing the image to be colorized. The dimensions of the array are determined byheightandwidth.
The colorize() function takes an image represented as a 2D array of RGBTRIPLE structures and applies colorization to it. The exact implementation of the colorization algorithm is not provided in the given code snippet but should be defined separately.
The function modifies the image in-place, meaning the original image array will be modified directly.
Here is an example of how to use the colorize() function:
int height = 100;
int width = 100;
RGBTRIPLE image[height][width];

// Populate the image array with pixel data

colorize(height, width, image);

// The image array has been modified with the colorization algorithm applied
In this example, the colorize() function is called with the dimensions of the image array. After the function call, the image array will contain the colorized version of the image.
It compiles the source files colorize.c and helpers.c into an executable named colorize. The compilation command includes several compiler flags for enabling sanitizer checks and specifying warning options.
Here is a breakdown of the compilation command and the included flags:
clang -fsanitize=signed-integer-overflow -fsanitize=undefined -ggdb3 -O0 -Qunused-arguments -std=c11 -Wall -Werror -Wextra -Wno-sign-compare -Wno-unused-parameter -Wno-unused-variable -Wshadow -o colorize colorize.c helpers.c-fsanitize=signed-integer-overflowand-fsanitize=undefined: Enable sanitizer checks for signed integer overflow and undefined behavior, respectively. These flags help detect and diagnose potential issues in the code.-ggdb3: Include debug symbols for debugging purposes. The level of detail is set to 3.-O0: Disable optimization. This flag ensures that the code is compiled without any optimization, making it easier to debug.-Qunused-arguments: Suppress warnings for unused command-line arguments.-std=c11: Specify the C11 standard for compilation.-Wall -Werror -Wextra -Wno-sign-compare -Wno-unused-parameter -Wno-unused-variable -Wshadow: Enable various warning flags to catch potential issues in the code.-Werrortreats warnings as errors, ensuring that the code is compiled cleanly without warnings. The flags-Wno-sign-compare,-Wno-unused-parameter,-Wno-unused-variable, and-Wshadowdisable specific warnings to reduce noise, indicating that the code intentionally avoids addressing those particular warnings.-o colorize: Specify the output file name ascolorize, indicating that the compiled program should be namedcolorize.colorize.c helpers.c: Provide the source files to be compiled,colorize.candhelpers.c.
After successfully executing this compilation command, an executable named colorize will be generated, which can be run to apply the colorization algorithm to input images.