Guides CreatingAnApplication Python
View this tutorial in Node.js
This guide will walk you through the creation of a simple RESTful API for user information using Scootr Studio. Our API will consist of two endpoints:
| Endpoint | Method | Functionality |
|---|---|---|
/users |
POST |
Create a new user in our database with a randomly generated ID. |
/users/{id} |
GET |
Get a single item from our database |
The items in this guide will have the following format:
| Property | Type | Description |
|---|---|---|
id |
integer |
An integer between 1000 and 9999 that represents the unique identifier of our user. |
name |
string |
The name of the user. |
username |
string |
The username of the user. |
email |
string |
The email address of the user. |
We will be using the Python 3.8 runtime.
Throughout the guide, configuration input names will be given in itallics and their values will be given in bold.
The first thing we need to do is configure our Scootr application. Using the inputs in the toolbar at the top of the blueprint canvas:
- Set the application name to UserApplication
- Set the provider to AWS
- Set the region to US West 2

Since we are creating a RESTful API, we need to create some HTTP events that we can use to trigger our business logic.
- Drag an External Event from the resource bar to the left of the blueprint canvas and drop it onto the canvas
- Set the name of the External Event resource to CreateUser
- Give the event a type of HTTP
- Set the URL of the HTTP event to
/users - Set the method to
POST

Now that we have an HTTP event configured, we need to create a Compute Resource to handle it.
- Drag a Compute Resource from the resource bar and drop it onto the blueprint canvas
- Set the name of the Compute Resource to CreateUserHandler
- Set the runtime to Python 3.8

In the code editor inside the "Code" tab pane, we are going to place the Python code that will create a new user based on information we get from the request body. Take a moment to read through the code below to help you understand how the compute resource will operate.
import boto3
from botocore.exceptions import ClientError
import os
import json
from random import random
from math import floor
import decimal

def endpoint(event, context):
    """
    This is the entrypoint for our logic.
    """
    # Create our Document Client
    client = boto3.resource('dynamodb')

    # We will come back to the `CreateUserToStorageRef` environment
    # variables
    table = client.Table(os.getenv('CreateUserToStorageRef'))

    # Generate a (non-secure) random ID for our new item
    id = floor(random() * 10000)

    # We need to parse the request body, which is a JSON formatted
    # string
    body = json.loads(event["body"])

    # Create the item
    item = {
        "id": id,
        "name": body["name"],
        "username": body["username"],
        "email": body["email"]
    }

    # Make the request
    try:
        # Add the item to the database
        table.put_item(
            Item=item
        )
        return create_json_response(201, item)
    except ClientError as e:
        return create_json_response(500, {
            "message": "Failed to create user",
            "details": str(e)
        })

class CustomJsonEncoder(json.JSONEncoder):
    """
    This is a custom class that allows the `json` library to encode decimal
    types without throwing an error. The encoder is used in the
    `create_json_response` method below.
    """
    def default(self, obj):
        if isinstance(obj, decimal.Decimal):
            return str(obj)
        # Let the base class default method raise the TypeError
        return json.JSONEncoder.default(self, obj)

def create_json_response(code, body = {}, headers = {}):
    """
    Creates the AWS Lambda response necessary for responding to API
    Gateway events when the response body is formatted as JSON.
    """
    original_headers = {
        "Content-Type": "application/json",
        "Access-Control-Allow-Origin": "*",
        "Access-Control-Allow-Headers": "*"
    }
    original_headers.update(headers)
    return {
        "statusCode": code,
        "headers": original_headers,
        "body": json.dumps(body, cls=CustomJsonEncoder)
    }
Now, copy and paste the code into the code editor in The Studio.
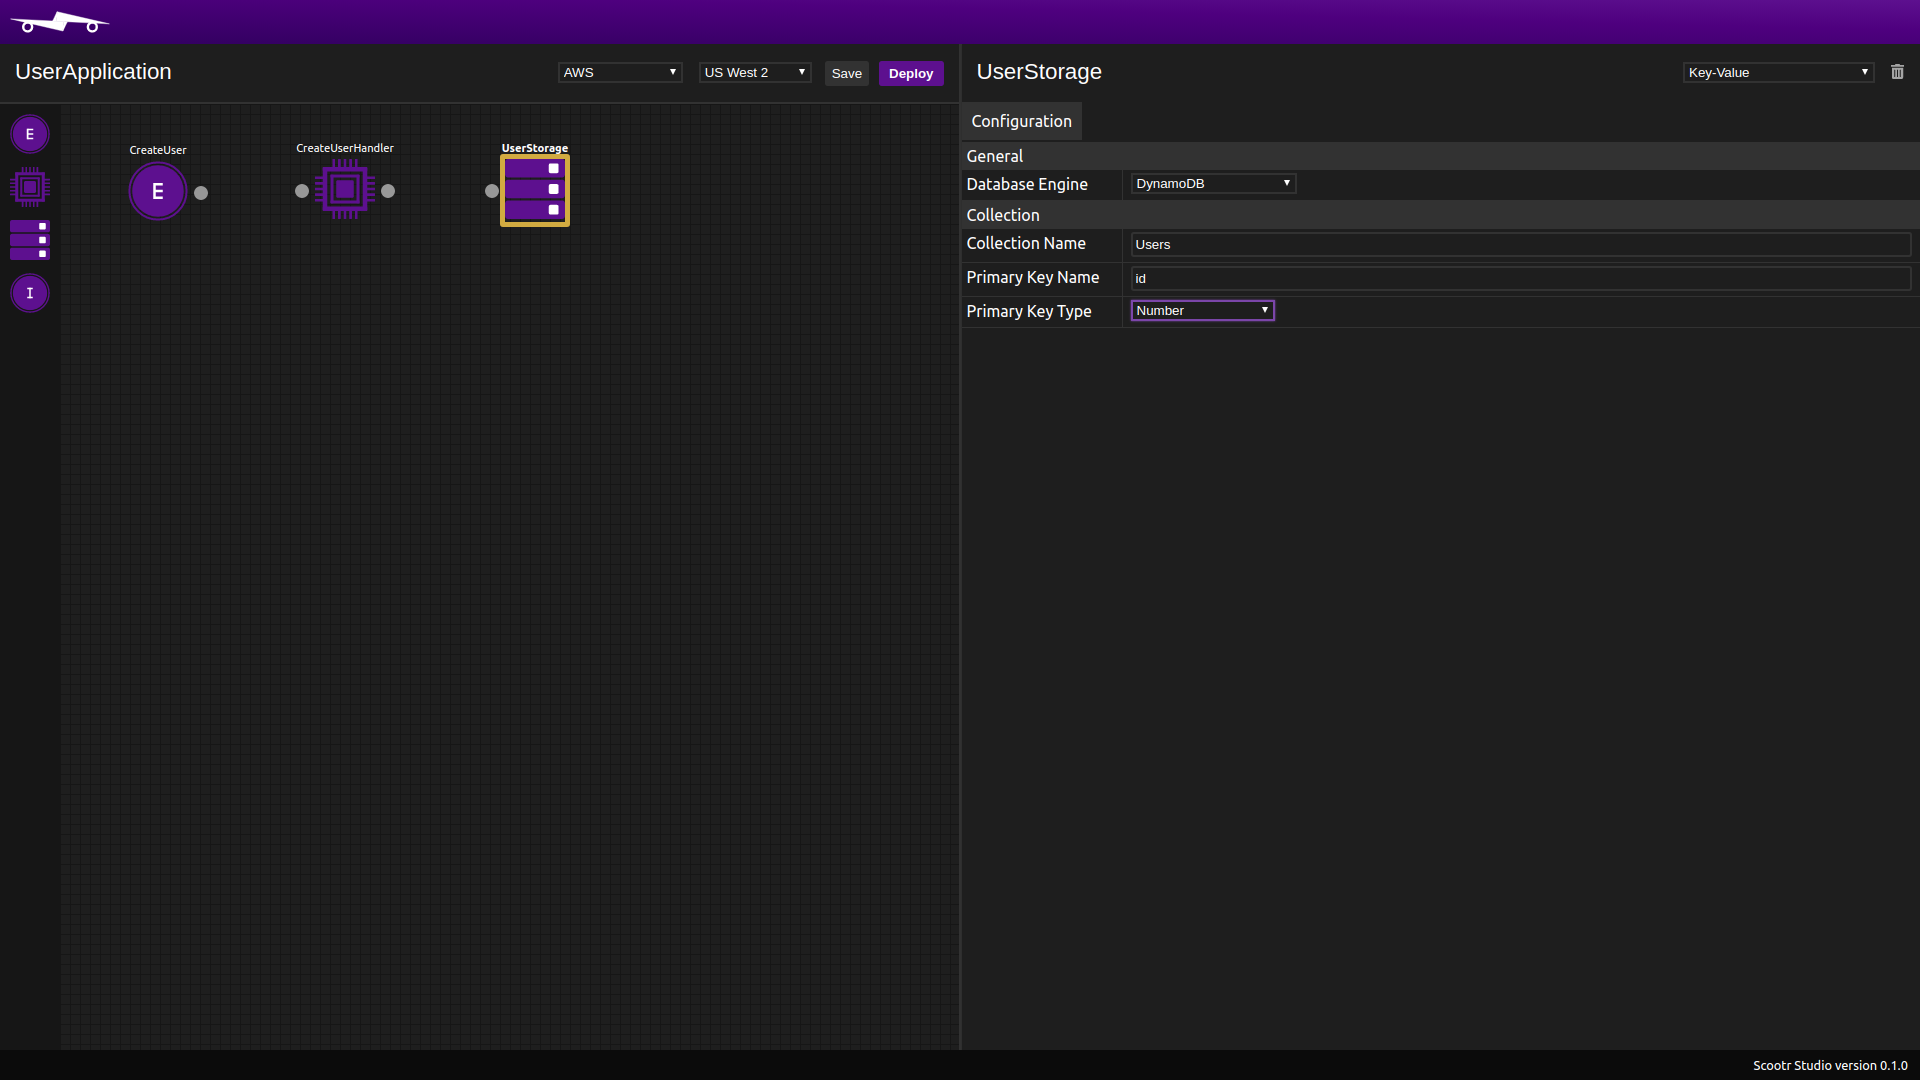
Now we need a place to store our user data. Since we are using AWS, we are going to use their DynamoDB key-value store for our database.
- Drag a Storage Resource from the resource panel onto the canvas
- Give it a name of UserStorage
- Set it's type to Key-Value
- Set the database engine to DynamoDB
- Give it a collection name of Users
- Give it a primary key name of
id - Set the primary key type to Number
At this point, we have a valid External Event of type HTTP, a Compute Resource, and a Storage Resource. But, in order to do anything userful, we need to connect them all together.
We'll start by creating a Trigger from our CreateUser event to our CreateUserHandler Compute resource.
- Click and hold on the gray dot to the right of the CreateUser event and start dragging to create a new connection
- Drag the connection to the dot to the left of the CreateUserHandler
- Drop the connection onto the endpoint to create a new Trigger connection

Triggers do not need any additional configuration, so now we can move on to creating a Reference.
Next, we will add a Reference from our CreateUserHandler to the UserStorage resource.
- Click and hold on the gray dot to the right of the CreateUserHandler event and start dragging to create a new connection
- Drag the connection to the dot to the left of the UserStorage
- Drop the connection onto the endpoint to create a new Reference connection
- Set the name of the reference to CreateUserToStorageRef
- Set the allowed action to Create

Remember how in our code from Step 3 above we had the following code as a parameter for our DynamoDB Document Client put_item method?
table = client.Table(os.getenv('CreateUserToStorageRef'))Notice how the CreateUserToStorageRef environment variable is named the same as the Reference we just created. The library behind the scenes of the Studio makes the resource identifier we need for the TableName property available to us as this environment variable. Since the library is generating our resources for us, we can't always predict what it will be, but the library will make sure that our code has access to this identifier no matter what the generated name is so long as we use this environment variable.
Congratulations! You've created your first request/response chain in Scootr Studio! Let's deploy it so that we can test how it works.
- Click on the Deploy button in the toolbar above the blueprint canvas
You'll be able to see status updates about your deployment in the left of the status bar at the bottom of the application (bottom left of the screen). Once the deployment has finished, the loading circle will disappear and a message indicating the deployment success will appear.
The Studio makes it easy to test our external HTTP events by providing a RESTful API testing tool in the "Test" pane of the External Event resource.
-
Click on the CreateUser event
-
Click on the "Test" tab to open the event testing pane
-
Enter the following as our request body for our test:
{ "name": "Luke Skywalker", "username": "masterjedi", "email": "skywalker@starwars.com" } -
Click on the "Send Request" button
-
Take note of the response. You should see the following (minus header values):
HTTP/1.1 201 Created { "id": <integer>, "name": "Luke Skywalker", "username": "masterjedi", "email": "skywalker@starwars.com" } -
Make note of the returned
id. We will be using it later.

Once a compute resource has started receiving events, we can view logs from the processing that takes place in the "Logs" tab of the Compute resource details pane.
- Click on the CreateUserHandler resource
- Click on the "Logs" tab
- Wait for the Studio to connect to the log stream. Once it is connected and starts receiving events, you will be able to see the logs from AWS CloudWatch.
NOTE: Logs are polled once a second, so it may take some time for all of the logs to be displayed after the resource has received an event.
NOTE: The Studio shows logs up to 30 minutes before the "Logs" pane was opened

Now let's add our second API endpoint to the application.
- Drag and drop another External Event onto the canvas
- Give it a name of GetUser
- Set its type to HTTP
- Give it a url of
/users/{id} - Set the method to
GET

Time to set up the handler for our second HTTP event.
- Drag and drop another Compute resource onto the canvas
- Give it a name of GetUserHandler
- Set the runtime to Python 3.8

Use the following as the code for this Compute resource:
import boto3
from botocore.exceptions import ClientError
import os
import json
import decimal

def endpoint(event, context):
    """
    This is the entrypoint for our logic.
    """
    # Create our Document Client
    client = boto3.resource('dynamodb')

    # We will come back to the `CreateUserToStorageRef` environment
    # variables
    table = client.Table(os.getenv('GetUserToStorageRef'))

    # Get the id from the path parameters. It will be string, so we
    # need to convert it to a number since that is the type of the
    # key in our database
    id = int(event["pathParameters"]["id"])

    # Make the request
    try:
        # Add the item to the database
        response = table.get_item(
            Key={
                "id": id
            }
        )
        return create_json_response(200, response["Item"])
    except ClientError as e:
        return create_json_response(500, {
            "message": "Failed to get user",
            "details": str(e)
        })

class CustomJsonEncoder(json.JSONEncoder):
    """
    This is a custom class that allows the `json` library to encode
    decimal types without throwing an error. The encoder is used in the
    `create_json_response` method below.
    """
    def default(self, obj):
        if isinstance(obj, decimal.Decimal):
            return str(obj)
        # Let the base class default method raise the TypeError
        return json.JSONEncoder.default(self, obj)

def create_json_response(code, body = {}, headers = {}):
    """
    Creates the AWS Lambda response necessary for responding to API
    Gateway events when the response body is formatted as JSON.
    """
    original_headers = {
        "Content-Type": "application/json",
        "Access-Control-Allow-Origin": "*",
        "Access-Control-Allow-Headers": "*"
    }
    original_headers.update(headers)
    return {
        "statusCode": code,
        "headers": original_headers,
        "body": json.dumps(body, cls=CustomJsonEncoder)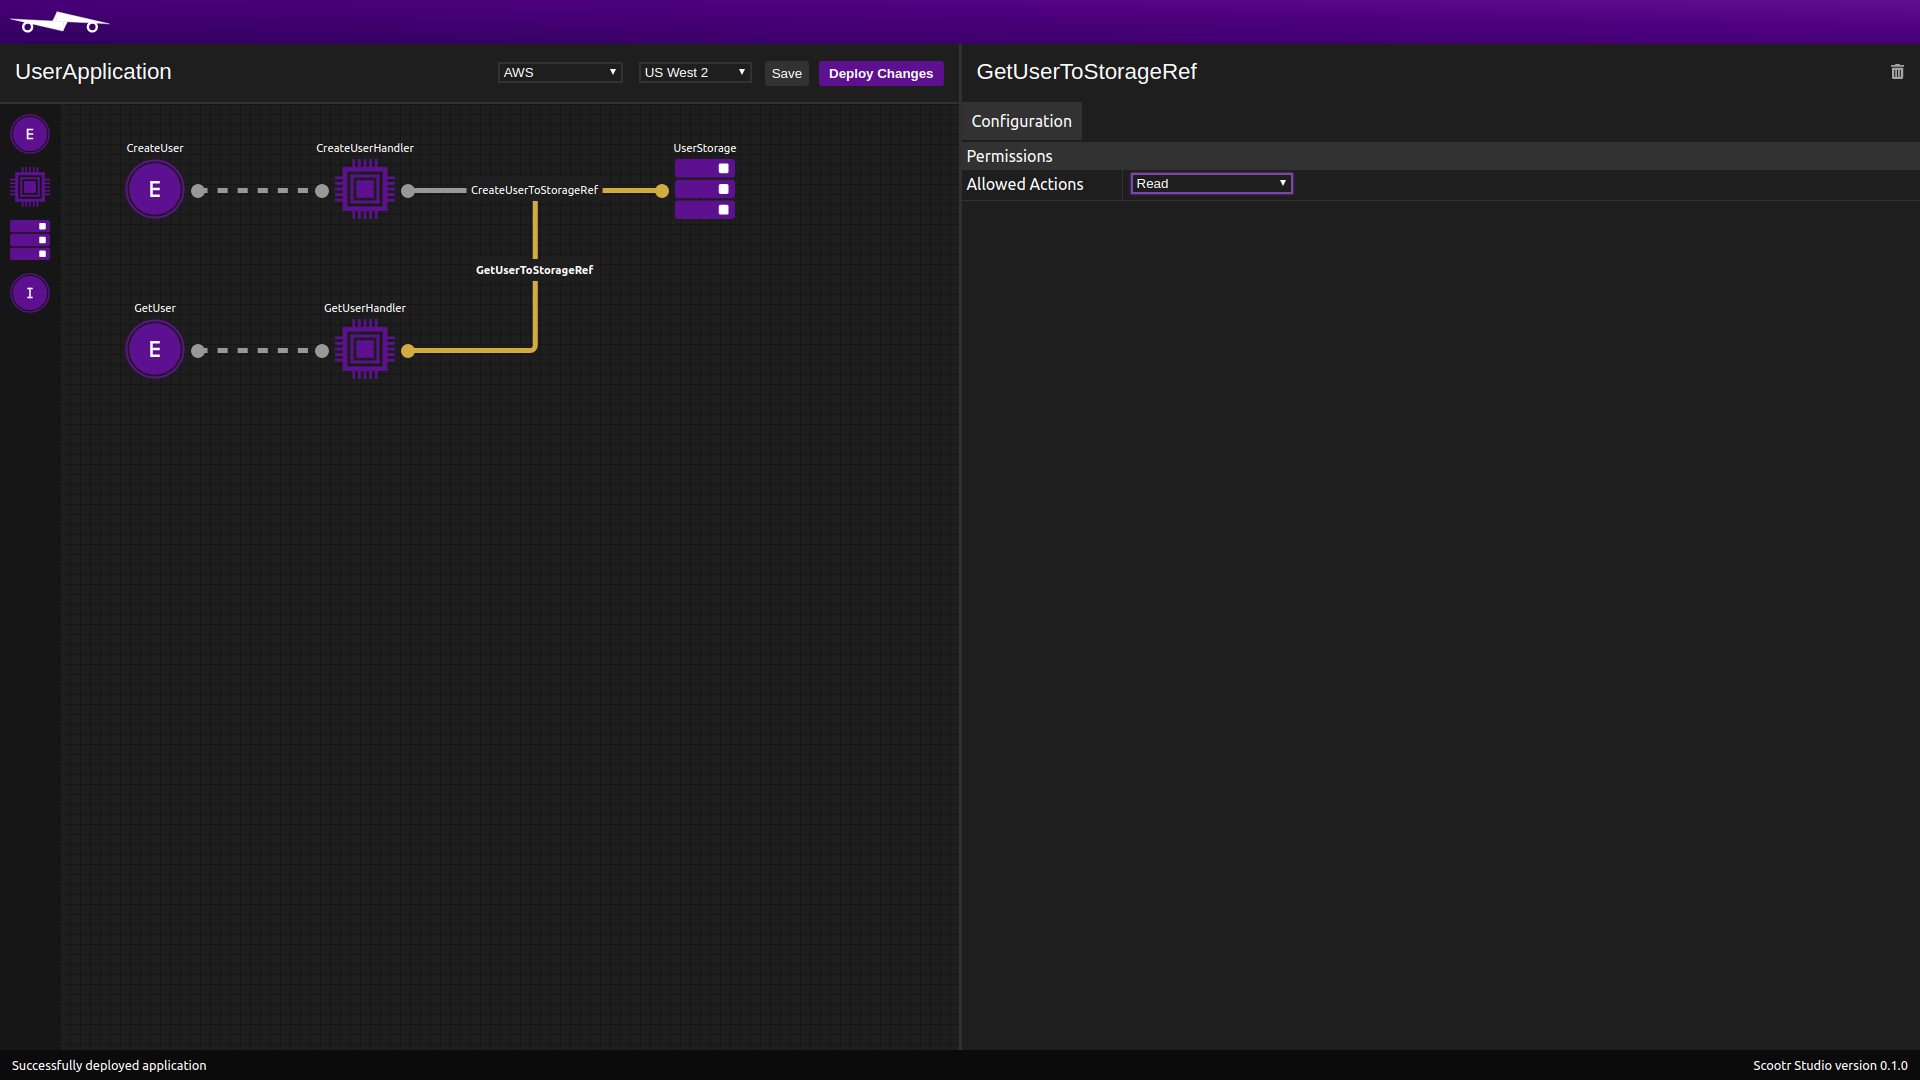
}Now let's connect the dots between the resources implementing this new endpoint's logic.
- Create another Trigger by connectiong the GetUser event to the GetUserHandler Compute resource
- Create a Reference by connecting the GetUserHandler resource to the UserStorage resource we created in Step 4
- Give this new Reference a name of GetUserToStorageRef
- Set the allowed action to Read
At this point, your blueprint canvas should look similar to the following:
Now we need to update our deployed application with our changes.
- Click on the "Deploy Changes" button again to deploy the changes you've made to your application to the cloud
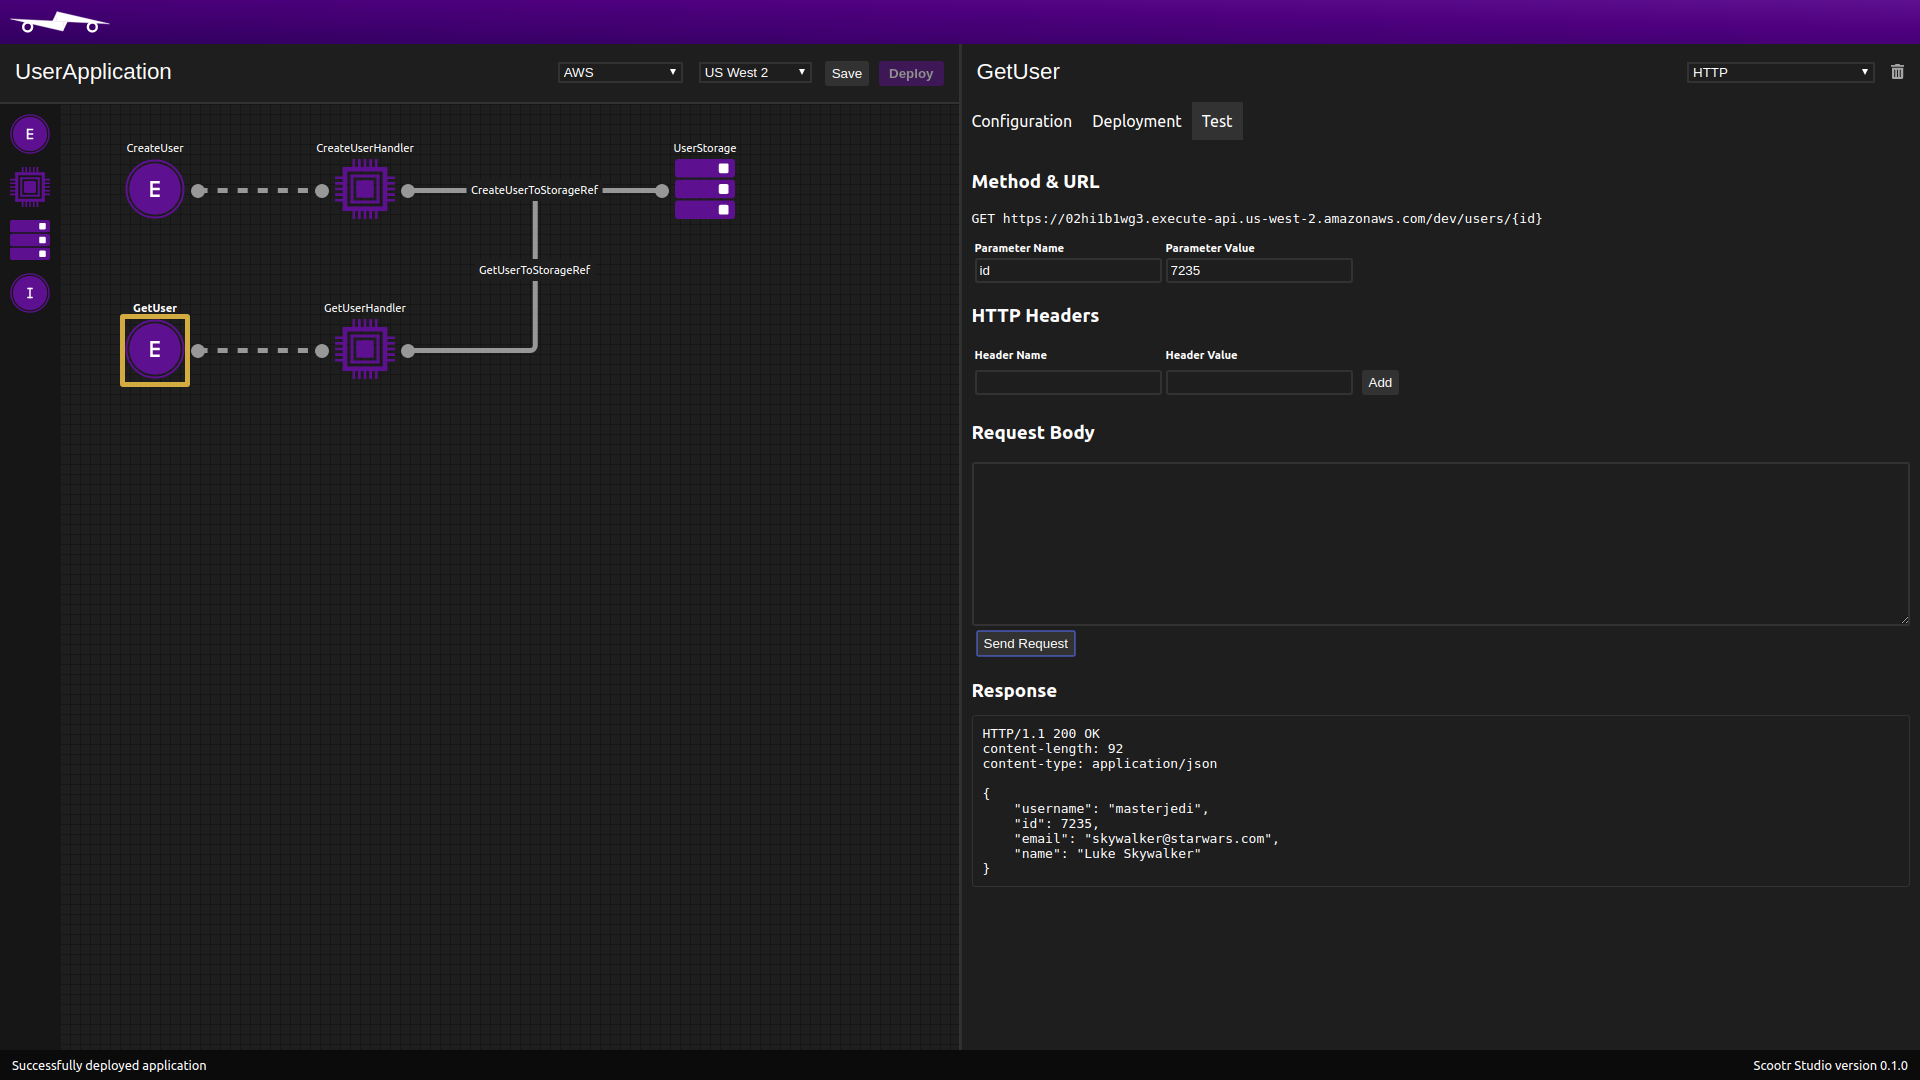
Once the deployment has completed:
-
Click on the GetUser event
-
Click on the "Test" tab
-
Enter the ID from your original test of the CreateUser event as the value for the
idpath parameter -
Click on "Send Request". You should see a response similar to the one below (minus headers):
HTTP/1.1 200 OK

{
    "id": <integer>,
    "name": "Luke Skywalker",
    "username": "masterjedi",
    "email": "skywalker@starwars.com"
}
If you didn't save or don't remember the ID, you can always create a new User by testing the CreateUser event again.
And that's it! You've successfully created a simple RESTful API for user information using Scootr Studio. Feel free to extend your user application by adding more endpoints for updating a user, deleting a user, and getting a list of all the users. You may find the Scootr AWS Driver documentation helpful for implementing these additional functionalities.