Run a Remote VNC Desktop on your RPi
Remotely access a desktop session on your RPi4 or RPi3, using VNC, even when your Pi doesn't have a local monitor or keyboard attached!
It is often useful to be able to connect to your RPi4/3 from a (possibly geographically distant) computer, and run a remote desktop on it.
So, in this tutorial, I'll show how to set up a tigervnc server on your RPi, and also (briefly) review how to install and use both the tigervnc client on a Linux box, and the compatible RealVNC VNC Viewer client on a Windows box.
VNC is a widely used remote access protocol, for which many open-source (and proprietary) clients (and servers) are available.
The process involved isn't difficult or time consuming!
For avoidance of doubt, you won't need to keep a screen, mouse or keyboard locally attached to the RPi you wish to remotely access (although you can do if you wish).
Although not shipped pre-installed with the image, the FOSS tigervnc package is available in pre-compiled form on the project's binhost, and the server USE flag for this package is (by default) set, via the custom profile.
So, to install it, running as the regular user, you need simply issue:
demouser@pi64 ~ $ sudo emaint sync --repo genpi64
demouser@pi64 ~ $ sudo emerge --verbose --noreplace net-misc/tigervnc
This shouldn't take long to complete. Once done, set up a VNC password for your regular user. Issue:
demouser@pi64 ~ $ vncpasswd
Password: <type your new VNC password, and press Enter>
Verify: <type it again, and press Enter>
Would you like to enter a view-only password (y/n)? <press n then Enter>
Choose a password that is different from that which you use for login, and, for compatibility with popular VNC clients, between 6 and 8 characters in length. Don't be too concerned about security implications of such a password, as I'll cover how to tunnel your VNC traffic securely over
ssh, later in this tutorial.
With that done, we need to run the server once briefly: this will create a number of default files, which we can then edit as required.
Still as the regular user, issue:
demouser@pi64 ~ $ vncserver

New 'pi64:1 (demouser)' desktop is pi64:1

Creating default startup script /home/demouser/.vnc/xstartup
Creating default config /home/demouser/.vnc/config
Starting applications specified in /home/demouser/.vnc/xstartup
Log file is /home/demouser/.vnc/pi64:1.log
Your output may differ slightly.
Since the files we need now exist, you can safely stop the server (on display :1) again. Issue:
demouser@pi64 ~ $ vncserver -kill :1Next, edit your (regular user's) ~/.vnc/xstartup file (it will have been created by the previous vncserver run), to instruct tigervnc how you'd like your (virtual) desktop to appear. Issue:
demouser@pi64 ~ $ mousepad ~/.vnc/xstartup &>/dev/null&If setting up the RPi over an
sshconnection, you can use e.g.nano -w ~/.vnc/xstartupinstead.
Then edit this file so it reads:
#!/bin/sh
# run a regular desktop
unset SESSION_MANAGER
unset DBUS_SESSION_BUS_ADDRESS
vncconfig -iconic &
xfce4-session &
Save the file, and exit the editor.
The simple script above, which you can of course modify as required, specifies that:
- the created session should be isolated from any existing one;
- the
vncconfigprogram (which allows shared clipboard preferences etc. to be set) should be started and iconified; and - a vanilla
xfce4-sessionshould be commenced (using your user's default panel settings etc.).
With that done, we need to instruct the tigervnc server to bring up this virtual display whenever it is run. To do so, issue (you need root privileges this time, so we'll use sudo):
demouser@pi64 ~ $ sudo mousepad /etc/conf.d/tigervnc &>/dev/null&If setting up the RPi over an
sshconnection, you can use e.g.sudo nano -w /etc/conf.d/tigervncinstead.
Modify the DISPLAYS line in that file, editing it so it now reads:
DISPLAYS="demouser:1"Obviously, adapt for your username, if not still running as
demouser.
Leave the rest of the file as-is. Save the file, and exit the editor.
Tip: you can also uncomment and tweak the
VNC_OPTSin this file, if you want to pass options tovncserver. For example, to change the default desktop dimensions of the virtual desktop, pass-geometry <width>x<height>here. You can get a overview of what's available by looking atman vncserver. We'll run with the default settings to get going, but feel free to revisit this later should you wish.
In order for Qt applications to launch, you need to export your XAUTHORITY environment variable. You can do this automatically by adding the the following line to the end of your .bashrc file.
demouser@pi64 ~ $ echo "export XAUTHORITY=~/.Xauthority" >> ~/.bashrcThat's the basic configuration done!
You can now start the tigervnc service to test it out (this will invoke vncserver for us, under the hood). Issue:
demouser@pi64 ~ $ sudo rc-service tigervnc startand the VNC server should begin running, listening for connections on port 5901/tcp by default.
Now find the current IP address of your RPi, with:
demouser@pi64 ~ $ ifconfigI'll use the (example) address
192.168.1.100in what follows, but obviously, you'll need to substitute with your own. For test purposes, it's best to run the client machine on the same (hopefully firewalled!) local network as your RPi, since we don't yet havesshset up, so the connection will be insecure.
Next, we can set up the client system. In what follows, I'll describe how to connect from both a Linux and Windows PC.
Both
tigervncand RealVNC VNC Viewer are also available for macOS.
The best performance when connecting from another Linux box will be achieved by using a tigervnc client (since that will support all the available compression options etc.)
For example, suppose you have a Gentoo Linux PC on same subnet as your RPi4 / RPi3.
You could of course use another RPi to be the client, if you chose ^-^
You could then simply issue:
user@gentoopc ~ $ sudo emerge --verbose --noreplace net-misc/tigervncto install it.
Other VNC clients are, of course, available. Check your particular distro's package list for details.
Next, make sure you have basic connectivity to your RPi:
user@gentoopc ~ $ ping -c 3 192.168.1.100Remember to adapt the IP address as required for the actual address of your RPi, which you determined using
ifconfigabove.
and, assuming it responds to the ping as expected, start the viewer (VNC client):
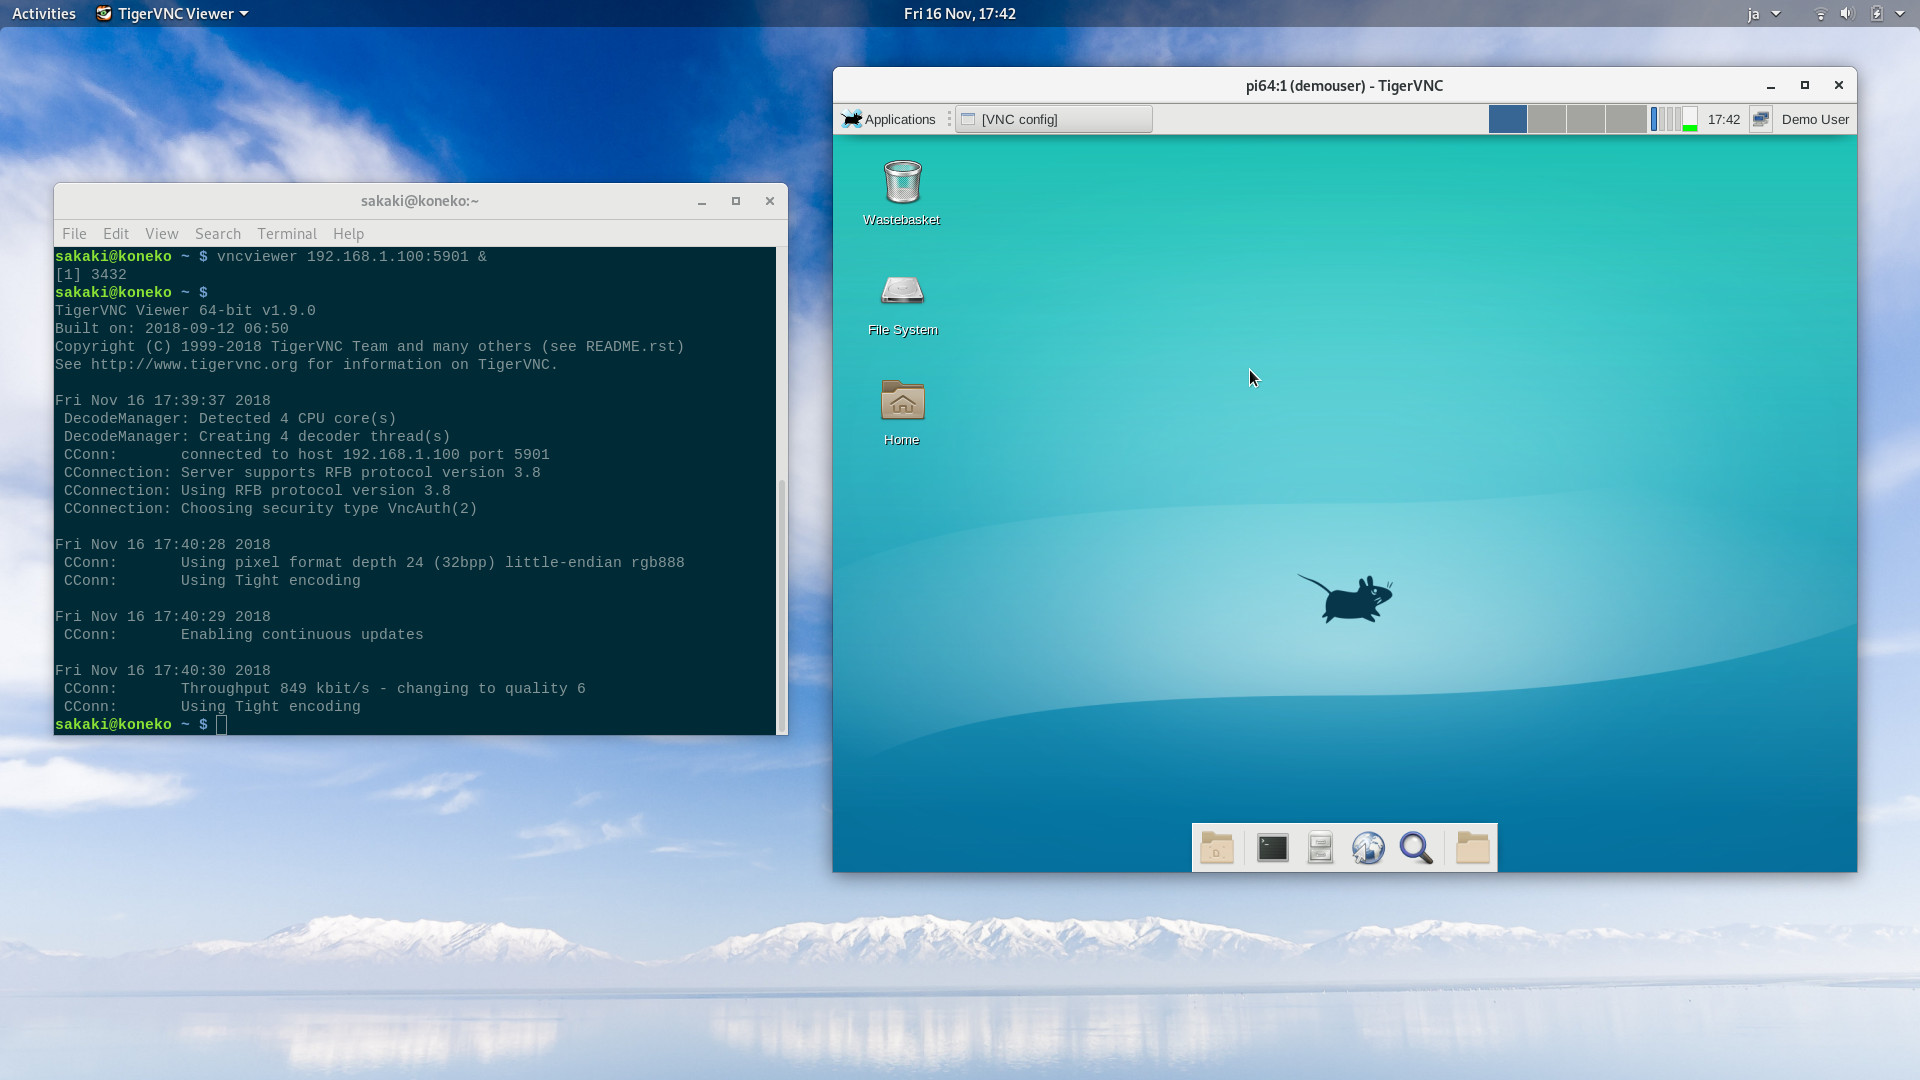
user@gentoopc ~ $ vncviewer 192.168.1.100:5901 &Again, remember to substitute the appropriate IP address for
192.168.1.100in the above. The:5901suffix denotes which port to connect to, and should be retained.
Enter the VNC access password when prompted (the one you set up earlier), press OK, and voilà, you should have a remote desktop visible!
This can now be used like a regular desktop connection. Obviously, things like video playback will be considerably slower than when running locally, as each individual update must be sent across the network, but overall the experience should be quite usable.
One point to note: if you do run a local graphical session on your target RPi4 / RPi3 as well, it will be distinct from this one, even if both are running at the same time. It is possible to set
tigervncup so the remote and local (if any) desktops are one and the same (an approach sometimes used by remote helpdesks etc.) but we we won't cover that here. Look atman x0vncserverif this topic interests you, for further information.
Many options (including tigervnc!) are available on Windows, but I'll concentrate on RealVNC's VNC Viewer here, as it is widely used. If you don't already have it on your system, download and install it now (be sure you choose the "Windows" version), from here.
The RealVNC Viewer software is (financially) free to use at time of writing, but has a click-through EULA you will need to review and accept, upon installation.
You can also use the native Windows
RDPviewer if you wish; please see my notes here.
Once done, open the app, dismiss any initial dialogs, then click on File → New connection.... Enter the address and a short nickname in the dialog that opens, as shown in the example below:
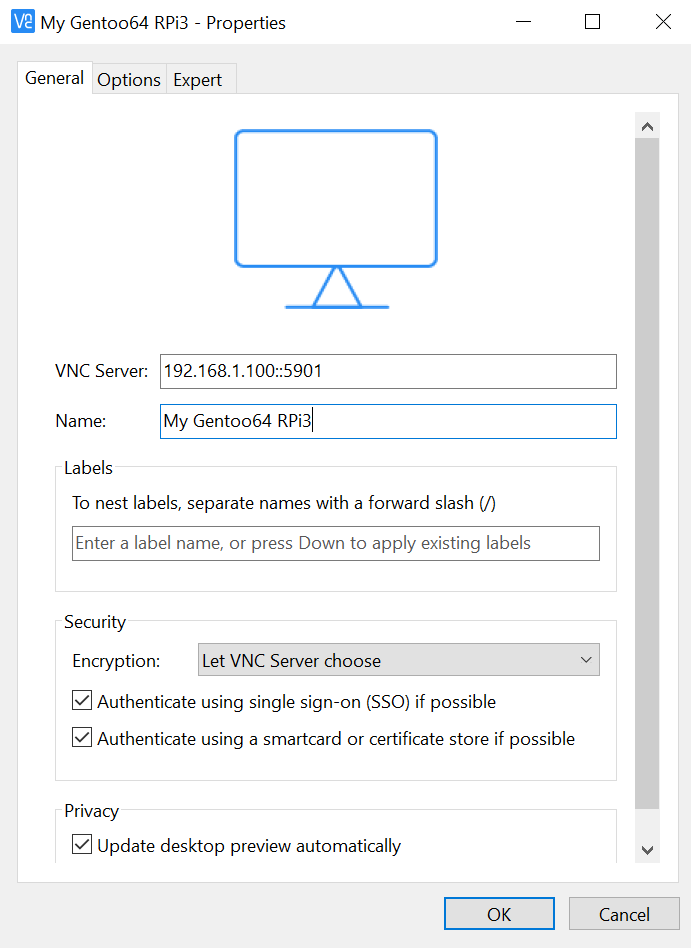
Remember to substitute the appropriate IP address for
192.168.1.100in the above. The::5901suffix denotes which port to connect to, and should be retained (you use a dual colon separator for this app).
Once you have filled this out, to avoid an ugly display, click on the Options tab, and then set the Picture quality: dropdown to Medium (at least). Then click OK to dismiss the dialog.
You should now see a large icon representing your new connection, labelled with the nickname you specified. Double-click on it, dismissing the Unencrypted connection warning (if shown) by pressing Continue, and then enter the password you set earlier when prompted, and click OK. That's it, you should now be in:
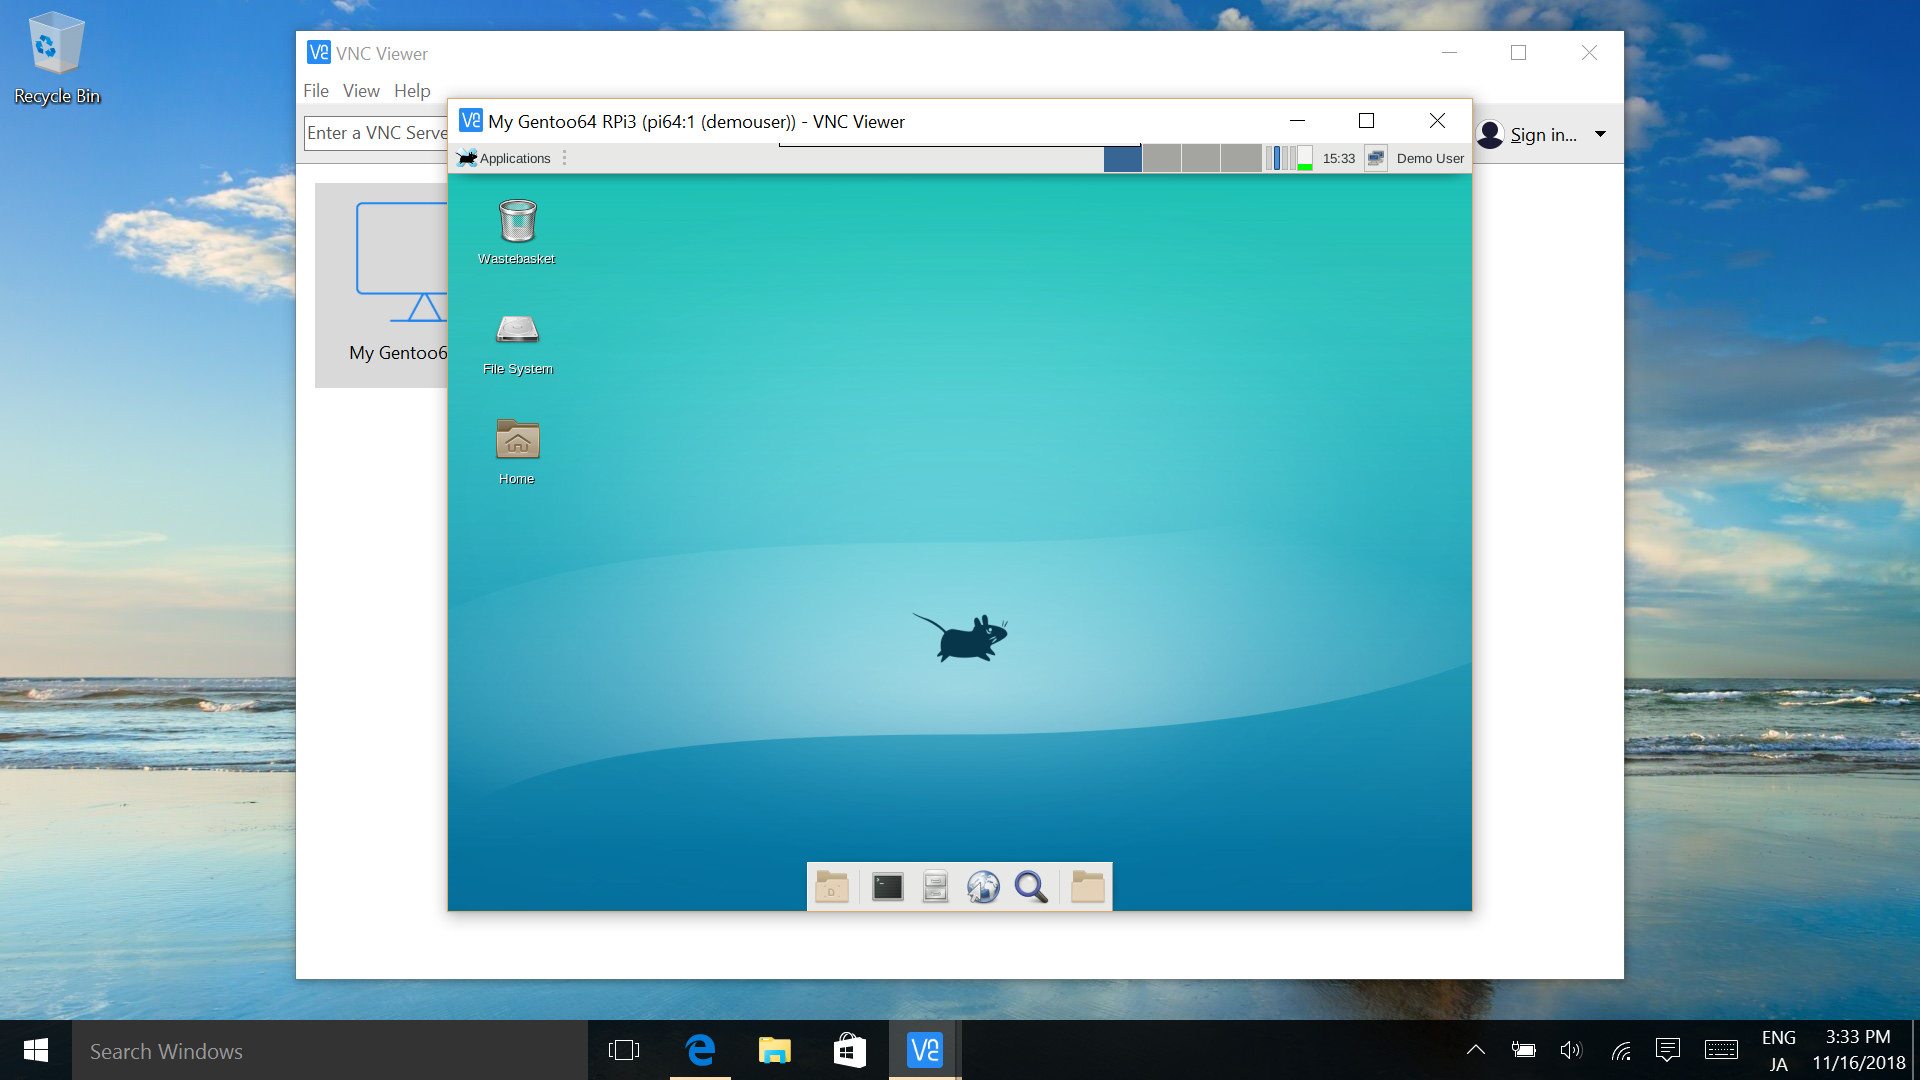
If you move your cursor to the top centre edge of the virtual desktop, a drop-down menu will appear, from where you can change viewer settings etc.
If you would like the tigervnc server to start automatically each boot, then simply issue:
demouser@pi64 ~ $ sudo rc-update add tigervnc defaultYou need only do this once.
Tip: you may wish to assign a fixed IP address to your RPi (either via your router, or using NetworkManager) if you are going to connect to it regularly, for convenience. Also, note that wired headless systems are generally more reliable, and easier to debug, than wireless ones.
To remove the auto-start again (should you want to do so at some future point), simply issue:
demouser@pi64 ~ $ sudo rc-update del tigervnc defaultIf you wish, you can run your target RPi4 (or RPi3) with no monitor attached, and use the virtual desktop exclusively. If you do this, you can also, at your option, disable the default vc4 graphics display driver and X11 server, to save system resources. To do so (remember, this is optional!) issue:
demouser@pi64 ~ $ sudo rc-update del xdm defaultthen:
demouser@pi64 ~ $ sudo mousepad /boot/config.txt &>/dev/null&If setting up the RPi over an
sshconnection, you can use e.g.sudo nano -w /boot/config.txtinstead.
Comment out the following line in that file, so it now reads:
#dtoverlay=vc4-fkms-v3d,cma-256Depending on your configuration, the
,cma-256suffix may be absent; even so, that's the line you need to comment out.
Leave the rest of the file as-is. Save, and exit the editor. Make sure you have set up the tigervnc server to automatically start up on boot (as described above), then reboot your RPi.
Should you wish to re-enable a locally connected display at some point in future, simply uncomment the above line in /boot/config.txt again, and then issue:
demouser@pi64 ~ $ sudo rc-update add xdm defaultand reboot.
If you would like to connect to your RPi's remote desktop across the Internet, you don't have to expose the unencrypted VNC server traffic directly. Instead, you can use ssh to tunnel your VNC connection, which is much more secure.
Assuming you already:
- have working
sshcredentials set up on your RPi for your regular user (password or public key), and - can successfully use these to log in remotely (to a shell prompt), and
- have set up a
tigervncserver on that RPi as detailed above; then it is a simple matter to create such a tunnel.
To do so, on your remote Linux (i.e. VNC client) PC simply issue:
user@gentoopc ~ $ ssh -f -N -T -L 55901:127.0.0.1:5901 demouser@yourhost.orgIn the above, the -f makes the command run in the background; -N means there is no separate remote command to execute; -T disables pseudo-terminal allocation, and -L precedes the port-forwarding specification string itself. 127.0.0.1 is the special IPv4 local loopback address.
Obviously, substitute the address you normally use to access your RPi across the Internet, for
demouser@yourhost.orgin the above. Feel free to substitute another port for the local 55901 used above, if you like; there's nothing 'magic' about it.
After typing in the login password for demouser and pressing Enter (if you don't have password-less public key login set up, that is), the above ssh command will appear to complete silently, but in fact will set up a persistent port-forwarding tunnel between port 55901 on 127.0.0.1 (localhost) and port 5901 on the RPi (as you can check with e.g. netstat -vatn).
Tip: to make it easier to disconnect the
sshtunnel when done, you can omit the-f; you can then kill it (in the terminal window) with Ctrlc when finished.
Important: make sure you have changed the
demouserandrootpasswords (from the shippedraspberrypi64defaults) — or better yet have set up public-key-only remote logins — before exposing your RPi4/3 to the Internet forsshaccess.
You can now start up a VNC connection as before, except this time, point the viewer at the local side of the tunnel:
user@gentoopc ~ $ vncviewer 127.0.0.1:55901 &You can ignore any warnings from vncviewer that This connection is not secure now: the client is unaware that the connection is being tunneled (securely) via ssh (but it is).
Windows users can also set up this kind of
sshtunnel using e.g. the freePuTTYapplication (see e.g. these notes for further details). macOS users have thesshutility directly available at the command line.
Have fun!
