CLI
To run a relay you must first create a relay config, this allows for permanent storage of relay configuration and easy management. You can create as many of these as you like.
# Create a simple TCP relay
localrelay new <relay_name> -host <bind_addr> -destination <remote_addr>

# Create HTTP relay
localrelay new <relay_name> -host <bind_addr> -destination <remote_addr> -http

# Create HTTPS relay
localrelay new <relay_name> -host <bind_addr> -destination <remote_addr> -https -certificate=cert.pem key=key.pem

# Use proxy
localrelay new <relay_name> -host <bind_addr> -destination <remote_addr> -proxy <proxy_url>

# Set custom output config file
localrelay new <relay_name> -host <bind_addr> -destination <remote_addr> -output ./config.toml

# Create a failover TCP relay
localrelay new <relay_name> -host <bind_addr> -destination <remote_addr_(1)>,<remote_addr_(2)> -failover# Create a simple TCP relay
localrelay new example.com -host 127.0.0.1:8080 -destination example.com:80
# Create HTTP relay
localrelay new example.com -host 127.0.0.1:8080 -destination http://example.com -http
# Create HTTPS relay
localrelay new example.com -host 127.0.0.1:8080 -destination https://example.com -https -certificate=cert.pem key=key.pem
# Create a TCP relay and store it in the config dir to auto start on system boot (daemon required)
sudo localrelay new example.com -host 127.0.0.1:8080 -destination example.com:80 -store
# Use proxy
localrelay new onion -host 127.0.0.1:8080 -destination 2gzyxa5ihm7nsggfxnu52rck2vv4rvmdlkiu3zzui5du4xyclen53wid.onion:80 -proxy socks5://127.0.0.1:9050
# Create a failover TCP relay with one remote accessed via Tor
localrelay new onion -host 127.0.0.1:8080 -destination 192.168.1.240:80,2gzyxa5ihm7nsggfxnu52rck2vv4rvmdlkiu3zzui5du4xyclen53wid.onion:80 -failover -ignore_proxy=0 -proxy socks5://127.0.0.1:9050Now you have your relay config toml files we can now launch them using the CLI.
# Run 1 relay
localrelay run <relay_config>

# Run 2 relays
localrelay run <relay_config1> <relay_config2>

# Run more than 2
# Keep adding the config files to the command
localrelay run <relay_config1> <relay_config2>...# Run 1 relay
localrelay run onion.toml
# Specify dial timeout (for none proxied remotes)
# <num>s seconds
# <num>ms milliseconds
# <num>m minute
localrelay run onion.toml -timeout=5s
# Run 2 relays
localrelay run onion.toml bitwarden.toml
# Run more than 2
# Keep adding the config files to the command
localrelay run onion.toml bitwarden.toml nextcloud.toml piped.tomlTo manage the daemon you can use the following commands:
# Stop the relay and prevent it from auto restarting
sudo localrelay stop
# Stop a single relay
sudo localrelay stop <relay-name>
# Restart the whole service processes
sudo localrelay restart
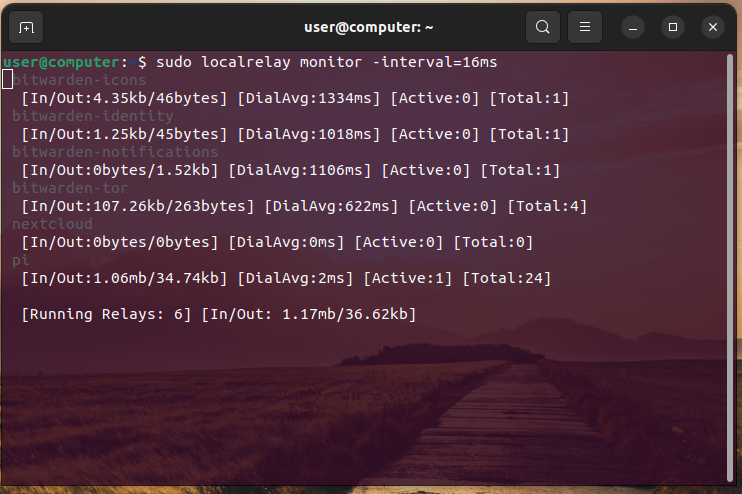
# Monitor live auto updated metrics
sudo localrelay monitor
# Monitor live auto updated metrics with a custom refresh rate
# ms Micro Seconds
# s Seconds
# m Minutes
# h Hours
# d Days
sudo localrelay monitor -interval=5s
# Monitor live auto updated metrics for specific relays
sudo localrelay monitor <relay-name-(1)> <relay-name-(2)>...
# View relay stats and running relays
sudo localrelay status
# View all logs
journalctl -u localrelayd
# Follow log output
journalctl -u localrelayd -flocalrelay status

localrelay monitor
Windows: C:\ProgramData\localrelay\
Unix: /etc/localrelay/

