Note
This project is part of the DevOpsTheHardWay course.
In this project, you develop a Python chatbot application which applies filters to images send by users to a Telegram bot.
Here is a short demonstration:

- Fork this repo by clicking Fork in the top-right corner of the page.
- Clone your forked repository by:
Change
git clone https://github.com/<your-username>/<your-project-repo-name>
<your-username>and<your-project-repo-name>according to your GitHub username and the name you gave to your fork. E.g.git clone https://github.com/johndoe/PolybotServicePython. - Open the repo as a code project in your favorite IDE (Pycharm, VSCode, etc..). It is also a good practice to create an isolated Python virtual environment specifically for your project (see here how to do it in PyCharm).
Later on, you are encouraged to change the README.md file content to provide relevant information about your service project, e.g. how to launch the app, main features, etc.
Let's get started...
Reference: https://ai.stanford.edu/~syyeung/cvweb/tutorial1.html
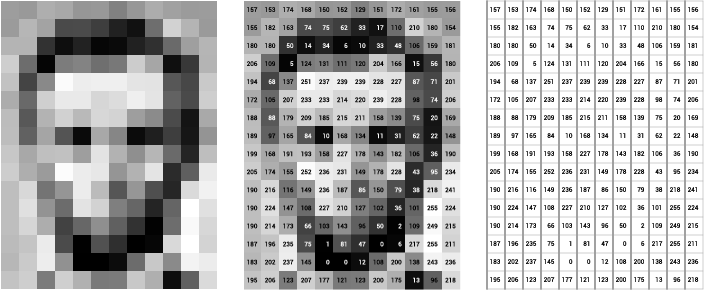
If we take a closer look on a digital image, we will notice it comprised of individual pixels, each pixel has its own value. For a grayscale image, each pixel would have an intensity value between 0 and 255, with 0 being black and 255 being white.
A grayscale image, then, can be represented as a matrix of pixel values:
A color image is just a simple extension of this. The colors are constructed from a combination of Red, Green, and Blue (RGB). Instead of one matrix of pixel values, we use 3 different matrix, one for the Red (R) values, one for Green (G), and one Blue (B) values.
As can be seen, each pixel of the image has three channels, represent the red, green, blue values.
Python-wise, a digital grayscale image is essentially a list of lists:
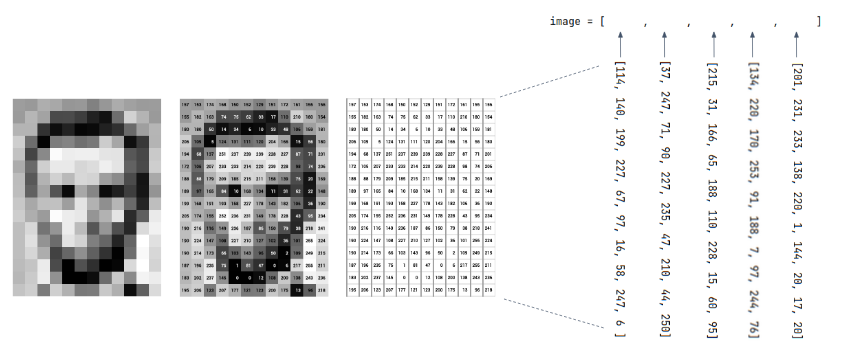
Each element in the image list is a list represented a row of pixels.
Filtered images are ubiquitous in our social media feeds, news articles, books—everywhere! Image filtering is a technique in image processing that involves modifying or enhancing an image by applying a filter to it. Filters can be used to remove noise, sharpen edges, blur or smooth the image, or highlight specific features or details, among other effects.
Python-wise, image filtering is as simple as manipulate the pixel values.
Under polybot/img_proc.py, the Img class is designed for image filtering on grayscale images.
Here is a detailed usage instruction for the class:
-
Creating an instance of
Img:Provide the path to the image file as a parameter when creating an instance of the
Imgclass, for example:my_img = Img('path/to/image.jpg')
-
Saving the modified image: After performing operations on the image, you can save the modified image using the
save_img()method, for example:my_img.save_img()
This will save the modified grayscale image to a new path with an appended
_filteredsuffix, and uses the same file extension.
You are instructed to implement at least the following 4 filters: concat(), rotate(), salt_n_pepper(), segment().
You have to implement the filter using Python builtin functionality only. Don't use external packages like numpy, Pillow, openVC, etc.
On every error (E.g. image path doesn't exist, input image is not an RGB) you should raise a RuntimeError exception.
The concat() method is meant to concatenate two images together horizontally (side by side).
Implementation instruction for horizontal concatenation:
- Check the dimensions of both images to ensure they are compatible for concatenation. If the dimensions are not compatible (e.g., different heights), raise a
RuntimeErrorexception with informative message. - Combine the pixel values of both images to create a new image. For horizontal concatenation, combine each row of the first image with the corresponding row of the second image.
- Store the resulting concatenated image in the
self.dataattribute of the instance.
my_img = Img('path/to/image.jpg')
another_img = Img('path/to/image2.jpg')
my_img.concat(another_img)
my_img.save_img()   # concatenated image was saved in 'path/to/image_filtered.jpg'
Note: you can optionally use the direction argument to implement vertical concatenation as well.
The salt_n_pepper() noise method applies a type of image distortion that randomly adds isolated pixels with value of either 255 (maximum white intensity) or 0 (minimum black intensity).
The name "salt and pepper" reflects the appearance of these randomly scattered bright and dark pixels, resembling grains of salt and pepper sprinkled on an image.
Implementation instruction:
- Iterate over the pixels of the image by looping through each row and each pixel value.
- For each pixel in the image:
- Randomly generate a number between 0 and 1.
- If the random number is less than 0.2, set the pixel value to the maximum intensity (255) to represent salt.
- If the random number is greater than 0.8, set the pixel value to the minimum intensity (0) to represent pepper.
- If neither condition is met (the random number is in between 0.2 to 0.8), keep the original pixel value without any modification.
my_img = Img('path/to/image.jpg')
my_img.salt_n_pepper()
my_img.save_img() # noisy image was saved in 'path/to/image_filtered.jpg'The rotate() method rotates an image around its center in a clockwise direction.
Implementation remarks:
The resulting rotated image will have its rows become the columns, and the columns will become the rows. The pixels in the rotated image will be repositioned based on a clockwise rotation around the center of the original image. For example, the first row in the original image will become the last column in the rotated image, the second row will become the second-to-last column, and so on.
my_img = Img('path/to/image.jpg')
my_img.rotate()
my_img.rotate()  # rotate again for a 180 degrees rotation
my_img.save_img() # rotated image was saved in 'path/to/image_filtered.jpg'The segment() method partitions the image into regions where the pixels have similar attributes, so the image is represented in a more simplified manner, and so we can then identify objects and boundaries more easily.
Implementation instruction:
- Iterate over the pixels of the image by looping through each row and each pixel value.
- All pixels with an intensity greater than 100 are replaced with a white pixel (intensity 255) and all others are replaced with a black pixel (intensity 0).
my_img = Img('path/to/image.jpg')
my_img.segment()
my_img.save_img()The below two filters was already implemented, you can review these functions to get some inspiration of how might a filter implementation look like.
The blur() method is already implemented. You can control the blurring level blur_level argument (default is 16).
It blurs the image by replacing the value of each pixel by the average of the 16 pixels around him (or any other value, controlled by the blur_level argument. The bigger the value, the stronger the blurring level).
my_img = Img('path/to/image.jpg')
my_img.blur()   # or my_img.blur(blur_level=32) for stronger blurring effect
my_img.save_img()The contour() method is already implemented. It applies a contour effect to the image by calculating the differences between neighbor pixels along each row of the image matrix.
my_img = Img('path/to/image.jpg')
my_img.contour()
my_img.save_img()Under polybot/test you'll find unittests for each filter.
For example, to execute the test suite for the concat() filter, run the below command from the root dir of your repo:
python -m polybot.test.test_concatAn alternative way is to run tests from the Pycharm UI.
- Download and install Telegram Desktop (you can use your phone app as well).
- Once installed, create your own Telegram Bot by following this section to create a bot. Once you have your telegram token you can move to the next step.
Never commit your telegram token in Git repo, even if the repo is private. For now, we will provide the token as an environment variable to your chat app. Later on in the course we will learn better approaches to store sensitive data.
The Telegram app is a flask-based service that responsible for providing a chat-based interface for users to interact with your image processing functionality. It utilizes the Telegram Bot API to receive user images and respond with processed images.
The code skeleton for the bot app is already given to you under polybot/app.py.
In order to run the server, you have to provide 2 environment variables:
TELEGRAM_BOT_TOKENwhich is your bot token.BOT_APP_URLwhich is your app public URL provided by Ngrok (will be discussed soon).
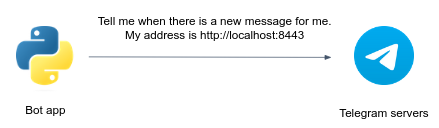
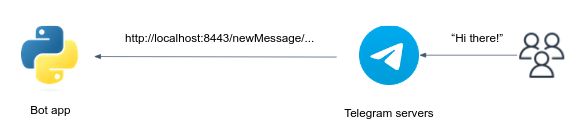
Implementing bot logic involves running a local Python script that listens for updates from Telegram servers. When a user sends a message to the bot, Telegram servers forward the message to the Python app using a method called webhook (long-polling and websocket are other possible methods which wouldn't be used in this project). The Python app processes the message, executes the desired logic, and may send a response back to Telegram servers, which then delivers the response to the user.
The webhook method consists of simple two steps:
Setting your chat app URL in Telegram Servers:
Once the webhook URL is set, Telegram servers start sending HTTPS POST requests to the specified webhook URL whenever there are updates, such as new messages or events, for the bot.
You've probably noticed that setting localhost URL as the webhook for a Telegram bot can be problematic because Telegram servers need to access the webhook URL over the internet to send updates.
As localhost is not accessible externally, Telegram servers won't be able to reach the webhook, and the bot won't receive any updates.
Ngrok can solve this problem by creating a secure tunnel between the local machine (where the bot is running) and a public URL provided by Ngrok. It exposes the local server to the internet, allowing Telegram servers to reach the webhook URL and send updates to the bot.
Sign-up for the Ngrok service (or any another tunneling service to your choice), then install the ngrok agent as described here.
Authenticate your ngrok agent. You only have to do this once:
ngrok config add-authtoken <your-authtoken>Since the telegram bot service will be listening on port 8443, start ngrok by running the following command:
ngrok http 8443Your bot public URL is the URL specified in the Forwarding line (e.g. https://16ae-2a06-c701-4501-3a00-ecce-30e9-3e61-3069.ngrok-free.app).
Don't forget to set the BOT_APP_URL env var to your URL.
In the next step you'll finally run your bot app.
Tip
If you want to keep the same URL each time you use ngrok, create a static domain on your dashboard and then use the --url flag to ask the ngrok agent to use it.
Under polybot/bot.py you are given a class called Bot. This class implements a simple telegram bot, as follows.
The constructor __init__ receives the token and telegram_chat_url arguments.
The constructor creates an instance of the TeleBot object, which is a pythonic interface to Telegram API. You can use this instance to conveniently communicate with the Telegram servers.
Later, the constructor sets the webhook URL to be the telegram_chat_url.
The polybot/app.py is the main app entrypoint. It's nothing but a simple flask webserver that uses a Bot instance to handle incoming messages, caught in the webhook endpoint function.
The default behavior of the Bot class is to "echo" the incoming messages. Try it out!
In bot.py you are given a class called QuoteBot which inherits from Bot.
Upon incoming messages, this bot echoing the message while quoting the original message, unless the user is asking politely not to quote.
In app.py, change the instantiated instance to the QuoteBot:
if __name__ == "__main__":
-   bot = Bot(TELEGRAM_BOT_TOKEN, BOT_APP_URL)
+   bot = QuoteBot(TELEGRAM_BOT_TOKEN, BOT_APP_URL)
    app.run(host='0.0.0.0', port=8443)
Run this bot and check its behavior.
In bot.py you are given a class called ImageProcessingBot which inherits from Bot, again.
Upon incoming photo messages, this bot downloads the photos and processes them according to the caption field provided with the message.
The bot will then send the processed image to the user.
A few notes:
- Inside the
ImageProcessingBotclass, overridehandle_messagemethod and implement the needed functionality. - Remember that by inheriting the
Botclass, you can use all of its methods (such assend_text,download_user_photo,send_photo...). - Possible
captionvalues are:['Blur', 'Contour', 'Rotate', 'Segment', 'Salt and pepper', 'Concat']. - Handle potential errors using
try... except.... Send an appropriate message to the user (E.g. "something went wrong... please try again"). - Set a timeout when sending a message to Telegram.
- Use
loggerto log important information in your app. - Your bot should support the
BlurandContourfilters (those filters have already implemented for you).
Test your bot on real photos and make sure it's functioning properly.
Tip
When working with Telegram's API, you might encounter situations where your code encounters errors while processing incoming messages. In such cases, Telegram's server will automatically retry sending messages that were not responded to with a status code of 200. This retry mechanism is designed to ensure the reliable delivery of messages. If you find that your bot is receiving repeated messages due to this retry mechanism, just review your code and identify any errors or issues that might be causing the message processing failures.
You can test your bot logic locally by executing the below unittests from the root directory of your project:
python -m polybot.test.test_telegram_botAdd any functionality you wish to your bot...
- Greet the user.
- Add some informative message when user sends photos without captions or with invalid caption value.
- Add your own filters.
- Extend the functionality of the filters, e.g. allow users to specify "Rotate 2" to rotate the image twice).
Go wild!!!
Time to submit your solution for testing.
- Commit and push your changes.
- In GitHub Actions, watch the automated test execution workflow (enable Actions if needed). If there are any failures, click on the failed job and read the test logs carefully. Fix your solution, commit and push again.
You are highly encourages to share your project with others by creating a Pull Request.
Create a Pull Request from your repo, branch main (e.g. johndoe/PolybotServicePython) into our project repo (i.e. exit-zero-academy/PolybotServicePython), branch main.
Feel free to explore other's pull requests to discover different solution approaches.
As it's only an exercise, we may not approve your pull request (approval would lead your changes to be merged into our original project).