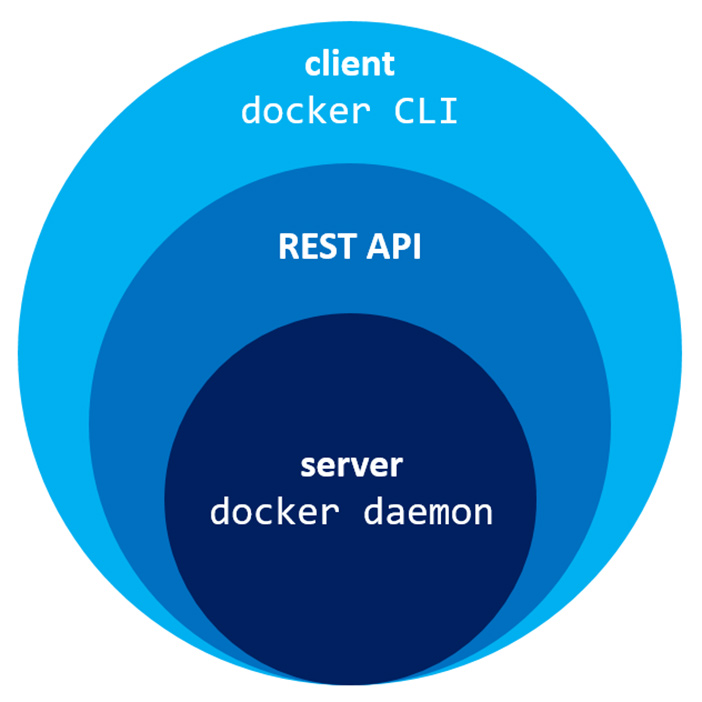
let’s define those layers from the bottom up:
-
The Docker daemon: is a service that runs on your host operating system. It currently only runs on Linux because it depends on a number of Linux kernel features, but there are a few ways to run Docker on MacOS and Windows too.
-
The Docker daemon itself exposes a REST API: From here, a number of different tools can talk to the daemon through this API.
-
The most widespread tool is the Docker CLI: It is a command line tool that lets you talk to the Docker daemon. When you install Docker, you get both the Docker daemon and the Docker CLI tools together.
The Docker client communicates usually with the daemon either locally, via the unix socket /var/run/docker.sock, or over a network via a tcp socket
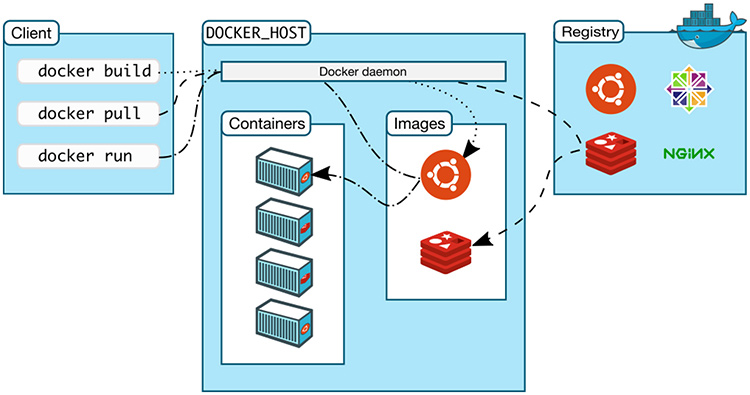
And this time we’ll discuss the above picture from left to right:
-
First we have the client on the left, this is where we’re running various Docker commands. The client could be installed on your laptop running Windows, MacOS or a server running Linux, it doesn’t matter.
-
Next up, we have the Docker host. This is typically referred to as the server running the Docker daemon. That makes sense right? It’s the host that happens to be running the Docker daemon.
It’s very simple to configure the Docker client to connect to a remote Docker host. This is one way you’re able to run Docker on MacOS and Windows.
In that case, the Docker daemon ends up running in a virtual machine that uses Linux, and the Docker client is configured to connect to that remote Docker host.
The key take away here is, the client and daemon does not need to be on the same box.
-
Lastly, we have the registry which is also part of the Docker ecosystem but for now you can ignore it. Discussing what that does goes beyond the scope of this article, but it would have looked weird if I chopped it out because then the arrows would be coming from no where.
 docker run -i -t ubuntu /bin/bash
Unable to find image 'ubuntu:latest' locally
latest: Pulling from library/ubuntu
473ede7ed136: Pull complete
c46b5fa4d940: Pull complete
93ae3df89c92: Pull complete
6b1eed27cade: Pull complete
Digest: sha256:29934af957c53004d7fb6340139880d23fb1952505a15d69a03af0d1418878cb
Status: Downloaded newer image for ubuntu:latest
- First, we told Docker to run a command using docker run . We passed it two command line flags: -i and -t . The -i flag keeps STDIN open from the container, even if we're not attached to it. This persistent standard input is one half of what we need for an interactive shell.
- The -t flag is the other half and tells Docker to assign a pseudo-tty to the container we're about to create. This provides us with an interactive shell in the new container
Checking the container's hostname
root@38c947568a9a:/# hostname
38c947568a9a
root@38c947568a9a:/# cat /etc/hosts
127.0.0.1	localhost
::1	localhost ip6-localhost ip6-loopback
fe00::0	ip6-localnet
ff00::0	ip6-mcastprefix
ff02::1	ip6-allnodes
ff02::2	ip6-allrouters
172.17.0.3	38c947568a9a
root@38c947568a9a:/#
Container naming
$ docker run --name owasp-container -i -t ubuntu /bin/bashList Containers information
docker ps
CONTAINER ID        IMAGE                     COMMAND             CREATED             STATUS                            PORTS                                                 NAMES
5712b04abf8b ubuntu "/bin/bash" 12 minutes ago Up 10 minutes owasp-container$ docker stop owasp-container docker start owasp-container Keep in your mind that we can attach only one process per Container, but We can run multiple processes per Container
$ docker attach owasp-container
root@5712b04abf8b:/#
OR
docker attach <container-ID>you can also use the
nsenterto attach to a container : more info
$ docker stop 5712b04abf8b
5712b04abf8b
$ docker rm  5712b04abf8b
5712b04abf8bdocker ps -afor i in `docker ps -a | cut -d " " -f 1| tail -n +2` ; do docker stop $i && docker rm $i ; done $ docker run --name daemon_owasp -d ubuntu /bin/sh -c "while true; do echo hello world; sleep 1;"- --detach | -d will run the container in the background.
docker container ls
# OR
docker ps
You can check what’s happening in your containers by using a couple of built-in Docker commands: docker container logs and docker container top.
docker container logs <container>-
Volumes mount a directory on the host into the container at a specific location
- to create a volume via CLI
docker volume create owasp-hello
- to mount it
docker run -v owasp-hello:<mount-point> ...
- List volumes
docker volume ls
- Inspect a volume
    $ docker volume inspect owasp-hello
    [
        {
            "CreatedAt": "2018-11-03T16:14:43+01:00",
            "Driver": "local",
            "Labels": {},
            "Mountpoint": "/var/lib/docker/volumes/owasp-hello/_data",
            "Name": "owasp-hello",
            "Options": {},
            "Scope": "local"
        }
    ]
As you see the mountpoint is by default /var/lib/docker/volumes/owasp-hello/_data.
- Attach a volume to a container
  $ docker run --name owasp-volume -it -v owasp-hello:/owasp abdelhalim/static_web /bin/bash
  root@4cb9dbd55aae:/# ls
  bin  boot  dev  etc  home  lib  lib64  media  mnt  opt  owasp  proc  root  run  sbin  srv  sys  tmp  usr  var
  root@4cb9dbd55aae:/# cd owasp/
  root@4cb9dbd55aae:/owasp# ls
  hde  shsh  tettette
  root@4cb9dbd55aae:/owasp# mkdir test
  root@4cb9dbd55aae:/owasp# touch file
  root@4cb9dbd55aae:/owasp# echo secret > secret.txt
  root@4cb9dbd55aae:/owasp# cat secret.txt
  secret
On The host machine
  # pwd
  /var/lib/docker/volumes
  root@H-1:/var/lib/docker/volumes# ls -R owasp-hello/
  owasp-hello/:
  _data

  owasp-hello/_data:
  file  hde  secret.txt  shsh  test  tettette

  owasp-hello/_data/test:

  owasp-hello/_data/tettette:
  $ cat owasp-hello/_data/secret.txt
  secret
- Remove a volume
$ docker volume rm owasp-hello Volumes :
- Can be used to share(or/and persist) data between host and containers.
- Can be created in Dockerfile or via CLI
Why Use Volumes
- mount local source code into a running container
- improve performance
- Data persistence
- Volumes are easier to back up or migrate than bind mounts.
- You can manage volumes using Docker CLI commands or the Docker API.
- Volumes work on both Linux and Windows containers.
- Volumes can be more safely shared among multiple containers.
- Volume drivers let you store volumes on remote hosts or cloud providers, to encrypt the contents of volumes, or to add other functionality
- New volumes can have their content pre-populated by a container.
More info see : https://docs.docker.com/storage/volumes/
- Step 1 - The
docker networkcommand - Step 2 - List networks
- Step 3 - Inspect a network
- Step 4 - List network driver plugins
- Step 5 - Network Lab :
The docker network command is the main command for configuring and managing container networks.
Run a simple docker network command from any of your lab machines.
$ docker network

Usage:  docker network COMMAND

Manage Docker networks

Options:
      --help   Print usage

Commands:
  connect     Connect a container to a network
  create      Create a network
  disconnect  Disconnect a container from a network
  inspect     Display detailed information on one or more networks
  ls          List networks
  rm          Remove one or more networks

Run 'docker network COMMAND --help' for more information on a command.
The command output shows how to use the command as well as all of the docker network sub-commands. As you can see from the output, the docker network command allows you to create new networks, list existing networks, inspect networks, and remove networks. It also allows you to connect and disconnect containers from networks.
Run a docker network ls command to view existing container networks on the current Docker host.
$$ docker network ls
NETWORK ID          NAME                          DRIVER              SCOPE
8d06b1d4bddd        bridge                        bridge              local
5f495e0a4344        docker-keycloak-sso_default   bridge              local
4bf0af6e2141        dreamer                       bridge              local
42df8058e38e        host                          host                local
0bdc1bdf6710        keycloak-network              bridge              local
a65250cfdd0a        none                          null                local
450ceee4c5c5        testvln                       macvlan             local
8a9e6ae0fbe2        vlan                          macvlan             local
The output above shows the container networks that are created as part of a standard installation of Docker.
New networks that you create will also show up in the output of the docker network ls command.
You can see that each network gets a unique ID and NAME. Each network is also associated with a single driver. Notice that the "bridge" network and the "host" network have the same name as their respective drivers.
The docker network inspect command is used to view network configuration details. These details include; name, ID, driver, IPAM driver, subnet info, connected containers, and more.
Use docker network inspect to view configuration details of the container networks on your Docker host. The command below shows the details of the network called bridge.
$ docker network inspect bridge
[
    {
        "Name": "bridge",
        "Id": "1befe23acd58cbda7290c45f6d1f5c37a3b43de645d48de6c1ffebd985c8af4b",
        "Scope": "local",
        "Driver": "bridge",
        "EnableIPv6": false,
        "IPAM": {
            "Driver": "default",
            "Options": null,
            "Config": [
                {
                    "Subnet": "172.17.0.0/16",
                    "Gateway": "172.17.0.1"
                }
            ]
        },
        "Internal": false,
        "Containers": {},
        "Options": {
            "com.docker.network.bridge.default_bridge": "true",
            "com.docker.network.bridge.enable_icc": "true",
            "com.docker.network.bridge.enable_ip_masquerade": "true",
            "com.docker.network.bridge.host_binding_ipv4": "0.0.0.0",
            "com.docker.network.bridge.name": "docker0",
            "com.docker.network.driver.mtu": "1500"
        },
        "Labels": {}
    }
]
NOTE: The syntax of the
docker network inspectcommand isdocker network inspect <network>, where<network>can be either network name or network ID. In the example above we are showing the configuration details for the network called "bridge". Do not confuse this with the "bridge" driver.
The docker info command shows a lot of interesting information about a Docker installation.
Run a docker info command on any of your Docker hosts and locate the list of network plugins.
$ docker info
......
 Network: bridge host macvlan null overlay
 Log: awslogs fluentd gcplogs gelf journald json-file logentries splunk syslog
Swarm: inactive
...
The output above shows the bridge, host, macvlan, null, and overlay drivers.
bridge: The default network driver. If you don’t specify a driver, this is the type of network you are creating. Bridge networks are usually used when your applications run in standalone containers that need to communicate. See bridge networks.
host: For standalone containers, remove network isolation between the container and the Docker host, and use the host’s networking directly. host is only available for swarm services on Docker 17.06 and higher. See use the host network.
overlay: Overlay networks connect multiple Docker daemons together and enable swarm services to communicate with each other. You can also use overlay networks to facilitate communication between a swarm service and a standalone container, or between two standalone containers on different Docker daemons. This strategy removes the need to do OS-level routing between these containers. See overlay networks.
macvlan: Macvlan networks allow you to assign a MAC address to a container, making it appear as a physical device on your network. The Docker daemon routes traffic to containers by their MAC addresses. Using the macvlan driver is sometimes the best choice when dealing with legacy applications that expect to be directly connected to the physical network, rather than routed through the Docker host’s network stack. See Macvlan networks.
none: For this container, disable all networking. Usually used in conjunction with a custom network driver. none is not available for swarm services. See disable container networking.
In this workshop we will use the bridge which is the default one
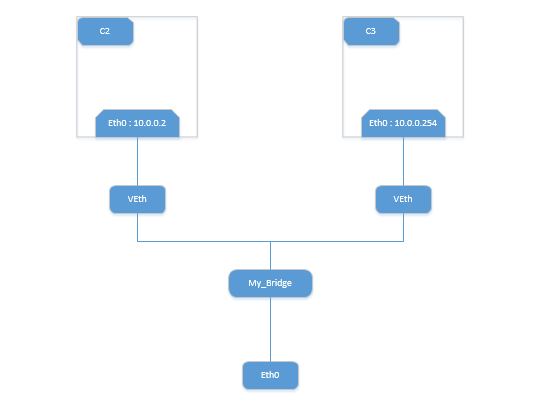
$ docker network create -d bridge --subnet 10.0.0.0/24 my_bridge
3a1132fd392861ad5f1f5715f03098845acf9d4349fb8c07a5266a600fb13598
nordo@H-1:~/owasp-workshop/owasp-workshop/image-docker$ docker run -itd --name c2 --net my_bridge busybox sh
Unable to find image 'busybox:latest' locally
latest: Pulling from library/busybox
90e01955edcd: Pull complete
Digest: sha256:2a03a6059f21e150ae84b0973863609494aad70f0a80eaeb64bddd8d92465812
Status: Downloaded newer image for busybox:latest
446b2f15856d549b98ea1b85ab2c1e075095373b156abba14a244c8b734854cb
nordo@H-1:~/owasp-workshop/owasp-workshop/image-docker$ docker run -itd --name c3 --net my_bridge --ip 10.0.0.254 busybox sh
410b85a17c722a8d0f01ff701f2c1c4dce59b5f908d095d68750352ff437f0fc
nordo@H-1:~/owasp-workshop/owasp-workshop/image-docker$ docker attach c3
/ # ifconfig
eth0      Link encap:Ethernet  HWaddr 02:42:0A:00:00:FE
          inet addr:10.0.0.254  Bcast:10.0.0.255  Mask:255.255.255.0
          UP BROADCAST RUNNING MULTICAST  MTU:1500  Metric:1
          RX packets:24 errors:0 dropped:0 overruns:0 frame:0
          TX packets:0 errors:0 dropped:0 overruns:0 carrier:0
          collisions:0 txqueuelen:0
          RX bytes:3545 (3.4 KiB)  TX bytes:0 (0.0 B)

lo        Link encap:Local Loopback
          inet addr:127.0.0.1  Mask:255.0.0.0
          UP LOOPBACK RUNNING  MTU:65536  Metric:1
          RX packets:0 errors:0 dropped:0 overruns:0 frame:0
          TX packets:0 errors:0 dropped:0 overruns:0 carrier:0
          collisions:0 txqueuelen:1000
          RX bytes:0 (0.0 B)  TX bytes:0 (0.0 B)

/ #
Open another terminal, and do the followig commands
nordo@H-1:~/owasp-workshop/owasp-workshop/image-docker$ docker attach c2
/ # ifconfig
eth0      Link encap:Ethernet  HWaddr 02:42:0A:00:00:02
          inet addr:10.0.0.2  Bcast:10.0.0.255  Mask:255.255.255.0
          UP BROADCAST RUNNING MULTICAST  MTU:1500  Metric:1
          RX packets:61 errors:0 dropped:0 overruns:0 frame:0
          TX packets:0 errors:0 dropped:0 overruns:0 carrier:0
          collisions:0 txqueuelen:0
          RX bytes:9075 (8.8 KiB)  TX bytes:0 (0.0 B)

lo        Link encap:Local Loopback
          inet addr:127.0.0.1  Mask:255.0.0.0
          UP LOOPBACK RUNNING  MTU:65536  Metric:1
          RX packets:0 errors:0 dropped:0 overruns:0 frame:0
          TX packets:0 errors:0 dropped:0 overruns:0 carrier:0
          collisions:0 txqueuelen:1000
          RX bytes:0 (0.0 B)  TX bytes:0 (0.0 B)

/ #
/ # ping 10.0.0.254
PING 10.0.0.254 (10.0.0.254): 56 data bytes
64 bytes from 10.0.0.254: seq=0 ttl=64 time=0.218 ms
64 bytes from 10.0.0.254: seq=1 ttl=64 time=0.255 ms
64 bytes from 10.0.0.254: seq=2 ttl=64 time=0.233 ms
64 bytes from 10.0.0.254: seq=3 ttl=64 time=0.213 ms
^C
--- 10.0.0.254 ping statistics ---
4 packets transmitted, 4 packets received, 0% packet loss
round-trip min/avg/max = 0.213/0.229/0.255 ms
/ #
See that your network bridge has been created
$ docker network ls
NETWORK ID          NAME                          DRIVER              SCOPE
8d06b1d4bddd        bridge                        bridge              local
5f495e0a4344        docker-keycloak-sso_default   bridge              local
4bf0af6e2141        dreamer                       bridge              local
42df8058e38e        host                          host                local
0bdc1bdf6710        keycloak-network              bridge              local
3a1132fd3928        my_bridge                     bridge              local
a65250cfdd0a        none                          null                local
450ceee4c5c5        testvln                       macvlan             local
8a9e6ae0fbe2        vlan                          macvlan             local


