Home Assistant has some support for myStrom products. But I couldn't get functioning the buttons, I get a 401 error. I tried different combinations :
homeassistant:
    - type: trusted_networks
      trusted_networks:
        - 192.168.0.0/21
        - 192.168.1.40
        - 172.17.0.0/24
        - fd00::/8
  - type: legacy_api_password
    api_password: !secret api_password
http:
binary_sensor:
  - platform: mystrom
but it doesn't work and the legacy_api_password is deprecated and will be dropped in a future release.
So I decided to create this gateway.

The goal is to have binary_sensors for single, double, long, touch, wheel_final event and sensors for battery level and wheel event (italic only available for Button Plus) automatically created in Devices of Home Assistant. So Home Assistant can suggest Automations.
You need to have a myStrom Wifi button with the minimal Firmware version: 2.74.10.
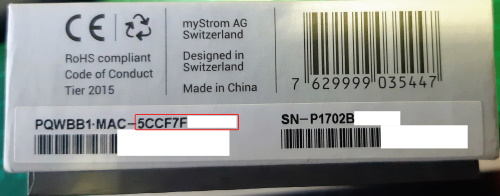
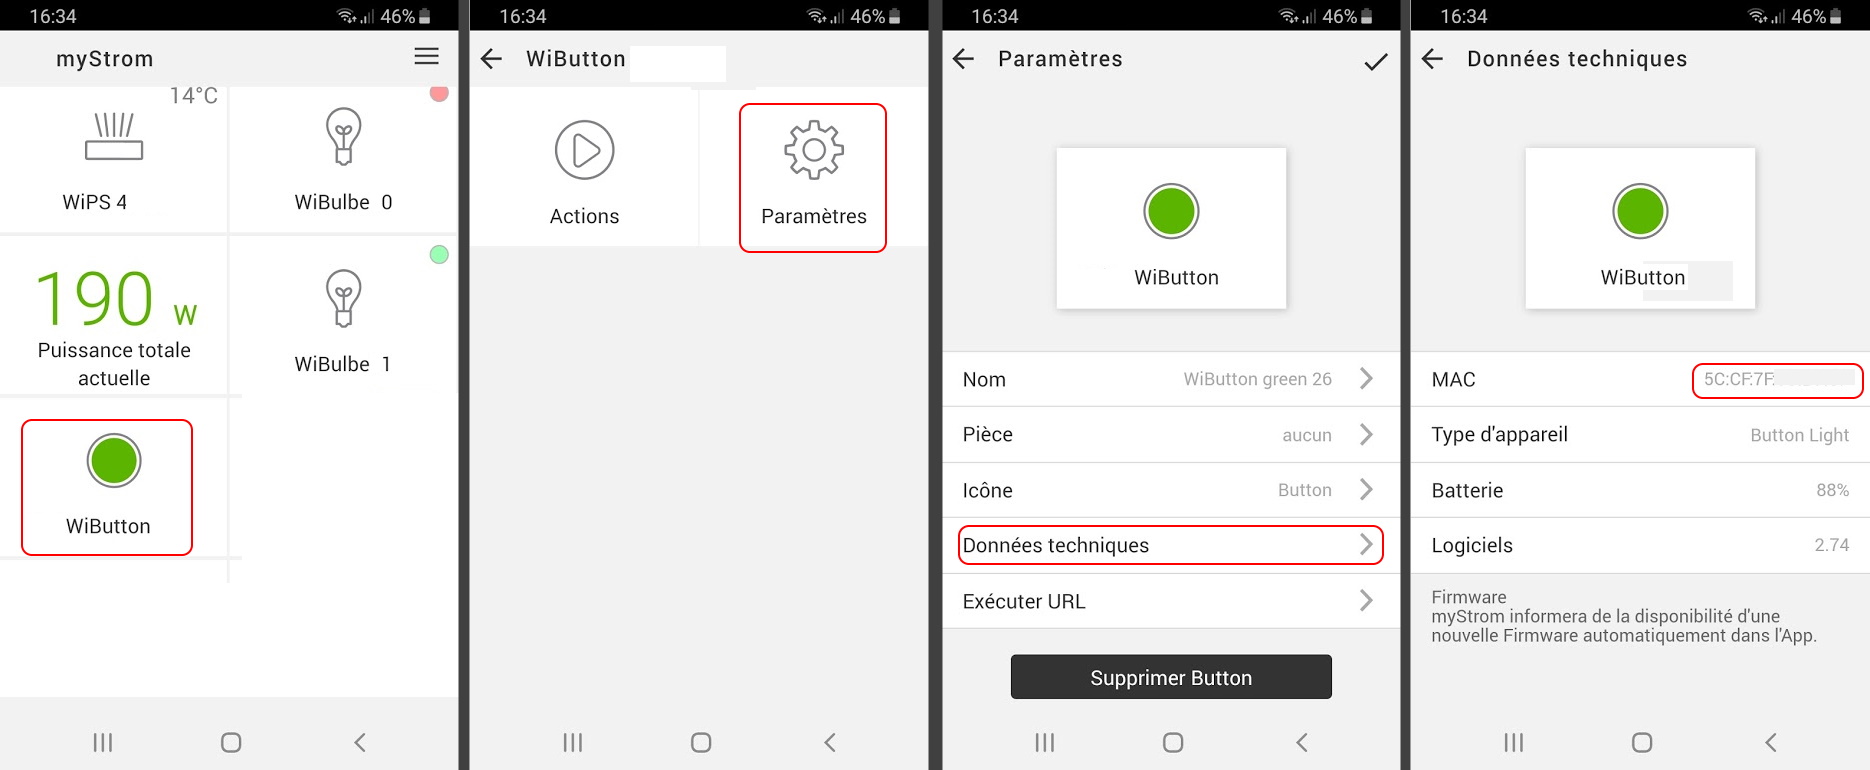
Please note the MAC address of your button. (only the numbers or letters). It will be know as [BUTTON_MAC]
You find this address on the purchase box or in myStrom application.
 or
or

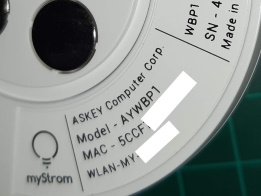
On a Button Plus, the MAC address is written on the bottom:
Identify the IP address of your wifi button. It will be known as [BUTTON_IP] .
Identify the IP address of this GATEWAY. It will be known as [GATEWAY_IP] .
Note that the port 8321 is the default port of the gateway and can be modified in the settings.json file.
The following command will erase the previous actions of the button (single , double , long click and touch) and replace them by a generic action.
The actions created in the app seem to be working independently.
Run the command :
curl -v -d "generic=get://[GATEWAY_IP]:8321/api/mystrom/gen&single=&double=&long=&touch=" http://[BUTTON_IP]/api/v1/device/[BUTTON_MAC]For the myStrom Wifi Button, the button has to be plugged to a charger and press to communicate with your Wifi.
For the myStrom Wifi Button +, you should remove the batteries and insert them again.
A positive setup should look like that:
*   Trying [BUTTON_IP]...
* TCP_NODELAY set
* Connected to [BUTTON_IP] ([BUTTON_IP]) port 80 (#0)
> POST /api/v1/device/[BUTTON_MAC] HTTP/1.1
> Host: [BUTTON_IP]
> User-Agent: curl/7.52.1
> Accept: */*
> Content-Length: 77
> Content-Type: application/x-www-form-urlencoded
>
* upload completely sent off: 77 out of 77 bytes
< HTTP/1.1 200 OK
< Pragma: no-cache
< Cache-Control: no-store, no-cache
< Access-Control-Allow-Origin: *
< Content-Type: application/json
< Content-Length: 126
< Connection: close
<
{
        "single": "",
        "double": "",
        "long": "",
        "touch": "",
        "generic": "get:\/\/[GATEWAY_IP]:8321\/api\/mystrom\/gen"
* Curl_http_done: called premature == 0
* Closing connection 0
The "\/" in the generic URL are normal.
Update and rename the "resources/settings.json.sample" into "resources/settings.json"
Please add the [BUTTON_MAC] and a short uniq name of your choice [CHOOSEN_NAME] in the section "button" or "buttons+" of the file "resources/settings.json". Personnally I have chosen the color of the rubber band as [CHOOSEN_NAME].
"button":{
		"123456789ABC" : {"name":"green"},
		"0123456789AB" : {"name":"orange"},
        "[BUTTON_MAC]" : {"name":"[CHOOSEN_NAME]"}
   },
For a button plus, you have to set the initial level [LEVEL] (as integer), the minimum [LEVEL_MIN] (as integer) and the maximum [LEVEL_MAX] (as integer). The [LEVEL] is controlled by the "wheel" event which is a difference between -127 and +127. It will increase to the [LEVEL_MAX] and decrease to the [LEVEL_MIN].
   "button+":{
		"3423456789AB" : {"name":"plus 1", "level_min": 0 , "level_max":255, "level":0},
        "[BUTTON_MAC]" : {"name":"[CHOOSEN_NAME]", "level_min": [LEVEL_MIN] , "level_max": [LEVEL_MAX], "level": [LEVEL]}
}Start the gateway with the command:
python3 mystrombutton2mqtt.py ./resources/settings.jsonThe following topics for each button will be published:
## The Discovery Topics
## --------------------
[PREFIX]/sensor/myStrom/[BUTTON_MAC]_battery/config
# only if it's a "Button Plus"
[PREFIX]/sensor/myStrom/[BUTTON_MAC]_wheel/config
[PREFIX]/sensor/myStrom/[BUTTON_MAC]_level/config

[PREFIX]/binary_sensor/myStrom/[BUTTON_MAC]_single/config
[PREFIX]/binary_sensor//myStrom/[BUTTON_MAC]_double/config
[PREFIX]/binary_sensor/myStrom/[BUTTON_MAC]_long/config
# only if it's a "Button Plus"
[PREFIX]/binary_sensor/myStrom/[BUTTON_MAC]_touch/config
[PREFIX]/binary_sensor/myStrom/[BUTTON_MAC]_final_wheel/config
[PREFIX]/binary_sensor/myStrom/[BUTTON_MAC]_level/config
## The state topics
## ----------------
myStrom/wifi_buttons/[CHOOSEN_NAME]_[BUTTON_MAC]/single
myStrom/wifi_buttons/[CHOOSEN_NAME]_[BUTTON_MAC]/double
myStrom/wifi_buttons/[CHOOSEN_NAME]_[BUTTON_MAC]/long
myStrom/wifi_buttons/[CHOOSEN_NAME]_[BUTTON_MAC]/battery
# only if it's a "Button Plus"
myStrom/wifi_buttons/[CHOOSEN_NAME]_[BUTTON_MAC]/touch
myStrom/wifi_buttons/[CHOOSEN_NAME]_[BUTTON_MAC]/wheel
myStrom/wifi_buttons/[CHOOSEN_NAME]_[BUTTON_MAC]/wheel_final
myStrom/wifi_buttons/[CHOOSEN_NAME]_[BUTTON_MAC]/level
[PREFIX] will be the prefix you specify in the ./resources/settings.json
For HomeAssistant, according to the documentation, the default discovery prefix is homeassistant
On Home Assistant, you should have the same [MQTT_BROKER_IP] in your "configuration.yaml":
mqtt:
  broker: [MQTT_BROKER_IP]
  discovery: true
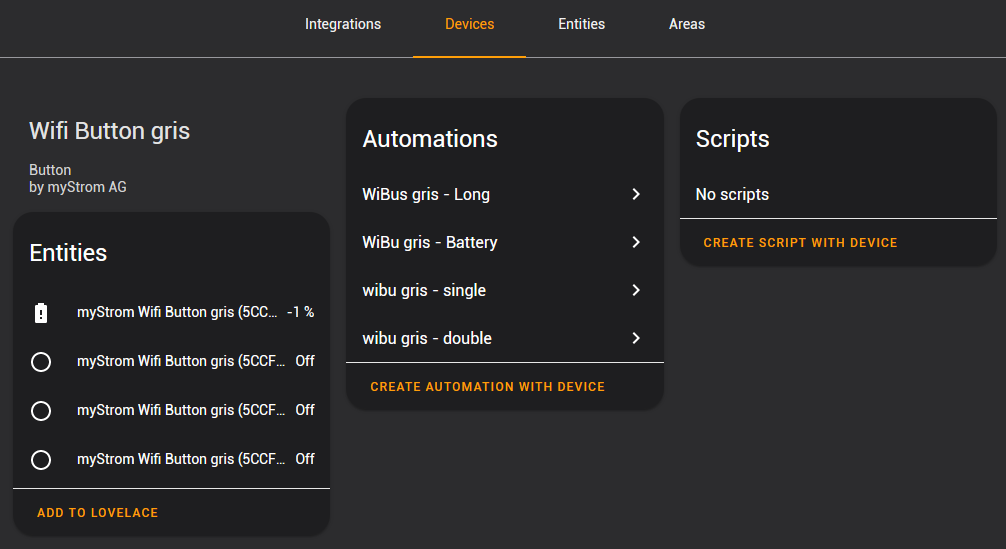
Once the gateway started, Home Assistant will show the button(s) in "Configuration" > "Devices" as "Wifi Button [CHOOSEN_NAME]" with "MQTT" in the integration column and "myStrom AG" as the manufacturer
The battery information will be updated after each button action or every 12 hours when the button does a heartbeat.
If you run the gateway on a raspberry pi, you may want to run it as a service. To do so, create a file:
sudo vi /lib/systemd/system/mystrombutton2mqtt.servicePaste this code and replace the [DIRECTORY_PATH] by the correct one:
[Unit]
Description=myStrom Wifi Buttons 2 MQTT Gateway Service
After=multi-user.target
Conflicts=getty@tty1.service

[Service]
Type=idle
User=pi
WorkingDirectory=[DIRECTORY_PATH]
ExecStart=/usr/bin/python3 [DIRECTORY_PATH]/mystrombutton2mqtt.py [DIRECTORY_PATH]/resources/settings.json
KillSignal=SIGINT
Restart=always

[Install]
WantedBy=multi-user.target
Enable the service:
sudo systemctl enable mystrombutton2mqtt.serviceStart the service:
sudo systemctl start mystrombutton2mqtt.serviceCheck if it's active:
sudo systemctl status mystrombutton2mqtt.serviceThe included Dockerfile will build a basic image off python:3. Running docker-compose up will build and start the image, and will mount the resources/settings.json file.
You can use the CREATE AUTOMATION WITH DEVICE UI Automation Generator.
Under Do something when..., the useful choices are:
- myStrom Wifi Button [CHOOSEN_NAME] ([BUTTON_MAC]) single turned on
- myStrom Wifi Button [CHOOSEN_NAME] ([BUTTON_MAC]) double turned on
- myStrom Wifi Button [CHOOSEN_NAME] ([BUTTON_MAC]) long turned on
- myStrom Wifi Button [CHOOSEN_NAME] ([BUTTON_MAC]) touch turned on (Button plus only)
- myStrom Wifi Button [CHOOSEN_NAME] ([BUTTON_MAC]) battery battery level changed
the device_id: 240e4c5a16da4b96a45e060b184ed880, platform: device and type: turn_on have been added by the UI Automation Generator. Written manually, they would be replaced by: platform: state and to: "on"
- id: 'wibu_gris_single'
  alias: wibu gris - single
  description: ''
  trigger:
  - device_id: 240e4c5a16da4b96a45e060b184ed880
    domain: binary_sensor
    entity_id: binary_sensor.mystrom_wifi_button_gris_5ccf56789abc_single
    platform: device
    type: turned_on
  condition: []
  action:
  - data:
      message: Click once
service: notify.telegram- id: 'wibu_gris_double'
alias: wibu gris - double
description: ''
trigger:
- device_id: 240e4c5a16da4b96a45e060b184ed880
domain: binary_sensor
entity_id: binary_sensor.mystrom_wifi_button_gris_5ccf56789abc_double
platform: device
type: turned_on
condition: []
action:
- data:
message: Click twice
service: notify.telegram- id: 'wibu_gris_long'
alias: WiBus gris - Long
description: ''
trigger:
- device_id: 240e4c5a16da4b96a45e060b184ed880
domain: binary_sensor
entity_id: binary_sensor.mystrom_wifi_button_gris_5ccf56789abc_long
platform: device
type: turned_on
condition: []
action:
- data:
message: Long click
service: notify.telegramFor the battery event, as the battery dicovery value is -1, make sure to set above : -1 in the trigger if you want to be notified when to recharge/change the battery:
- id: 'wibu_gris_battery'
  alias: WiBu gris - Battery
  description: ''
  trigger:
  - above: -1
    below: 20
    device_id: 240e4c5a16da4b96a45e060b184ed880
    domain: sensor
    entity_id: sensor.mystrom_wifi_button_gris_5ccf56789abc_battery
    platform: device
    type: battery_level
  condition: []
  action:
  - data:
      message: Please recharge the gray button!!!
service: notify.telegram- id: 'wibu_plus_touch'
alias: WiBus Plus - Touch
description: ''
trigger:
- device_id: 240e4c5a16da4b96a45e060a184ed880
domain: binary_sensor
entity_id: binary_sensor.mystrom_wifi_button_plus_5ccf56789aaa_long
platform: device
type: turned_on
condition: []
action:
- data:
message: Long click
service: notify.telegramYou could use _myStrom Wifi Button plus ([BUTTON_MAC]) Wheel final turned on _, but the event is fired by the button quite long after the wheel action is finished. But if you want a real time action for adjusting the brightness of a light, you can add in your automations.yaml:
- id: wibu_plus_level
  alias: wibu plus - Level
  trigger:
  - entity_id: sensor.mystrom_wifi_button_plus_5ccf56789aaa_level
    platform: state
  condition: []
  action:
  - data_template:
      brightness: '{{ states(''sensor.mystrom_wifi_button_plus_5ccf56789aaa_level'')|int }}'
    entity_id: light.dimmable_bulb
service: light.turn_onYou can find the the API doc here: https://api.mystrom.ch/?version=latest
This gateway has been tested with:
- PQWBB1 (Button light)
- AYWPB1 (Button Plus)


