-
Create a Big Query (BQ) GCP Project and download a service account key credentials json file with BQ access permissions. If you already have an existing GCP BQ Project but not a service account or a key credentials json file, see these for instructions on creating one. Download and save this file in your local directory as you will need this later to setup your
gitpod.iodbt workspace. -
(Optional) Install the Gitpod Chrome/Brave/Firefox browser extension/addon. This will add a Gitpod button on your main repository page that will conveniently open your github project in a
gitpod.ioworkspace. -
If you already have an existing DBT project on github, open the github project in gitpod.io using the Gitpod button on your github page. Note: You can also create a new branch or use an existing branch if you don't want to use the default branch to open in gitpod.io -- just add the
tree/<branch-name>to end of the gitpod url. -
If you don't have an existing dbt project but just want to try out using dbt on gitpod, create a new dbt project from an existing dbt project template repository. Then you can open this dbt project on gitpod.
-
As an alternative to clicking the gitpod button (i.e. you didn't install the browser extension), you can also open your github project in a gitpod workspace by using the url
https://gitpod.io/#<your-github-repo-url>(if you are not using the main branch, you can append the name of the branch of the repo (/tree/<branch-name>) to the end of the url).
Note: If your git repo is not hosted by Github, but is supported by gitpod (e.g. bitbucket and gitlab), please follow gitpod.io's instructions on how to load those repos into your gitpod workspace.

- Run the following command in your gitpod VS Code terminal window. This script will copy over some configuration files (including a gitpod configuration file called
.gitpod.yml).
curl -s https://raw.githubusercontent.com/butchland/dbt-gitpod-config/main/scripts/loadconfig | bash
- Edit the
gitpod-dbt-profiles.ymlconfiguration files to match your dbt profile. Make sure it is using the correct profile name (line 1) as theprofileproperty defined in yourdbt_project.ymlfile. Also check that thedatasetproperty is an existing BQ dataset in your GCP project. If you generated your dbt project from the sample dbt template linked above, they have been configured to match the default profile (sample_dbt_learn_project). Just make sure to create ajaffle_shopdataset in your GCP BQ project.

- Create a Gitpod workspace environment variable named
CREDENTIALS_JSONwith the scope limited to the project (usually<user-name>/<repo-name>). Copy the contents of your service account key credentials json file (which you should have created in step 1 of the Github and GCP BQ setup section) into the value of the environment variable.

-
Commit your new changes into git (i.e.
git add,git commit) and do agit pushto update your remote git repository. -
At this point, your dbt project is now configured for use in a gitpod workspace. You can close and delete the gitpod workspace instance of your project (since all the changes are now in your dbt project repo).

-
From your remote git repository web page, click the Gitpod button (if you installed the gitpod browser extension) or alternatively, open the url
https://gitpod.io/#<your-github-repo-url>. -
With
.gitpod.ymlin your project root directory, gitpod will now run the set of commands in the.gitpod.ymlfile to configure your environment for use with dbt, including the setup of a virtual python environment, your dbt profile, as well as other steps such as installing a default set of vscode extensions to make your gitpod vscode editor a powerful dbt development environment. -
The first run takes a little bit longer than the usual, as it takes additional steps to use it for the first time. See the gitpod documentation regarding these steps.
-
If you have setup everything correctly (including reloading the window to pickup the installation of the vscode extensions), there should be a VS Code browser showing the generated dbt documentation about your project.
-
You can setup the virtual environment
venv/bin/pythonas default python interpreter to be used by project. -
Open a new terminal and check if everything is setup correctly by running
dbt debug. If should return anOK Connectionsuccess message.

- You should now be able to run other
dbtcommands just like in a local dbt cli environment.
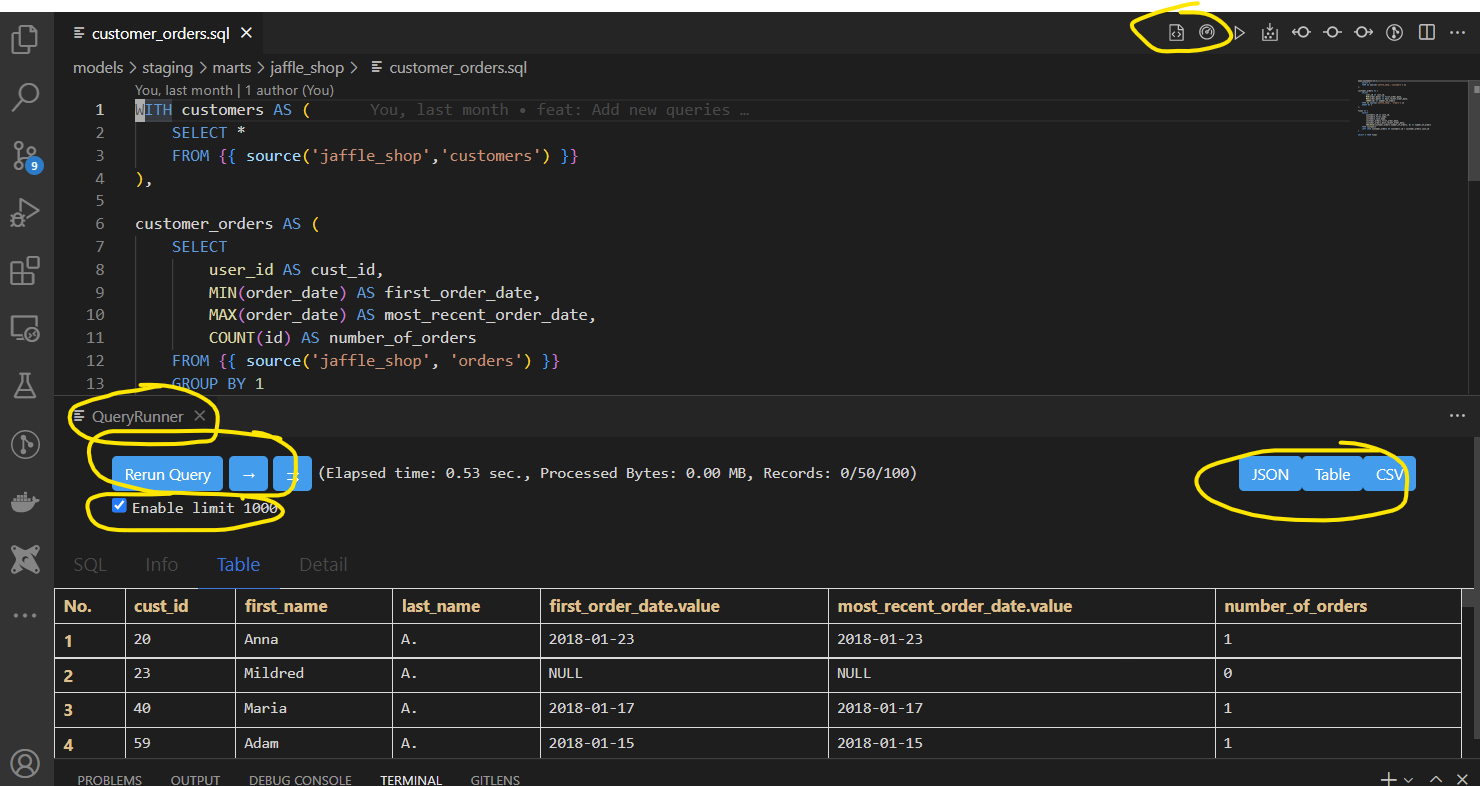
- Open a model or analysis sql file. There should be additional navigational menu buttons in the top right provided by the VS Code DBT Big Query Power User extension. You can trigger model compilation or run the sql as well as preview the results. Opening the query runner button runs the sql and previews the results of the sql. For more information, click here
Lastly, several additional VS Code extensions that improve your dbt development experience have also been installed in your workspace environment:
- vscode-dbt - VSCode Snippet Package for jinja and dbt
- sqlfluff - A linter and auto-formatter for SQLfluff, a popular linting tool for SQL and dbt
At this point, you should have a pretty powerful and productive online development environment that can rival your local development environment.
If you have comments or suggestions to improve this documentation, please file an issue on the tracker.