-
Notifications
You must be signed in to change notification settings - Fork 73
install
You need an Arduino connected to a PC with a working Arduino IDE. These directions are for Arduino v0023 and 1.0.
Since Bitlash is an Arduino library you upload with a sketch, you need to be comfortable uploading sketches. Get this working first to save debugging headaches. There is plenty of help over at the Arduino Forums.
The current version of Bitlash is available at the Download page.
You can also grab the latest development version using Git, and clone it right into your libraries directory using the recipe below.
NOTE: Back up your existing Bitlash directory first!
$ cd ~/Documents/Arduino/Libraries
$ mv bitlash/ bitlash-save/
$ git clone https://github.com/billroy/bitlash.git
Restart the Arduino IDE and you're good to go.
The Arduino Development Environment Guide specifies this procedure for installing third party libraries:
"To install these third-party libraries, create a directory
called libraries within your sketchbook directory. Then unzip
the library there."
There is also a post on the Arduino weblog with further explanation.
So, to install Bitlash,
-
Create a directory called libraries within your sketchbook directory
-
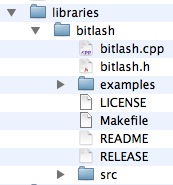
Unzip the download and copy or move the Bitlash distribution folder into the libraries folder you just created Rename the resulting folder to simply bitlash, if necessary, to remove the version number. You should end up with a folder setup that looks like this:

-
Restart the Arduino IDE; if all goes well, you will find the bitlash library listed in the Sketch / Import Library menu.
-
Select File / Examples / bitlash / bitlashdemo to open the demo sketch, then File / Upload to compile and upload it to your Arduino.
When your upload is complete, you are ready to connect to Bitlash. Proceed to the next section on Connecting.
Connect to the serial port at 57600 baud using whatever terminal emulator works for you. Here are some options:
- You can use the built-in Arduino Serial Monitor, but see the note below
- On Windows, HyperTerminal seems popular
- On OS X I use screen
- On Linux screen is available on most distributions
To use the Arduino "Serial Monitor" function with Bitlash, you must select "Carriage return" line ending handling option. The Bitlash demos use a baud rate of 57600.
Here is an example using the screen program in OS X to connect with Bitlash on a USB-connected Arduino. The /dev/tty.usb... part is the virtual serial port name that you can find in the Arduino Tools/Serial Port menu and the 57600 is the baud rate:
$ screen /dev/tty.usbserial-A7003pQ3 57600
bitlash 2.0 here! (c) 2012 Bill Roy -type HELP- 935 bytes free
>
Congratulations, you are up and running: Bitlash is listening for commands, as signified by the '>' prompt.
Now that you have a command prompt you can type a command, and press Enter.
Here is the usual Hello World example you might run as your first Bitlash program:
> print "Hello, world!"
Hello, world!
>
While you're there you might check the arithmetic:
> print 2+2
4
No discussion of "Hello, world!" for embedded systems would be complete without blinking an LED. This example shows how to build a complete Bitlash application using Bitlash functions and auto-start.
First it is necessary to introduce the concept of pin variables: Bitlash gives direct access to the digital IO pins via single-bit variables named d0, d1, d2, and so on. You can read a pin variable's value and print it like this:
> print d12
0
...and assign it like this:
> d13=1 * turn on pin 13
...though you must remember to set the pin mode if you want the port to be an output:
> pinmode(13,1)
So, returning to blink13, what we want is to toggle the pin periodically. Let's define a function named toggle13 to toggle the pin:
> function toggle13 {d13 = !d13;}
A function named toggle13 containing the Bitlash code "d13=!d13;" is defined and saved in EEPROM. When the function toggle13 runs, this program text sets pin d13 to the logical complement of its current value: if it was zero, it becomes one, and vice versa.
Now all we need is to arrange for toggle13 to be run at the desired toggle rate, let's say every 1000 milliseconds; and let's not forget to set pin 13 as an output. By using the special function name startup we designate this function to be automagically run at boot time, completing our application:
function startup {pinmode(13,1); run toggle13,1000;}
List our functions to make sure they're right using the ls command:
> ls
function toggle13 {d13 = !d13;};
function startup {pinmode(13,1); run toggle13,1000;}
>
You can invoke the startup function from the command line to test:
> startup
(the LED on pin d13 is blinking)
You can also restart to test the power-on startup:
> boot
bitlash here! v2.0...
(the LED on pin d13 is blinking)
Congratulations! If you get this far, you have a free-standing development environment on your Arduino.
You will very likely find it useful to proceed to the Documentation Index.
Happy Hacking!
Bitlash and this Bitlash documentation are Copyright 2012 by Bill Roy.