This repository contains a bunch of add-on actions that work with Dropzone 4. You can quick install most of these actions from a list of featured actions on our website here. All other untested actions can be installed from this page.
The API documentation for developing Dropzone 4 Add-on actions is provided below.
Table of Contents
- Introducing the Dropzone 4 API
- Developing an Action
- Action Debug Console
- Dragged Types
- Python Support
- Providing Status Updates
- Showing Alerts and Errors
- Getting Input
- Reading from the clipboard
- Adding items to Drop Bar via the API
- Pashua
- Saving and loading values
- Key Modifiers
- Copying Files
- Getting a temporary folder
- OptionsNIBs
- Included Ruby gems
- Bundling Ruby gems along with your action
- RubyPath metadata field
- CurlUploader Ruby library
- Customizing your actions icon
- Distributing your action
- Action Metadata
The general idea of a Dropzone action is that files or text will be dropped on the action and then the action will perform some useful function on the dropped items. This might be uploading the dropped files to a web service, renaming the files, resizing images, zipping files etc. The possible uses are limited only by your imagination.
A Dropzone action also accepts a click event so when you click on it in the Dropzone grid it does something: for example the Finder Path action copies the currently selected item path in Finder to the clipboard. The API outlined below describes how you can easily develop your own actions to use with Dropzone and then share these actions with others. Dropzone actions are developed in either Ruby or Python. If you haven't coded in Ruby or Python before then it would be a good idea to learn a little of either of these languages before attempting to create a Dropzone action. There's a good hands-on introduction to the Ruby language here and an introduction to Python here.
A Dropzone 4 action bundle is simply a directory with a .dzbundle extension. It must contain either an action.rb script (for Ruby actions) or an action.py script (for Python actions) and also an icon.png file that contains the default icon for the action. The bundle can also optionally contain other resources such as Ruby or Python libraries or executables. The action.rb or action.py file must have certain metadata at the top. Dropzone parses this metadata when you add the action.
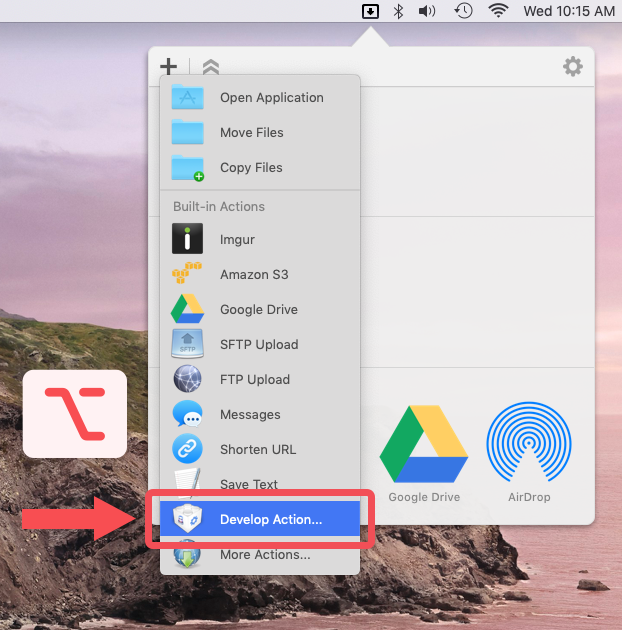
To develop a new Dropzone 4 action, click the white plus icon in the top left corner of the Dropzone grid and select 'Develop Action...'
Hold down the option key to make the 'Develop Action...' item appear.
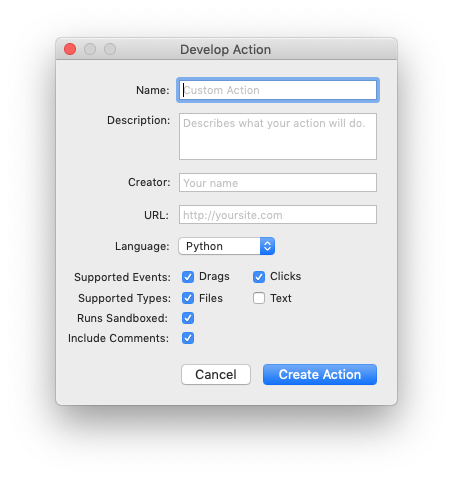
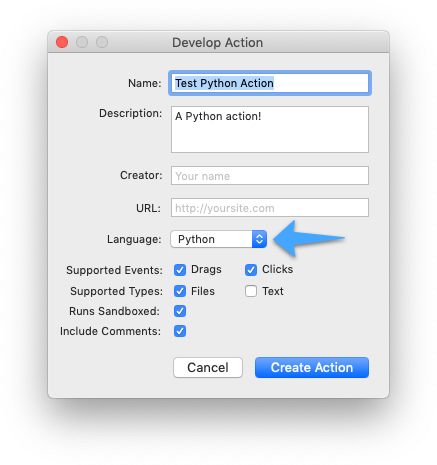
This will bring up the 'Develop Action' dialog shown below which allows you to configure your action:
The values entered here will be used to generate the metadata section at the top of the action.rb or action.py script. When you've chosen values appropriate for your action, click Create Action. This will open your default text editor with the newly generated script file and add the action to your Dropzone grid. The generated script file provides template code so you can easily get started. The generated Ruby template script is given below.
# Dropzone Action Info
# Name: Custom Action
# Description: Describes what your action will do.
# Handles: Files
# Creator: Your name
# URL: https://yoursite.com
# Events: Clicked, Dragged
# KeyModifiers: Command, Option, Control, Shift
# SkipConfig: No
# RunsSandboxed: Yes
# Version: 1.0
# MinDropzoneVersion: 4.0

def dragged
  puts $items.inspect

  $dz.begin("Starting some task...")
  $dz.determinate(true)

  # Below lines tell Dropzone to update the progress bar display
  $dz.percent(10)
  sleep(1)
  $dz.percent(50)
  sleep(1)
  $dz.percent(100)

  # The below line tells Dropzone to end with a notification center notification with the text "Task Complete"
  $dz.finish("Task Complete")

  # You should always call $dz.url or $dz.text last in your script. The below $dz.text line places text on the clipboard.
  # If you don't want to place anything on the clipboard you should still call $dz.url(false)
  $dz.text("Here's some output which will be placed on the clipboard")
end

def clicked
  # This method gets called when a user clicks on your action
  $dz.finish("You clicked me!")
  $dz.url(false)
end
At the top of the file is the generated metadata. The purpose of each metadata option is described in the Action Metadata section.
In the template action you will notice that two Ruby methods have been created for you. The dragged method is called by Dropzone when items are dragged onto your action and the clicked method is called when your action is clicked on in the grid.
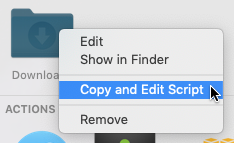
The other way you can develop a new action is by right clicking on an existing action in the grid and clicking 'Copy and Edit Script' - This will duplicate the underlying action bundle as a new action and open the duplicated action for editing. This is useful if you want to create an action with a similar purpose to an existing action but with some modifications. This is a great way to see how other actions work and to get code snippets that might be useful in your own actions. Note that 'Copy and Edit Script' is not available for all actions.
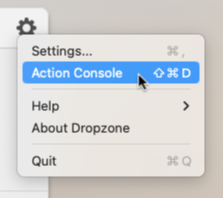
The action debug console makes it quick and easy to view the output and environment of your action. To open the action debug console, click on the Settings gear in the top right of the Dropzone grid, hold down the option key and click 'Action Console' - you can also open it by first clicking the Dropzone menu item so Dropzone gets keyboard focus and then pressing Cmd+Shift+D
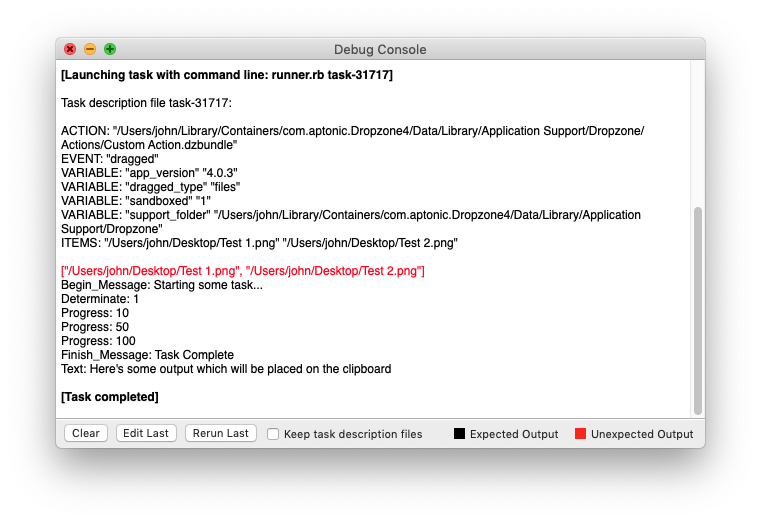
The screenshot above shows the action debug console after dropping two files onto the template action (the code for this is given in the above section). When a task is run, Dropzone creates a task description file that contains all the needed info to start the task. The runner.rb Ruby script (located inside the Dropzone.app application bundle at Contents/Actions/lib/runner.rb) then reads this task description file, sets environment variables and then calls the appropriate method in your action.rb or action.py script. The task description file contents are output in the debug console when running a task.
In the above example, the task description file contents were:
ACTION: "/Users/john/Library/Application Support/Dropzone 4/Actions/Custom Action.dzbundle"
EVENT: "dragged"
VARIABLE: "support_folder" "/Users/john/Library/Application Support/Dropzone 4"
VARIABLE: "dragged_type" "files"
ITEMS: "/Users/john/Desktop/Test2.jpeg" "/Users/john/Desktop/Test.jpeg"
The ACTION and EVENT fields are used by runner.rb to determine which action bundle to use and which method to call in your script. The VARIABLE fields can be accessed in your script using the ENV['variable_name'] global.
Note that output that was recognized and processed by Dropzone is shown in black (this is output that was generated from calling the $dz methods) while unrecognized output is shown in red. This is useful when debugging your script as if you use puts to output something for debugging purposes you can easily see it. Also, if your action causes a Ruby exception then the action debug console will be shown automatically and the backtrace will be shown in red so you can fix the issue.
Clicking on the 'Edit Last' button will open the last run action script in your text editor and clicking 'Rerun Last' runs the last run task again with the same items, drag type and variables. This makes developing and debugging actions faster and easier.
If your action supports the dragged event, then you must specify the types of content your action can handle in the metadata as follows:
Handle files only
# Handles: FilesHandle strings of text only
# Handles: TextHandle both files and strings of text
# Handles: Files, TextIf you specify files then the user will only be allowed to drag files onto your action. If you specify text then the user will only be allowed to drag strings of text onto your action. If you specify both types, then either type may be dragged and your action will need to determine the type as follows:
case ENV['dragged_type']
  when 'files'
  # Code to handle dragged files goes here
  # $items is an array of the dragged filenames
  when 'text'
  # Code to handle dragged text goes here
  # $items[0] is the dragged string of text
endThe easiest way to develop a new Python action is to click the white plus in the top left of the grid and choose the 'Develop Action...' item and then select 'Python' from the language drop down as shown below:
This would result in the following example action.py:
# Dropzone Action Info
# Name: Test Python Action
# Description: A Python action!
# Handles: Files
# Creator: Your name
# URL: https://yoursite.com
# Events: Clicked, Dragged
# KeyModifiers: Command, Option, Control, Shift
# SkipConfig: No
# RunsSandboxed: Yes
# Version: 1.0
# MinDropzoneVersion: 4.0

import time

def dragged():
    print(items)

    dz.begin("Starting some task...")
    dz.determinate(True)

    dz.percent(10)
    time.sleep(1)
    dz.percent(50)
    time.sleep(1)
    dz.percent(100)

    dz.finish("Task Complete")

    dz.text("Here's some output which will be placed on the clipboard")

def clicked():
    dz.finish("You clicked me!")
    dz.url(False)
Like the Ruby API, you can call the Dropzone API methods on the global dz object. All the $dz Ruby API methods documented in the following sections can also be called from Python, the only difference is you should remove the $ sign from the front of the dz, so instead of doing:
$dz.begin("Starting some task...")For Python actions you should do:
dz.begin("Starting some task...")To output debug info to the Dropzone action debug console you should use the Python print() function rather than the puts() function used in Ruby.
For example:
print("This text will be output to the Dropzone debug console from a Python action")If the Python action you're writing uses an OptionsNIB to get additional info from the user when setting up the action, you can access these set variables by using:
import osAnd then:
os.environ['variable_name']Here's an example action.py that requires a username and password when adding it and then prints these set variables to the Dropzone action debug console when you click it.
# Dropzone Action Info
# Name: Python OptionsNIB Test
# Description: Shows how to access OptionsNIBs variables when using Python.
# Creator: Your name
# URL: https://aptonic.com
# OptionsNIB: Login
# Events: Clicked
# SkipConfig: No
# RunsSandboxed: Yes
# Version: 1.0
# MinDropzoneVersion: 4.0

import time
import os

def clicked():
    print os.environ['username']
    print os.environ['password']
dz.url(False)Dropzone comes bundled with Python 3.10 and it uses this internally bundled version to run actions.
You can override the Python version Dropzone uses to run your action by using the PythonPath metadata option. You can use this as follows:
# PythonPath: /usr/local/bin/python3Adding that line in your action metadata would tell Dropzone to run your action with the Python located at /usr/local/bin/python3. Note that specifying your own Python version will mean that the action will only work on your own system and you will not be able to share it with others.
Your action can optionally call API methods to provide status updates to Dropzone so that the user can monitor the progress of your action using the in grid progress bars and text - For example if your action uploaded data to a server then you can call the below methods to inform the user about the progression of the upload. You can provide these status updates by calling methods on the $dz global which is an instance of the Dropzone class. This global is setup for you when Dropzone calls your script. The methods for providing status updates from your script are outlined below:
Tells Dropzone to show a new task status progress bar in the grid and to set the label above the progress bar to the specified message. You can call this method multiple times as your action runs to update the displayed text.
Example
$dz.begin("Running task...")Value may be either true or false. Determinate mode (true) indicates that you will be providing progress information to Dropzone from your script as a percent and indeterminate mode (false) means that no progress information will be provided.
You can switch between determinate and indeterminate modes as your script executes. For example, you might choose to resize some images and then upload them to a server - you may not be able to provide progress information as the images are resized, but you can provide progress information while uploading them to a server. Therefore you would tell Dropzone to use indeterminate mode initially and then switch to determinate mode once you begin uploading. You should use determinate mode and provide progress information when possible.
Examples
$dz.begin("Running task...")
$dz.determinate(false)$dz.begin("Running task...")
$dz.determinate(true)
$dz.percent(50)Value is an integer value between 0 and 100. Dropzone updates the task progress bar to reflect this value. You only need to call this method when in determinate mode.
Example
$dz.percent(50)Shows a notification center notification that the task is finishing with the given message. To actually end the task and remove the task status bar from the grid you have to call $dz.url after this.
Example
$dz.finish("Task Complete")Sets a URL to be placed on the pasteboard. This is useful for writing actions that result in content being made available at a URL so a user can quickly paste the URL into other applications. You can optionally provide a title for the URL that will be shown in the Recently Shared popup menu. If you don't specify a title then the first dragged filename will be used or the truncated text if text was dragged.
If you do not wish to specify a URL, you must still call either this method with false as the argument or $dz.text. Calling this method causes the task status bar to be removed from the grid and the task resources to be cleaned up. You should only call this method once and it should be the last method your action calls.
Examples
The following would result in the URL http://aptonic.com being placed on the pasteboard:
$dz.url("http://aptonic.com")You can use the following if you do not wish to provide a URL:
$dz.url(false)You can optionally provide a title for the URL for the Recently Shared popup menu:
$dz.url("http://aptonic.com", "Aptonic")You can use this in place of $dz.url. It behaves exactly the same except that it does not attempt to encode the argument as a URL so you can place raw strings of text on the pasteboard.
Example
The following would result in the raw string 'This is a test string that will not be URL encoded' being placed on the pasteboard:
$dz.text("This is a test string that will not be URL encoded")Shows a notification center notification that the task failed. Also terminates the task and makes a cross show in the status item to indicate task failure. If you call this you don't need to call $dz.url or $dz.text after.
Example
$dz.fail("Error uploading file")Shows a popup alert box with the given title and message.
Example
$dz.alert("Alert Title", "Some informative text...")Shows a popup error box with the given title and message.
Example
$dz.error("Error Title", "An error occurred...")Note that calling $dz.error results in your script terminating immediately while calling $dz.alert allows you to display a message and then continue execution of your script.
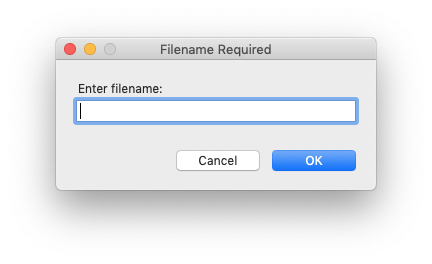
Shows an input box with the given title and prompt text. If no input is entered or the Cancel button is clicked the script exits and calls $dz.fail with an appropriate message. The field_name parameter is optional and is used if the user doesn't enter any input to show a '#{field_name} cannot be empty.' $dz.fail message. The field_name parameter defaults to 'Filename'
Example
filename = $dz.inputbox("Filename Required", "Enter filename:")Returns the current clipboard contents.
Example
clipboard_contents = $dz.read_clipboardYou can add items to Drop Bar using the API. This can be useful if your action produces a file output - Call this method to make the output file available for easy dragging somewhere else. Note that Drop Bar just keeps references to files and not the files themselves so a file needs to exist somewhere else on the filesystem for it to be added to and dragged out of Drop Bar.
To add a file to Drop Bar, simply call the $dz.add_dropbar method with an array of files you want to add. A new Drop Bar will be created in the Dropzone grid with the file(s) that you pass to this method.
Ruby Example
file_paths = [File.expand_path('~') + "/Pictures/test.jpg"]
$dz.add_dropbar(file_paths)
Or to add multiple files to a new Drop Bar:
file_paths = [File.expand_path('~') + "/Pictures/test.jpg", File.expand_path('~') + "/Pictures/test2.jpg"]
$dz.add_dropbar(file_paths)
This API method also works from Python. Simply remove the $ sign from the dz as explained in the Python Support section.
Pashua is an application bundled with Dropzone that allows the use of common UI controls such as text input, buttons, checkboxes, dropdown selection boxes and more. Pashua has many possible uses in a Dropzone action, for example, the 'Save Text' action that ships with Dropzone uses Pashua to popup a dialog box to get the desired filename.
You can launch Pashua by calling $dz.pashua(arguments) where arguments is a string with the arguments to be passed to the Pashua command line tool.
Examples
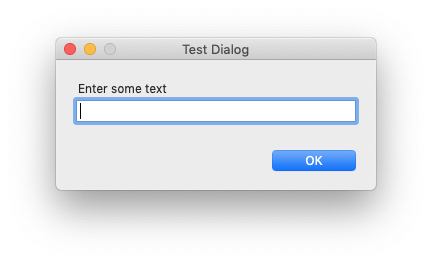
Here's an example of how you can use it to prompt for some text in a Dropzone action:
In Ruby:
config = "
*.title = Test Dialog
p.type = textfield
p.label = Enter some text
"
result = $dz.pashua(config)
In Python:
config = """
*.title = Test Dialog
p.type = textfield
p.label = Enter some text
"""
result = dz.pashua(config)
Would result in:
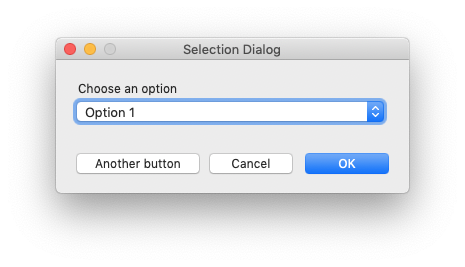
Here's another example that uses Pashua to show a popup selection box:
In Ruby:
config = "
*.title = Selection Dialog
p.type = popup
p.label = Choose an option
p.width = 310
p.option = Option 1
p.option = Option 2
p.option = Option 3
cb.type = cancelbutton
b.type = button
b.label = Another button
"
result = $dz.pashua(config)
puts result['p']
In Python:
config = """
*.title = Selection Dialog
p.type = popup
p.label = Choose an option
p.width = 310
p.option = Option 1
p.option = Option 2
p.option = Option 3
cb.type = cancelbutton
b.type = button
b.label = Another button
"""
result = dz.pashua(config)
print result['p']
Would result in:
The users choice would be printed in the Dropzone debug console (open the grid and press Cmd+Shift+D to open the console). If you want to know if the button labelled ‘Another button’ was clicked instead, you can check this as follows:
In Ruby:
if result['b'] == '1'
  puts "Another button clicked!"
end
In Python:
if result['b'] == '1':
  print "Another button clicked!"
Or to check if the user clicked the cancel button:
In Ruby:
if result['cb'] == '1'
  puts "User cancelled!"
end
In Python:
if result['cb'] == '1':
  print "User cancelled!"
The full Pashua documentation is available here. Also see the blog post announcing Pashua support in Dropzone here.
Your action can store string values in the Dropzone database by calling $dz.save_value(value_name, value). This is useful for storing configuration for your action - e.g. when your action first runs you could use Pashua to prompt for a setting and then store the result. When your action is next run, all saved values are set as environment variables and can be accessed using ENV['stored_value_name'] in Ruby or os.environ['stored_value_name'] in Python. You can see which variables were set in the debug console each time your action is run. If the user has multiple instances of your action setup in the grid, the stored values are unique to each instance.
Example
Saving a value:
$dz.save_value('username', 'john')Outputting the saved value to the debug console:
In Ruby:
puts ENV['username']In Python:
import os
print os.environ['username']
You can also remove values stored for a grid action by doing $dz.remove_value(value_name). For example to delete the stored value in the above example you could do the following:
$dz.remove_value('username')If the user holds down a modifier key while dragging items onto your action and you have specified in your scripts metadata that the modifier key is supported then the symbol for the held modifier is overlaid on your action as shown above. The ENV['KEY_MODIFIERS'] environment variable is also set with the held modifier for your script to access. You can specify that your action supports multiple key modifiers by specifying each supported modifier delimited by a comma, however only one key modifier may be used at a time.
To support key modifiers, in your action metadata at the top of action.rb add a line like the example below with a comma separated list of the modifiers your action supports:
# KeyModifiers: Command, Option, Control, ShiftThen in your action.rb dragged method access the held key modifier as follows:
puts ENV['KEY_MODIFIERS']The above line would output the held key modifier to the debug console.
As copying files is a common thing to need to do in a Dropzone action - e.g. to resize some images and then copy them to a folder, a Ruby library is provided by Dropzone that handles this for you. An advantage of using the Rsync library to copy files is that it also prompts the user to cancel or replace if a file they are copying already exists at the destination. This library is automatically loaded for you by runner.rb.
You can call it as follows:
Rsync.do_copy(files, destination, remove_sent)To see an example of this in use, add a 'Copy Files' action to your grid, right click it and do 'Copy and Edit Script'
If your action needs to store files in a temporary location you can use $dz.temp_folder to get return a path that is writeable by both the sandboxed and unsandboxed versions of Dropzone.
Example
puts $dz.temp_folderWould output /Users/john/Library/Application Support/Dropzone 4/Temp to the debug console. The output path will be different on your system.
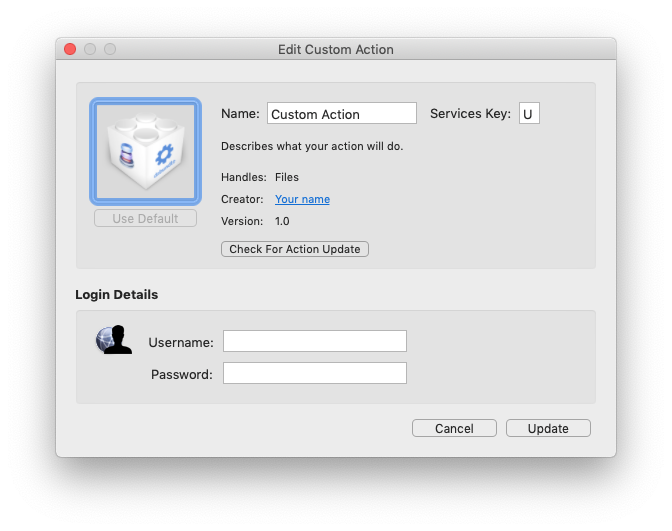
Some actions may require additional information from the user, such as login details, API keys or a folder path in order to work. Dropzone provides a way to collect this information by loading an additional interface into the 'Add Action' panel when a user adds your action to the Dropzone grid. When Dropzone runs your action, environment variables are set with the information collected in the OptionsNIB.
The currently available OptionsNIBs are Login, ExtendedLogin, APIKey, UsernameAPIKey, ChooseFolder, ChooseApplication and GoogleAuth. To use an OptionsNIB, you need to add a line to the metadata section like below:
# OptionsNIB: LoginYou will need to reload your grid actions for this metadata change to take effect. Click the Dropzone menu item and press Cmd+R to reload action metadata. The above would show the below panel with username and password fields when adding or editing the action:
When your action is run, the values would then be available from the environment variables as follows:
| Field | Environment Variable |
|---|---|
| Username | ENV['username'] |
| Password | ENV['password'] |
The following Ruby gems are distributed along with the Dropzone application bundle and made available for actions to use:
- rest-client - Simple HTTP and REST client for Ruby
- httparty - Makes http fun again!
- faraday - Faraday is an HTTP client lib that provides a common interface over many adapters (such as Net::HTTP)
- excon - Usable, fast, simple Ruby HTTP 1.1
- aws-sdk - AWS SDK for Ruby
- multi_json - A generic swappable back-end for JSON handling
- google-api-client - Access many different Google APIs. Currently used by the Google Drive and YouTube actions.
You can find examples and documentation for these gems from the links above.
Require the above gems at the top of action.rb to use them. Here is an example action (excluding the required metadata) that retrieves the URL http://example.com using the included rest-client gem and prints it to the Dropzone debug console:
require 'rest-client'

def clicked
  puts RestClient.get 'http://example.com'
endIf your action needs gems that are not included with Dropzone then you can download and run this bundle-gems.sh script to download the gems listed in a Gemfile into your action bundle. You must have the bundler gem installed to use this script, you can install bundler by running:
gem install bundlerBelow is an example of using this script to download the Chunky PNG gem into an action bundle:
First create the Gemfile inside the action bundle with the following:
source 'https://rubygems.org'
gem 'chunky_png'
Now run bundle-gems.sh with the action path to download the gems into the bundle:
$ ./bundle-gems.sh ~/Library/Application\ Support/Dropzone\ 4/Actions/Custom\ Action.dzbundle/
Add the following require statement after the action metadata before requiring your bundled gems:
require './bundler/setup'Note the ./ in front of the bundler/setup. This is important as it ensures that the bundler setup.rb inside your action bundle is required rather than the one included with Dropzone to support the included gems.
Now require the gem:
require 'chunky_png'Dropzone comes bundled with ruby 2.6.8 and it uses this internally bundled version to run actions.
You can override the used Ruby version by specifying the RubyPath metadata field in your action metadata. For example you could specify a custom ruby version you installed using rvm:
# RubyPath: /Users/john/.rvm/rubies/ruby-2.2.0/bin/rubyNote that specifying your own Ruby version will mean that the action will only work on your own system and you will not be able to share it with others.
Some web services (such as Imgur) allow you to upload a file by posting it to a particular URL. To achieve this, Dropzone provides a Ruby wrapper around the curl command line tool included with macOS.
Here's an example that uses the CurlUploader library to upload an image to Imgur. Action metadata is not shown (the below would also need # OptionsNIB: Imgur specified in the metadata as this causes the client_id environment variable required by Imgur for anonymous uploading to be set). You can change the upload_url and other options as needed to work with your own web service.
require 'curl_uploader'

def dragged
  uploader = CurlUploader.new
  uploader.upload_url = "https://api.imgur.com/3/upload"
  uploader.file_field_name = "image"
  uploader.headers["Authorization"] = "Client-ID #{ENV['client_id']}"
  results = uploader.upload($items)

  $dz.finish("URL is now on clipboard")
  $dz.url(results[0][:output]["data"]["link"])
end
When dragging a file onto an action with the above, the CurlUploader library runs the following command using IO.popen:
/usr/bin/curl -# -H "Authorization: Client-ID AUTH_ID" -F "image=@/Users/john/Desktop/test.png" "https://api.imgur.com/3/upload" 2>&1 | tr -u "\r" "\n"
The output from this command is processed line by line by the CurlUploader library and $dz.percent calls are made automatically so that Dropzone displays the upload progress.
The result after uploading with curl is an array of hashes with the keys :output and :curl_output_valid for every path uploaded. :output is a hash created by treating the curl output as JSON. :curl_output_valid is set to true if a certain string is found in the output. The starting string also gives CurlUploader a string from which to start processing output from. This starting string defaults to '"success'" but it can be set as follows:
uploader.output_start_token = '"success"'Here's an example of the results array after uploading two images successfully to Imgur (with some keys removed for brevity).
results = uploader.upload($items)
puts results.inspect[{:output => {"data" => {"link" => "http://i.imgur.com/rTfVPbqx.png"}, :curl_output_valid => true},
{:output => {"data" => {"link" => "http://i.imgur.com/TghcXsze.png"}, :curl_output_valid => true}]If required you can specify extra POST variables (for example if the web service required you to post extra variables for authentication, such as an API key) by setting post_vars with a hash of the variables you wish to set. An example of this is given below.
uploader.post_vars = {:api_key => ENV['api_key']}The same applies for setting headers, simply set uploader.headers to a hash with the required headers as shown in the first example.
You can view the source code for the CurlUploader library inside the Dropzone 4 application bundle at 'Dropzone 4.app/Contents/Actions/lib/curl_uploader.rb'
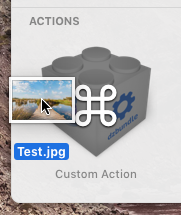
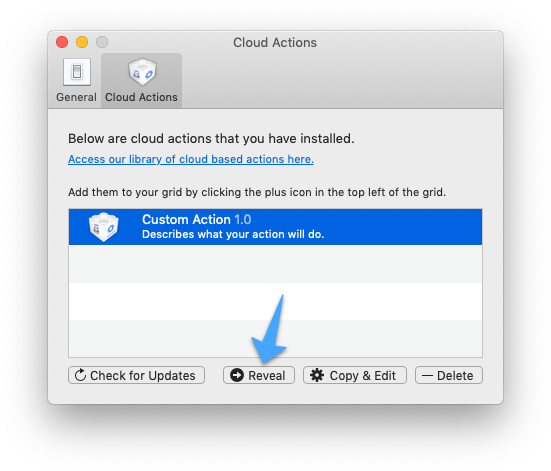
There needs to be an icon.png file inside your action bundle. This icon is used as the default action icon when your action is added to the grid. This icon should ideally be at least 300x300px in size. The maximum size action icons can be displayed in the grid is 150x150 but when in retina display modes this is doubled to 300x300. You can change the icon for your action by going into the Dropzone preferences, opening the User Actions tab and clicking the Reveal button to show your Action bundle in the Finder. You then right click the bundle and click 'Show Package Contents' and drag a new icon.png into the bundle. This is illustrated below:
Dropzone 4 action distribution is done via GitHub. You should clone this repository, copy your dzbundle into it and send a GitHub pull request. To copy your action, Reveal it in the Finder from the User Actions tab in the Preferences and then copy it into your cloned copy of this repository. After your pull request is merged, within 24 hours your action can be automatically installed from a link like http://aptonic.com/actions/install.php?bundle_name=Bundle%20Name where Bundle%20Name is the URL encoded name of your action bundle. Your action will also appear on the untested actions page automatically.
In order to make your action updatable, you must add a UniqueID metadata field with a random numeric ID before releasing it. To release an update for your action: make your changes, increment the version number in the action metadata then send a pull request with your action to this repository. Users will then be automatically updated to the newest version of your action.
If you do not wish to distribute your action bundle this way then you can simply zip up the bundle and distribute it manually. Users can install it by unzipping it and double clicking it or dragging it to the Add to Grid area.
At the top of your action.rb file is the metadata section that was generated when you clicked 'Create Action'
The metadata block must begin with the line:
# Dropzone Action InfoAnd this must be the first thing at the top of the file.
All recognized metadata options are described below:
| Field | Explanation | Required |
|---|---|---|
| Name | Provides the name for your action. | Yes |
| Description | Describes what your action does. | Yes |
| Handles | Can be either "Files" or "Text" or "Files, Text" to handle both files and text. | Yes |
| Events | Can be either "Dragged" or "Clicked" or "Dragged, Clicked" to handle both clicks and drags. If not specified then defaults to handling both clicks and drags. |
No |
| Creator | Your name or company which will be shown when adding the action. | Yes |
| URL | Your URL which will be shown and linked to when adding the action. | Yes |
| OptionsNIB | A optional configuration view that can be shown when adding the action to collect needed info such as a username, password or API key Currently available OptionsNIBs are: Login, ExtendedLogin, APIKey, UsernameAPIKey, ChooseFolder and ChooseApplication. See the OptionsNIBs section for an explanation of how to use these. |
No |
| OptionsTitle | An optional title to display above the configuration view when using an OptionsNIB. You can provide a string for this such as "Service Login Details". | No |
| SkipConfig | If your action doesn't use an OptionsNIB then it's best to set this to Yes. It makes your action get added directly to the grid without showing the configuration panel first. The configuration panel is shown by default if this option is not specified. | No |
| SkipValidation | Allows you to disable validation of fields for an OptionsNIB. For example if you specified the Login OptionsNIB then when the user goes to add the action they would be required to enter both a username and password. If you wanted to disable validation and make these fields optional then you would set this metadata field to Yes. It defaults to No (validation required). | No |
| RunsSandboxed | If your action does things that are incompatible with macOS sandboxing (such as running AppleScript or writing to arbitrary directories) then set this to No. Users of the non-Mac App Store version of Dropzone 4 will be able to run your action as normal but users of the Mac App Store version of Dropzone 4 will be prompted to transition to the non-Mac App Store version of the app. | Yes |
| UniqueID | A random number that uniquely identifies your action. When Dropzone updates an action it checks that the UniqueID matches so that the updater doesn't inadvertently overwrite a users action that has the same name. If you want your action to be updatable then you must supply this field. | Yes |
| Version | The version number of your action. Dropzone uses this to see if a newer version of your action is available and if it is then it prompts the user to upgrade. Increment this before sending a pull request to this repository with your latest action. | Yes |
| MinDropzoneVersion | As Dropzone gets updated new API and features will be added so you may need to specify a minimum compatible version of Dropzone that your action works with. The user will be prompted to update Dropzone if they are using a version behind what your action supports. You can leave this out or set it to 4.0 initially. | No |
| KeyModifiers | A comma separated list of key modifiers your action supports. When the user drags a file onto your action they can hold a particular modifier key including Command, Option, Control or Shift. The held modifier will be passed to your script in the ENV['KEY_MODIFIERS'] variable and you can modify the behavior of your action based on the held key. A example of valid values for this field would be "Option" or "Command, Option, Control, Shift" (without quotes). | No |
| UseSelectedItemNameAndIcon | If your action uses the ChooseFolder OptionsNIB then this specifies whether you want the label and icon to be set to the chosen folders after selecting the folder. Defaults to No. | No |
| RubyPath | You can use this metadata field to specify a custom Ruby path. More info about this option can be found in the RubyPath section above. | No |
| PythonPath | The default Python used by Dropzone actions is Python 3.10 which is included with Dropzone. You can use this metadata field to override this and specify a custom Python path. More info about this option can be found in the Using an alternative Python version section above. | No |
