HowtoonUbuntu
Back to Installation guides
Due to variety of Linux configurations, it is difficult to provide a single recipe that "just works". The better strategy might be to focus on several configurations based on most popular distributions. Here I will start from building working configuration on fresh install of Ubuntu 16.04 LTS (Xenial Xerus), however this also must work for other Ubuntu 16.04-based distros, for example, Linux Mint 18.3
- Ubuntu 16.04 LTS x86-64 (64-bit)
- Qt 5.10.1
- ROOT 6.12.06
- ANTS2 from the master or development branch
- Optional: CUDA 9.1.85
First update your system.
- Download Qt 5.10.1 for Linux 64-bit offline installer from the Qt Offline Installers page or from this direct link
- Give it executable permissions with chmod +x and run as root. It asks for login, but it is optional and can be bypassed with "Skip" button.
- Accept default installation folder.
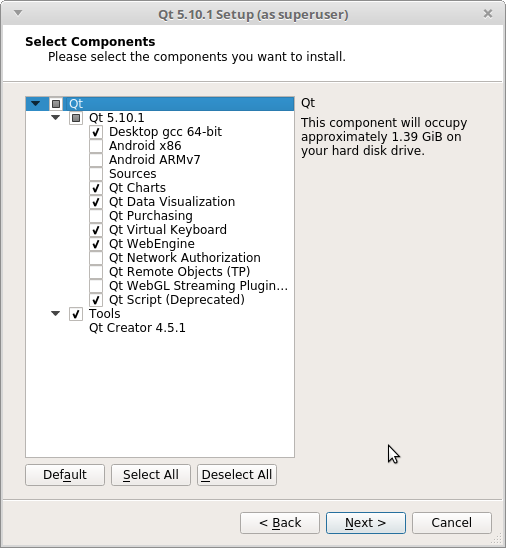
- Select the components according to the figure below:
- Accept licence agreement and proceed with installation
- Download ROOT 6.12.06 binary for Ubuntu 16 gcc5.4 from this page or from direct link
- Unpack it to /opt/root
- Add line
. /opt/root/bin/thisroot.shto ~/.profile - Restart desktop environment (log out and log back in)
- Download Debian package for CUDA network installer
- Run in a terminal:
sudo dpkg -i cuda-repo-ubuntu1604_9.1.85-1_amd64.deb
sudo apt-key adv --fetch-keys http://developer.download.nvidia.com/compute/cuda/repos/ubuntu1604/x86_64/7fa2af80.pub
sudo apt-get update
sudo apt-get install cuda
Troubleshooting tip: if the last command fails it's most probably because NVIDIA drivers are already installed on your system. Clean them up and try again:
sudo apt-get purge nvidia-*
sudo apt-get autoremove
sudo apt-get install cuda
- Add line
PATH="/usr/local/cuda-9.1/bin:$PATH"to ~/.profile - Restart desktop environment (log out and log back in)
sudo apt-get install libeigen3-dev
- Clone the development branch (more recent, potentially less stable):
git clone -b Dev https://github.com/andrmor/ANTS2.git
or the master branch (older but more stable):
git clone -b master https://github.com/andrmor/ANTS2.git
- Start Qt Creator, click "Open Project" button and navigate to ants2.pro file
- At the top on ants2.pro, under #Optional libraries uncomment eigen3 and, optionally, CUDA
- Run qmake and then build all
The following script contains all the commands necessary to prepare Ubuntu 16.04 for compiling ANTS2 from source. Logout/login is required in the end to update environment
#Qt 5.10.1
wget http://download.qt.io/official_releases/qt/5.10/5.10.1/qt-opensource-linux-x64-5.10.1.run
chmod +x qt-opensource-linux-x64-5.10.1.run
sudo ./qt-opensource-linux-x64-5.10.1.run
#ROOT 6.12.06
wget https://root.cern.ch/download/root_v6.12.06.Linux-ubuntu16-x86_64-gcc5.4.tar.gz
sudo tar -xzf root_v6.12.06.Linux-ubuntu16-x86_64-gcc5.4.tar.gz -C /opt
echo ". /opt/root/bin/thisroot.sh" >> ~/.profile
# CUDA 9.1.85 (optional)
wget http://developer.download.nvidia.com/compute/cuda/repos/ubuntu1604/x86_64/cuda-repo-ubuntu1604_9.1.85-1_amd64.deb
sudo dpkg -i cuda-repo-ubuntu1604_9.1.85-1_amd64.deb
sudo apt-key adv --fetch-keys http://developer.download.nvidia.com/compute/cuda/repos/ubuntu1604/x86_64/7fa2af80.pub
sudo apt-get update
sudo apt-get install cuda
echo "PATH=\"/usr/local/cuda-9.1/bin:\$PATH\"" >> ~/.profile
# Libraries
sudo apt-get install libeigen3-dev
Back to Installation guides