This is the final project of team 9 in Advanced Computer Architecture (2021 Spring) at NTU. For presentation slides, please refer to here.
This project is aimed at implementing the simulated quantum annealing in HLS and reproduces the paper [1].
We exploit the inter-trotter parallelism and the intra-trotter parallelism by referring to the [1] and design the interface which is more suitable for our environment.
After the first onboard test, we furtherly add the pseudorandom number generator into the kernel to speed up the whole system.
According to the [1] and our analysis, we find out that the naive implementation has the following problems:
-
Time complexity is O(TSS)
-
Not exploit the inter-trotter parallelism
- Although there exist data dependencies between two trotters, it's still possible to perform some transformation to overlap the update of each trotter in parallel.
-
Not exploit the intra-trotter parallelism
- Need a better scheme for reduction.
-
Need a huge memory to store the coefficients.
- On-chip memory size is not enough to store all the coefficients.
-
Low reuse rate of the coefficients (
J coupling).
-
According to the optimized access pattern of the coefficients, we design the interface with
hls::stream, successfully decrease the usage of the memory with the minor tradeoff. -
By the array partition, indicating loop dependencies, and the explicit loop unrolling, we successfully overlap the execution stage of the trotter units.
-
Adding pseudorandom number generator (reference) into the kernel to speed up the whole system.
-
Adding the support to the variable boundary.
-
Time complexity is O(S(S+T)), which the number of trotters won't harm the performance as huge as the naive implementation.
For further comparison and the detailed report, you can check the README at the impl_result, we explain the detailed technique and the reason there.
simulated-quantum-annealing/
├── build
├── data
│   └── (empty)
├── docs
│   └── report_images
├── impl_result
│   ├── _hw
│   │   ├── Opt2
│   │   ├── Opt3
│   │   ├── Opt5
│   │   ├── Opt5Adv
│   │   └── Opt5S
│   ├── _image
│   ├── basic_t16
│   ├── basic_t8
│   ├── opt1_fail_t8
│   ├── opt1_success_t8
│   ├── opt2_t16
│   ├── opt2_t8
│   ├── opt3
│   ├── opt5
│   ├── opt5_adv
│   └── opt5_sudoku
├── src
│   ├── helper
│   ├── host
│   │   └── sudoku
│   │       └── examples
│   │           ├── empty-10
│   │           ├── empty-15
│   │           ├── empty-20
│   │           ├── empty-25
│   │           └── empty-5
│   ├── include
│   ├── kernel_opt1
│   ├── kernel_opt2
│   ├── kernel_opt3
│   ├── kernel_opt5
│   ├── kernel_opt5_advance
│   ├── kernel_opt5_sudoku
│   └── original
└── tests
- PYNQ-Z2
- Vivado 2020.1
- Vivado HLS 2020.1
Since it's hard to write a script to build for us now. I will show the build step here.
-
1.1. Select the board,
PYNQ-Z2. -
1.2. Select the frequency, we recommend
100 MHzwhich is10nshere.
src/helper/prng.cpp
src/original/*.cpp
src/kerenl_opt1/*.cpp
src/kernel_opt2/*.cpp
src/kernel_opt3/*.cpp
src/kernel_opt5/*.cpp
src/kernel_opt5_advance/*.cpp
src/kernel_opt5_sudoku/*.cpp
./src/helper/helper.cpp
./src/host/host.cpp
- For simulation, please refer to the section
Run Testbelow.
-
Since all the pragma is already inline into the sources, just select your top function and run the synthesis.
Version Function Name 1 Basic QuantumMonteCarlo 2 Opt1 QuantumMonteCarloOpt 3 Opt2 QuantumMonteCarloOpt2 4 Opt3 QuantumMonteCarloOpt3 5 Opt5 QuantumMonteCarloOpt5 6 Opt5-Sudoku QuantumMonteCarloOpt5S 7 Opt5-Advance QuantumMonteCarloOpt5Adv
-
6.1. Select the board,
PYNQ-Z2 -
6.2. Adding our HLS IP into the IP Catalog.
-
Configure the
PS-PL ConfigurationofZYNQ7 Processing Systemto enable at least one Slave AXI interface for PS.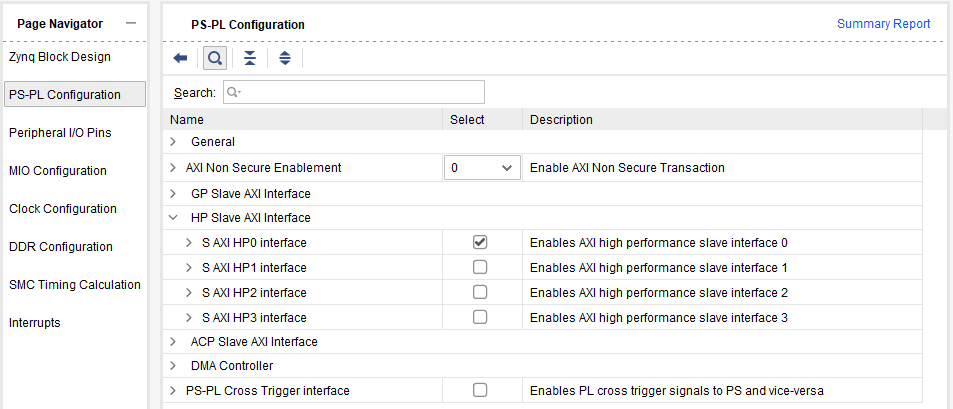
-
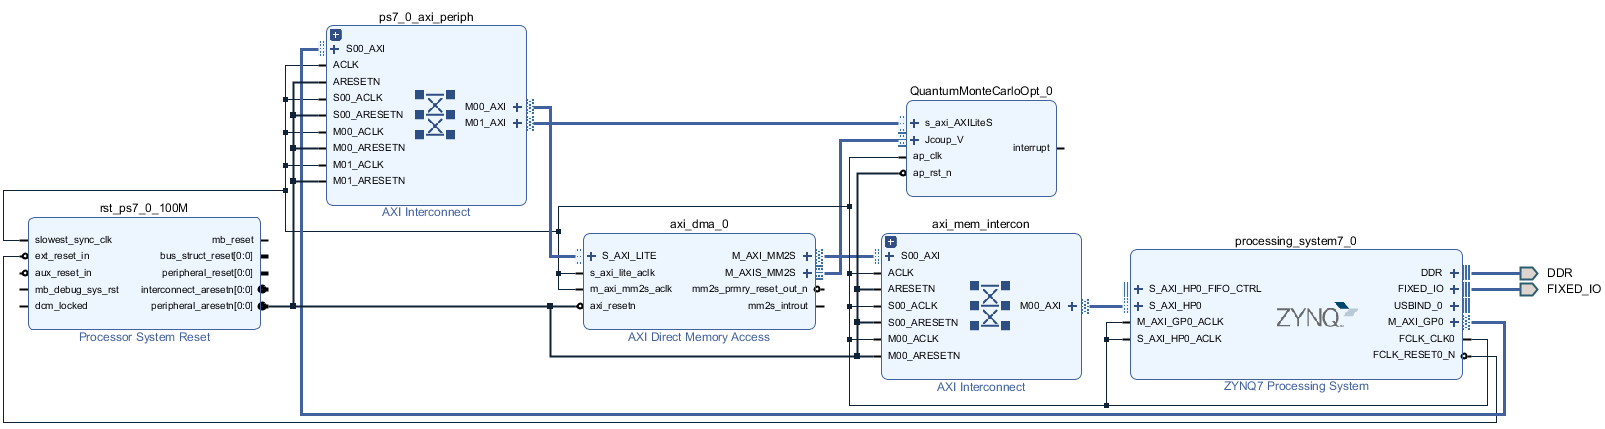
Route as the following diagram. (Only suitable for the Opt-Series, not for Basic)
-
8.1 Press
Generate Bitstreamdirectly -
8.2 Get
.bitand.hwhforOn-Board Test./<vivado_project>.srcs/sources_1/bd/<design>/hw_handoff/<design>.hwh ./<vivado_project>.runs/impl_1/<design>_wrapper.bit -
8.3. Remember to rename the two files to have the same prefix.
SQA.hwh
SQA.bit
- Please refer to the below section
Run Test.
- Follow the
Build SetupSteps 1~3to build and set up the Vivado HLS project.
-
The host code,
main.cpp, will perform the test ofNumber Partition Problem.- You can change the macro option at the top of
main.cppto test the different functions. - This host code doesn't support the test of
QuantumMonteCarloOpt5S(Sudoku).
- You can change the macro option at the top of
-
2.1. It will generate the testing data by itself.
-
2.2. It will run the 500 iterations of SQA.
-
2.3. It will dump the following information at the end of the execution.
[Best Run] [Trotter Number] [Best Trotter] [Best Energy] [Sum of 1st Subset] [Sum of 2nd Subset] -
2.4. It will also generate an
out.txtfile which dumps the summation of the energy in each run. You can use the script./tests/vision.ipynbto visualize it.
We don't recommend do co-simulation here.
There exists some problem with the connection of the DSP when doing co-simulation in Vivado HLS 2020.1. The time needed for co-simulation will be extremely slow down due to the message output.
The detailed discussion can be found at here and here
- Follow the
Build SetupSteps 1~8to generate the.bitand.hwhfiles.
- Just move your
.bitand.hwhfiles to thePYNQ-Z2.
- We provide following host files to test :
./src/host/SQA-Opt2.ipynb
./src/host/SQA-Opt3.ipynb
./src/host/SQA-Opt5.ipynb
./src/host/SQA-Opt5-Adv.ipynb
./src/host/sudoku/SQA-sudoku.ipynb
- For the detail about the test on
SQA-Opt5-Sudoku, please refer to the here.