来吧,来玩实时视频流呗!
在这第一篇教程中,让我们使用一块Raspberry Pi 3A+硬件板,通过USB接口连接摄像头。
然后,我们使用Lithosphere IoT平台提供的Webcam插件,简单做一点开发,我们就可以用App远程打开摄像头,来看实时监控视频了。
Java >= 11
Granite Lite IoT XMPP Server
点击这里下载Granite Lite IoT XMPP Server
Raspberry Pi 3A+硬件板
USB摄像头
下图是这个教程中使用到的硬件。
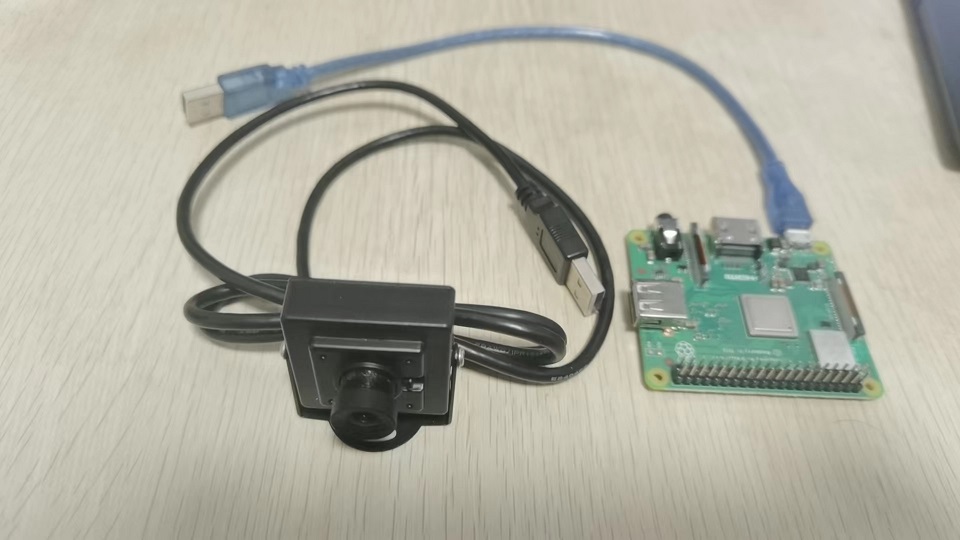
USB摄像头,720P/100W像素,淘宝上买42元一个。
WebRTC为英文Web Real-Time Communication的缩写。 中文翻译为网页即时通信。 WebRTC是一个由Google发起的实时通讯解决方案,其中包含视频音频采集,编解码,数据传输,音视频展示等功能,我们可以通过技术快速地构建出一个音视频通讯应用。 虽然其名为WebRTC,但是实际上它不光支持Web之间的音视频通讯,还支持Android以及IOS端,此外由于该项目是开源的,我们也可以通过编译C++代码,从而达到全平台的互通。
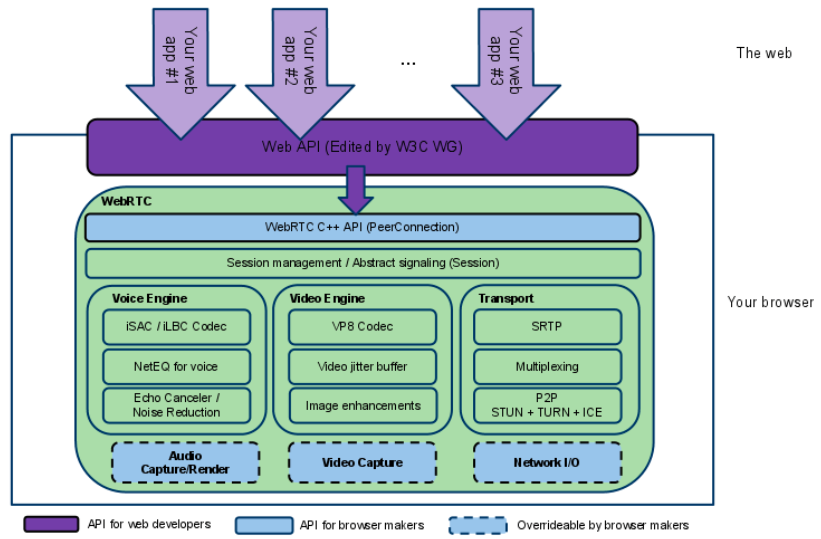
从WebRTC技术的架构分层可以看到,最上层开发接口是由W3C、WG制定的WebRTC标准Web API,应用开发者可以基于这些标准Web API来开发应用。
浏览器Web API层下面的的WebRTC实现由C++开发,被称为WebRTC Native Code。
WebRTC Native Code主要是用来给浏览器开发集成WebRTC。但在没有浏览器或者不适合浏览器的环境中,我们可以直接使用WebRTC Native Code来做应用开发。
在本教程中,我们会使用WebRTC Native库,在树莓派硬件板上来实现摄像头实时监控功能。
创建hello-webrtc-server目录,添加pom.xml文件。
<?xml version="1.0" encoding="UTF-8"?>

<project xmlns:xsi="http://www.w3.org/2001/XMLSchema-instance"
	xmlns="http://maven.apache.org/POM/4.0.0"
	xsi:schemaLocation="http://maven.apache.org/POM/4.0.0 http://maven.apache.org/maven-v4_0_0.xsd">
	<modelVersion>4.0.0</modelVersion>

    ... ...

	<groupId>com.thefirstlineofcode.lithosphere.tutorials.hellowebrtc</groupId>
	<artifactId>hello-webrtc-server</artifactId>
	<version>0.0.1-RELEASE</version>
	<name>Hello WebRTC server plugin</name>

	... ...
</project>
代码说明
- 除了服务器插件包的groupId和artifactId不一样之外,其它内容和Hello, Actuator教程服务器端插件工程中的pom.xml完全相同。不再赘述。
和前面的Hello,Actuator及Hello, LoRa教程类似,我们需要定义一个设备描述器HwtModelDescriptor。
public class HwtModelDescriptor extends SimpleThingModelDescriptor {
	public static final String MODEL_NAME = "HWT";
	public static final String DESCRIPTION = "Hello WebRTC Thing";

	public HwtModelDescriptor() {
		super(MODEL_NAME, DESCRIPTION, true, null, null, null);
	}
}
@Extension
public class ThingModelsProvider implements IThingModelsProvider {

	@Override
	public IThingModelDescriptor[] provide() {
		return new IThingModelDescriptor[] {
			new HwtModelDescriptor()
		};
	}

}
代码说明
- 注册HWT设备到服务器。
public IThingModelDescriptor[] provide() {
 return new IThingModelDescriptor[] {
        new HwtModelDescriptor()
    };
}
@Extension
public class ThingRegistrationCustomizer extends ThingRegistrationCustomizerAdapter {
	private static final String HARD_CODED_REGISTRATION_CODE = "abcdefghijkl";

	@Override
	public boolean isUnregisteredThing(String thingId, String registrationCode) {
		if (!super.isUnregisteredThing(thingId, registrationCode))
			return false;

		return HARD_CODED_REGISTRATION_CODE.equals(registrationCode);
	}

	@Override
	public boolean isAuthorizationRequired() {
		return false;
	}
}
代码说明
- ThingRegistrationCustomizer的isAuthorizationRequired()方法,返回false值。
... ...
public boolean isAuthorizationRequired() {
	return false;
}
... ...
我们在Hello,Actuator教程里,提到了设备注册的概念。
我们在sAuthorizationRequired()方法中返回false,禁止掉了Edge设备(直连Internet服务器的设备)的人工授权步骤。禁止人工授权后,设备仅需要通过Thing ID和Registration Code合法性检查,就会自动注册到服务器
- 我们检查设备的Registration Code必须为"abcdefghijkl"。
在src/main/resources目录下,创建plugin.properties。
plugin.id=hello-webrtc-server
plugin.provider=TheFirstLineOfCode
plugin.version=0.0.1-RELEASE
plugin.dependencies=sand-server-things
代码说明
- 这个教程的例子里,没有使用到特定的协议包。所以没有使用到non-plugin.dependencies配置。其余插件配置同Hello, Actuator教程服务器编写插件配置文件类似,仅有细节区别,不再赘述。
构建hello-webrtc-server插件包
cd hello-webrtc-server
mvn clean package
将hello-webrtc-server插件包,copy到服务器的plugins目录下。
cp hello-webrtc-server/target/hello-webrtc-server-0.0.1-RELEASE.jar granite-lite-iot-1.0.5-RELEASE/plugins
服务器端插件已经开发完成,你可以参考官方开源仓库代码hello-webrtc-server服务器端插件包工程源码
和[Hello, Actuator教程检查Granite Lite XMPP Server状态](./Hello_Actuator_Tutorial.md#检查Granite Lite XMPP Server状态)类似,不再赘述。
和Hello, Actuator教程创建测试用户类似,不再赘述。
安装了纯净RaspBerry Pi OS操作系统的树莓派,还需要做一些环境配置。
接上电源,启动树莓派。
使用ssh登录到树莓派上,然后安装默认的JDK。树莓派OS默认安装的JDK版本是Open JDK11。
ssh pi@192.168.1.180
sudo apt-get update
sudo apt-get install default-jdk
创建hello-webrtc-thing目录,添加pom.xml文件。
<?xml version="1.0" encoding="UTF-8"?>

<project xmlns:xsi="http://www.w3.org/2001/XMLSchema-instance"
	xmlns="http://maven.apache.org/POM/4.0.0"
	xsi:schemaLocation="http://maven.apache.org/POM/4.0.0 http://maven.apache.org/maven-v4_0_0.xsd">
	<modelVersion>4.0.0</modelVersion>

	<parent>
		<groupId>com.thefirstlineofcode.sand</groupId>
		<artifactId>sand-client</artifactId>
		<version>1.0.0-BETA4</version>
	</parent>

	<groupId>com.thefirstlineofcode.lithosphere.tutorials.hellowebrtc</groupId>
	<artifactId>hello-webrtc-thing</artifactId>
	<version>0.0.1-RELEASE</version>
	<name>Hello WebRTC Thing</name>

	<dependencies>
		<dependency>
			<groupId>com.thefirstlineofcode.chalk</groupId>
			<artifactId>chalk-logger</artifactId>
		</dependency>
		<dependency>
			<groupId>com.thefirstlineofcode.sand.client</groupId>
			<artifactId>sand-client-edge</artifactId>
		</dependency>
		<dependency>
			<groupId>com.thefirstlineofcode.sand.client</groupId>
			<artifactId>sand-client-webcam</artifactId>
		</dependency>
	</dependencies>

	<build>
		<plugins>
			<plugin>
				<groupId>org.apache.maven.plugins</groupId>
				<artifactId>maven-jar-plugin</artifactId>
				<version>2.4</version>
				<configuration>
					<archive>
						<manifest>
							<addClasspath>true</addClasspath>
							<classpathPrefix>libs/</classpathPrefix>
							<mainClass>com.thefirstlineofcode.lithosphere.tutorials.hellowebrtc.thing.Main</mainClass>
						</manifest>
					</archive>
				</configuration>
			</plugin>
			<plugin>
				<artifactId>maven-assembly-plugin</artifactId>
				<version>3.0.0</version>
				<configuration>
					<appendAssemblyId>false</appendAssemblyId>
					<descriptors>
						<descriptor>src/assembly/descriptor.xml</descriptor>
					</descriptors>
				</configuration>
				<executions>
					<execution>
						<id>make-assembly</id>
						<phase>package</phase>
						<goals>
							<goal>single</goal>
						</goals>
					</execution>
				</executions>
			</plugin>
		</plugins>
	</build>

	<repositories>
		<repository>
			<id>com.thefirstlineofcode.releases</id>
			<name>TheFirstLineOfCode Repository - Releases</name>
			<url>http://120.25.166.188:9090/repository/maven-releases/</url>
		</repository>
	</repositories>
</project>
代码说明
- POM继承com.thefirstlineofcode.sand:sand-client,以便复用父POM里的依赖配置管理。
- hello-webrtc-thing是一个独立运行的Java程序。我们使用maven-assembly-plugin和maven-jar-plugin来打包和配置可这个可运行程序。
- 依赖com.thefirstlineofcode.sand.client:sand-client-edge库,我们使用Edge库来帮助设备进行设备注册和连接服务器。
<dependency>
<groupId>com.thefirstlineofcode.sand.client</groupId>
<artifactId>sand-client-edge</artifactId>
</dependency>
- 依赖com.thefirstlineofcode.sand.client:sand-client-webcam库,我们需要使用Webcam插件。
<dependency>
<groupId>com.thefirstlineofcode.sand.client</groupId>
<artifactId>sand-client-webcam</artifactId>
</dependency>
public class HelloWebrtcThing extends AbstractEdgeThing {
	public static final String THING_MODEL = "HWT";
	public static final String SOFTWARE_VERSION = "0.0.1-RELEASE";

	private IWebcam.Capability requestedCapability;
	private Webcam webcam;

	public HelloWebrtcThing() {
		this(new IWebcam.Capability(800, 600, 30));
	}

	public HelloWebrtcThing(IWebcam.Capability requestedCapability) {
		super(THING_MODEL, null, true);

		this.requestedCapability = requestedCapability;
	}

	@Override
	public String getSoftwareVersion() {
		return SOFTWARE_VERSION;
	}

	@Override
	protected void registerIotPlugins() {
		chatClient.register(WebcamPlugin.class);
	}

	@Override
	protected void startIotComponents() {
		if (webcam == null)
			webcam = chatClient.createApiImpl(Webcam.class);

		webcam.setRequestedCapability(requestedCapability);
		webcam.start();
	}

	@Override
	protected void stopIotComponents() {
		webcam.stop();
	}

	@Override
	protected String loadThingId() {
		return THING_MODEL + "-" + ThingsUtils.generateRandomId(8);
	}

	@Override
	protected String loadRegistrationCode() {
		return "abcdefghijkl";
	}
}
代码说明
- 继承AbstractEdgeThing。我们使用sand-client-edge库来简化摄像头设备端程序的编写。
- 在HelloWebrtcThing中,我们需要使用Webcam插件。
protected void registerIotPlugins() {
	chatClient.register(WebcamPlugin.class);
}
- 在startIotComponents方法中,我们创建Webcam组件,设置打开摄像头时视频捕捉的Capability,然后启动它。
if (webcam == null)
webcam = chatClient.createApiImpl(Webcam.class);

webcam.setRequestedCapability(requestedCapability);
webcam.start();
编写一个简单的Main程序来启动运行摄像头设备。
... ...
public static void main(String[] args) {
	new Main().run(args);
}

private void run(String[] args) {
... ...
	LogConfigurator.configure(HelloWebrtcThing.THING_MODEL, getLogLevel(logLevel));
... ...
	thing.start();
... ...
}
代码说明
- 我们使用chalk-logger库来配置logger。因为Hello, LoRa教程的例子相较其它几篇教程,涉及到更多端和更多协议。我们配置logger方便调试和跟踪。
LogConfigurator.configure(HelloWebrtcThing.THING_MODEL, getLogLevel(logLevel));LogConfigurator.configure()方法的两个参数是日志文件名,和配置的LogLevel等级。
以上代码将日志文件保存为${USER_HOME}/.com.thefirstlineofcode.chalk/logs/${MODEL_NAME}.yyyy-MM-DD.log。
摄像头设备端程序已经开发完成,你可以参考官方开源仓库代码hello-webrtc-thing设备端程序工程源码
我们来部署测试设备端程序。
Webcam组件依赖封装了WebRTC库的WebRTC Native Service程序,它是一个C++程序。
关于WebRTC Native Service程序更多细节,可以参考WebRTC Native Service项目源码。
我们将树莓派接通电源启动起来,然后登录到树莓派,下载和部署WebRTC Native Service程序。
ssh pi@192.168.1.180
mkdir WebcamWebrtcNativeService
wget -O ./WebcamWebrtcNativeService/WebcamWebrtcNativeService https://github.com/TheFirstLineOfCode/sand/releases/tag/1.0.0-BETA4/WebcamWebrtcNativeService
chmod a+x ./WebcamWebrtcNativeService/WebcamWebrtcNativeService
注:
- Webcam组件默认会在${USER_HOME}/WebcamWebrtcNativeService/WebcamWebrtcNativeService路径找WebRTC Native Service程序。如果修改了WebRTC Native Service程序的存放路径,需要调用Webcam组件的setWebrtcNativeServicePath()方法来设置WebRTC Native Service程序路径。
- 注意下载到的WebcamWebrtcNativeService的文件权限。如果文件缺少x执行权限,需要用chmod命令给程序加上x权限。
将编译好的设备端程序,用scp拷贝到树莓派上。
cd hello-webrtc-thing
mvn clean package
scp target/hello-webrtc-thing-0.0.1-RELEASE.tar.gz pi@192.168.1.180:/home/pi
注:
- 192.168.1.180是树莓派板的网络地址。请改为你配置树莓派板时,指定的静态IP地址。
- pi为树莓派用户。请改为你配置树莓派时,初始化创建的用户名。
启动设备端程序,检查它是否能够正确注册到服务器。
ssh pi@192.168.1.180
tar -xzvf hello-webrtc-thing-0.0.1-RELEASE.tar.gz
cd hello-webrtc-thing-0.0.1-RELEASE
java -jar hello-webrtc-thing-0.0.1-RELEASE.jar --host=192.168.1.80
注:
- 在启动网关程序之前,先启动Granite XMPP Lite IoT Server。
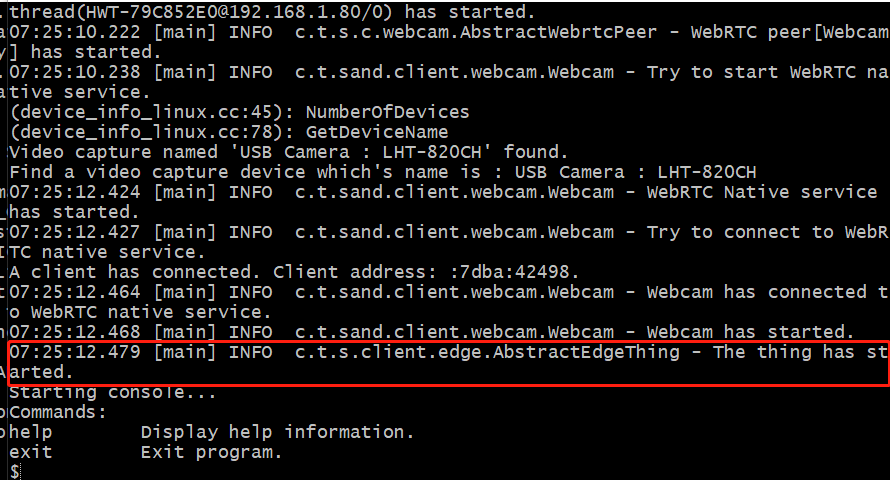
如果能够看到Thing thing has started,说明摄像头设备程序已经成功注册,并连接到服务器。
从头开发一个手机App比较繁琐,我们可以直接用Lithosphere平台提供的sand-demo App来遥控我们的摄像头设备。
你可以自己来构建sand-demo App,这是一个标准的Andriod工程,请用Andriod Studio来打开它。sand-demo App源码位于sand工程的demo/app-android子目录下。
你也可以直接下载构建好的sand-demo App安装使用。
sand-demo App里大部分是常规的Android开发。创建菜单,画界面... ...
和IoT通讯相关的部分,是App使用Sand的webcam插件来打开摄像头设备。
webcam插件的使用并不复杂,以下代码,来自sand-demo App源码。
... ...
	String sCameraJid = getIntent().getStringExtra("camera-jid");
	JabberId cameraJid = JabberId.parse(sCameraJid);

	setContentView(R.layout.activity_live_streaming);

	SurfaceViewRenderer videoRenderer = findViewById(R.id.video_renderer);
	watcher = ChatClientSingleton.get(this).createApiImpl(WebcamWatcher.class,
		new Class<?>[] {Context.class, JabberId.class, List.class, SurfaceViewRenderer.class},
		new Object[] {this.getApplicationContext(), cameraJid, MainApplication.ICE_SERVERS, videoRenderer});
	watcher.watch();
... ...
代码说明
- 拿到需要打开的摄像头设备的Jabber ID。
String sCameraJid = getIntent().getStringExtra("camera-jid");
JabberId cameraJid = JabberId.parse(sCameraJid);
- 创建IWebcamWatcher组件,这个组件来自webcam插件。调用IWebcamWatcher组件的watch()方法,就可以打开摄像头实时视频流了。
注意,在这里,我们调用IChatClient接口的createApiImpl()方法,而不是常规的createApi()方法,来创建IWebcamWatcher组件。这是因为IWebcamWatcher组件实现的构造器,需要接收几个构造器参数,我们通过调用createApiImpl()来传入构造器参数。
SurfaceViewRenderer videoRenderer = findViewById(R.id.video_renderer);
watcher = ChatClientSingleton.get(this).createApiImpl(WebcamWatcher.class,
	new Class<?>[] {Context.class, JabberId.class, List.class, SurfaceViewRenderer.class},
	new Object[] {this.getApplicationContext(), cameraJid, MainApplication.ICE_SERVERS, videoRenderer});
watcher.watch();
如果想了解sand-demo App更多细节,请参考开源仓库里的sand-demo App程序源码
将构建好或直接下载的sand-demo App安装到安卓手机上。
启动sand-demo App。点击配置传输通道链接,进入stream配置页面。
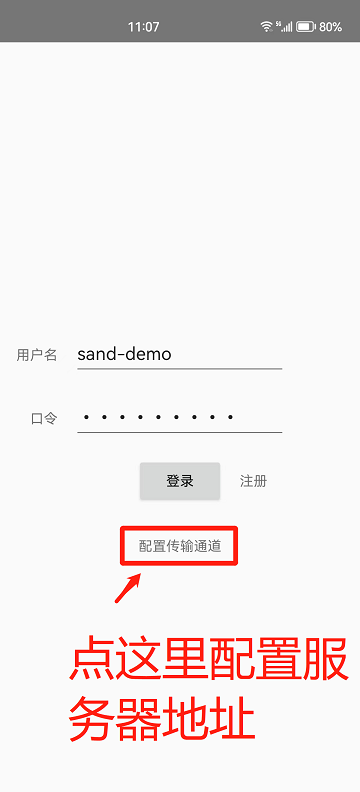
在传输通道配置页里,填写Granite XMPP Server的正确地址。
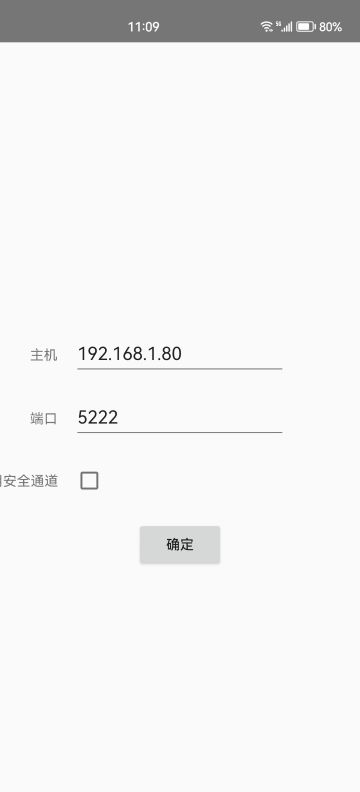
配置好传输通道后,回到登录页,使用sand-demo用户名来登录App。用户密码也是"sand-demo"。
登录后,可以看到注册成功后hello-webrtc-thing。点击“控制这个智能物件”,会看到下拉菜单里Open Live Streaming子菜单。
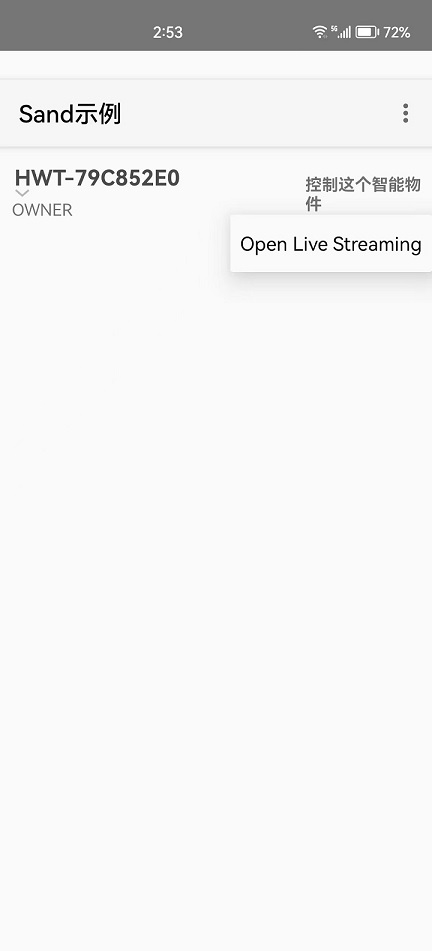
现在可以用手机App来控制hello-webrtc-thing了。
通过这篇教程,我们可以了解到以下的内容:
- 使用开源的WebRTC技术,可以为应用带来实时流媒体通讯能力。
- WebRTC技术使用Signaling服务器来帮助协商P2P通讯通道。XMPP服务器非常适合用来做WebRTC的Signaling Server。
- 基于XMPP协议和插件架构技术,使用Lithosphere平台提供的webcam插件(客户端和服务器),我们可以不需要了解WebRTC的技术细节,我们使用Webcam Watcher组件,做简单的开发,就可以实现摄像头实时监控功能。
- webcam插件和它提供的组件,验证了Lithosphere基于XMPP协议和插件架构技术做复杂通讯逻辑的能力。理论上来说,我们可以在Lithosphere平台下,做任意复杂的通讯逻辑。