Keyboard shortcuts in Terminal (OSX)
Skip to beginning of line: Ctrl+a
Skip to end of line: Ctrl+e
Skip forward a word: Esc+f
Skip back a word: Esc+b
for i in e f; do echo $i; done
sudo mount -o username=your_username_for_the_server //IP.address.of.server/path/to/folder/on/server /path/to/emtpy/directory/on/local/computer
%%bash
for f in *.gz
do
  STEM=$(basename "${f}" .gz)
  gunzip -c "${f}" > /Users/sr320/data-genomic/tentacle/mchil-sxt/fq/"${STEM}"
done
$wc -l < /path/to/file
Explanation:
wc = Terminal command for "word count"
-l = Flag to specify line count
< = Redirect your file as the input data source for the "wc" command
echo $(( $(wc -l < filename.fastq) / 4 ))
Explanation:
An Illumina FASTQ file contains four lines per read, so run a word count on the number of lines divided by four will yield the number of reads.
echo $(( $(gunzip -c filename.fastq.gz | wc -l) / 4 ))
Explanation:
See above explanations for the word counts.
gunzip -c - Decompresses the file, but leaves the gzipped file intatct.
$cut -f1 /path/to/file | sort | uniq -c
Explanation:
cut - Command to apply options to the designated field (i.e. column).
-f1 - -f1 = specifies which field (i.e. column) to work on. Change the number to specify your desired column. Or, you can even specify a range of columns to work on (e.g. -f2-6)
/path/to/file - Location of file to operate on. If file is in current directory, no path is needed; just use the filename
"|" - Pipe which sends the results of the previous command ("cut" in this example) to another command.
sort - Sorts the info from the "cut" command in ascending order.
"|" - Pipe which sends the results of the previous command ("sort" in this example) to another command.
uniq -c - Counts the number of occurrences of each unique "word" in the specified column(s). (Note: Technically "uniq -c" is counting the occurrence of each unique line in the specified column, not the actual "words." It is this reason (that uniq occurrences are tallied by line) that you use the cut command to have the uniq command focus on a single column from the source file.)
$awk '{print NF; exit}' input_file.txt
This reads the number of fields (NF; i.e. columns) in just the first row of the input file specified. If you suspect you may have more columns that are not represented on the first line of your file, remove the ; exit from the command to have awk scan the entire file.
awk '{print $1, "\t", $2, "\t", length($2)}' j_tab2 > tab_1_length
This is the same as Find and Replace in programs like Microsoft Word, but will run on files that are too large to be opened with such programs.
$sed 's/text_you_want_replaced/replacement_text/g' path/to/source_file > path/to/destination_file
Code explanation:
"s" invokes the substitute command in sed
"g" tells sed to apply the substitute command globally on each line. Without the "g" argument, sed will only apply your substitute command to the first instance it encounters on each line that contains your "text_you_want_replaced".
NOTE: This command is case sensitive and will only match EXACLTY what you enter in as the "text_you_want_replaced". If you need more flexibility (e.g. having sed find variations like upper- and lowercase text), it exists, but is a bit too in-depth to go into here.
Here's an example:
$awk '{ print $1"\t"$2"_"$3"_"$4 }' input_file.txt > output_file.txt
The above code will replace the delimiters after each field (i.e. column) with the indicated character. In this instance, the space between columns 1 and 2 is replaced with a tab (\t). The space between columns 2 & 3 is replaced with an underscore.
zcat input_file.fastq.gz | awk 'NR%4==1{printf ">%s\n", substr($0,2)}NR%4==2{print}' > output_file.fa
After typing in a Terminal command (and before hitting 'Enter') add the following:
; say "Text that you want to have the computer read aloud to notify you that the job is finished"
Code explanation:
; - Semicolon separates the "say" command from the previous command.
say - The speech-to-text command for Terminal
"text between quotes" - This is the text that you want to be read when your job is finished.
Example code is below which will move any files with the extension ".sra" in any subdirectories to a new, single directory. An explanation of how it works after the code.
find /volume1/web/trilobite/Crassostrea_gigas_HTSdata/SRP014 -iname '*.sra' -exec mv '{}' /volume1/web/trilobite/Crassostrea_gigas_HTSdata/SRP014 \;
Code explanation:
find - The command to initiate a search for files
/volume1/web/trilobite/Crassostrea_gigas_HTSdata/SRP014 - Example path to a starting directory. The find command searches recursively (i.e. from current directory through any/all subfolders containd therein) by default.
-iname - Test for the find command to perform a case insensitive search.
'*.sra' - The expression that the find command is evaluating. The asterisk is a wildcard and will match 0 or more characters before ".sra". So, in this example, the find command is using "-iname" to find all file names that end with the ".sra" suffix (file type).
-exec mv - Action that tells the find command to execute a move (mv) command on all matching file names.
'{}' - Empty expansion braces that are filled with the result of the find command to be processed. As each matching file is encountered, the file name is expanded in the curly braces until it is handled by another program/option. It is then removed from the curly braces and the next match is then entered into the curly braces.
/volume1/web/trilobite/Crassostrea_gigas_HTSdata/SRP014 - Example path to destination directory for any/all files that are to be moved.
; - The semi-colon is required to end the find command. However, the semi-colon is a special character in the bash. So, a backslash is required to escape (i.e. ignore) the semi-colon from being interpreted by bash.
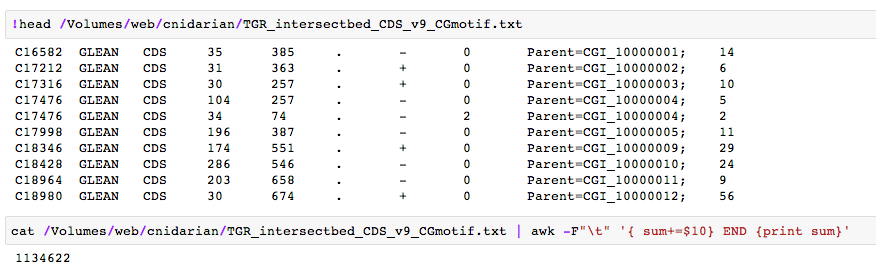
code: cat /Volumes/web/cnidarian/TGR_intersectbed_CDS_v9_CGmotif.txt | awk -F"\t" '{ sum+=$10} END {print sum}'
screenshot:
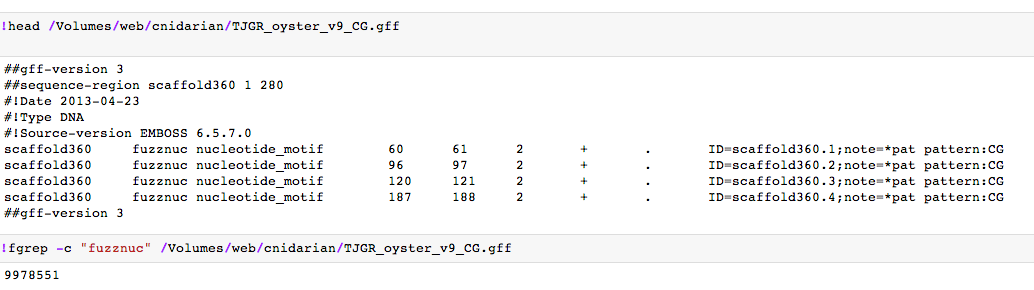
code: !fgrep -c "fuzznuc" /Volumes/web/cnidarian/TJGR_oyster_v9_CG.gff
screenshot:
code: !tr ',' "\t" </Users/sr320/Desktop/Ruphi\ Enriched\ Genes.csv> /Users/sr320/Desktop/Ruphi\ Enriched\ Genes.txt
code: cp ncbi-blast-2.2.27+/bin/* /usr/local/bin
Similar to hack above where all files are added to /usr/local/bin
modifed from http://hathaway.cc/post/69201163472/how-to-edit-your-path-environment-variables-on-mac
Step 2: Enter the follow commands:
touch ~/.bash_profile; open ~/.bash_profile
This will open the .bash_profile file in Text Edit (the default text editor included on your system). The file allows you to customize the environment your user runs in.
Step 3: Add the following line to the end of the file adding whatever additional directory you want in your path:
export PATH=$PATH:/Applications/SalmonBeta-0.4.2_OSX-10.10/bin
That example would allow me to just type salmon at command line to run program.
Step 4: Save the .bash_profile file and Quit (Command + Q) Text Edit.
Step 5: Force the .bash_profile to execute. This loads the values immediately without having to reboot. In your Terminal window, run the following command.
source ~/.bash_profile
That’s it! Now you know how to edit the PATH on your Mac OS X computer system. You can confirm the new path by opening a new Terminal windows and running:
echo $PATH
You should now see the values you want in your PATH.
code: !uniq /Volumes/web/cnidarian/TJGR_prom_notgene_cpgIsland1.gff > /Volumes/web/cnidarian/TJGR_prom_notgene_cpgIsland1u.gff
code: !tail -n +2 /Volumes/web/cnidarian/BiGo_methratio_boop.gff > /Volumes/web/cnidarian/BiGo_methratio_boop_c.gff
code: !grep -Ev '>' /Volumes/web/Mollusk/174gm_analysis/GenomeTracks_Fastas/Exons.fa > /Users/sr320/Desktop/tst.txt
code:
!sed 's/Roberts_20100712_CC_F3_trimmed/Haliotis_cra_v3/g' </Volumes/web/cnidarian/lft_BlackAbalone_v3_swissprot_blastout_c> /Volumes/web/cnidarian/lft_BlackAbalone_v3_swissprot_blastout_d
# sed 's/abc/XYZ/g' <infile> outfile
for file in *; do mv "$file" ${file// /}; done
Explanation:
for file in *; - A for loop that looks at all files in the current directory. The word file is a variable that takes on the value of each file name in the directory (one file name per loop). The ; is needed for bash for loop formatting.
do mv "$file" ${file// /}; - Tells bash to use the move command (mv) and use the current contents of the variable $file as the initial filename. The ${file// /} is a substitution command that tells bash to use the contents of the file variable and replace all spaces (// ) with nothing (/ - you can add text after this slash to replace with information of your choice). The The ; is needed for bash for loop formatting.
done - Ends the for loop
Note: Uses wget which is not installed on Mac OS X by default.
time wget -U mozilla -E -r -H -k -p -R *.xad,*.zip,*.gz,*.fastq -Donsnetwork.org,eagle.fish.washington.edu,http://heareresearch.blogspot.com --no-parent -e robots=off --wait=60 --random-wait --limit-rate=10m http://website.com/notebook
Explanation:
wget - Program for downloading remote files
-U mozilla - Specifies the user agent (in this case, mozilla) that wget presents itself as to the remote server. Using this gets around sites that disallow standard wget requests.
-E - Save HTML/CSS documents with proper extensions.
-r - Downloads recursively (i.e. follows all links and downloads content from those links).
-H - Go to foreign hosts when recursive (i.e. follow links outside of current website). This will download images hosted on other websites.
-k - Make links in downloaded HTML or CSS point to local files.
-p - Get all images, etc. needed to display HTML page.
-R *.xad,*.zip,*.gz,*.fastq - The -R flag specifies files to reject. The command is followed by a comma-separated list of files to skip when downloading.
-Donsnetwork.org,eagle.fish.washington.edu,http://heareresearch.blogspot.com - The -D flag specifies which domains content can be downloaded from. The flag is followed by a comma-separated list of domains (and/or subdomains) of the allowed websites.
--no-parent - This argument instructs wget to only download items within and below the initial directory specified.
--wait=60 - Sets an interval, in seconds, that wget should wait between download requests. Although this is not necessary, it's a polite way to approach recursive downloads from a server so that the server isn't overwhelmed trying to process the entire wget requests. In this example, the wait time is governed by the next option (--random-wait).
--random-wait - This sets the request interval to a random value between 0.5 x -wait and 1.5 x wait, in seconds. So, in this example, wget will wait between 30 and 90 seconds between file retrieval requests. This is a polite way to to approach recursive downloads from a server so that the server isn't overwhelmed trying to process the entire wget requests.
--limit-rate=10m - Limits bandwidth usage to 5MB/s. Without setting a rate limit, wget will use the maximum amount of bandwidth and, potentially, greatly slow the server's response. This is a polite way to to approach recursive downloads from a server so that the server isn't overwhelmed trying to process the entire wget requests.
http://website.com/notebook - Replace this with the URL to the desired notebook.
Note: Uses wget which is not installed on Mac OS X by default.
See above for code explanation. However, the following code substitutes the -m (mirror) flag, for the -r (recursive).
wget -U mozilla -E -m -H -k -p -R *.xad,*.zip,*.gz,*.fastq --no-parent -e robots=off --wait=1 --random-wait --limit-rate=100m -Dblogspot.com http://notebook.blogspot.com/