Macos
brew tap twilio/brew && brew install twilio
Windows
scoop bucket add twilio-scoop https://github.com/twilio/scoop-twilio-cli
scoop install twilio
Linux
wget -qO- https://twilio-cli-prod.s3.amazonaws.com/twilio_pub.asc \
  | sudo apt-key add -
sudo touch /etc/apt/sources.list.d/twilio.list
echo 'deb https://twilio-cli-prod.s3.amazonaws.com/apt/ /' \
  | sudo tee /etc/apt/sources.list.d/twilio.list
sudo apt update
sudo apt install -y twilio
Docker
docker run -it --rm twilio/twilio-cli bash
Npm
npm install -g twilio-cli
for this you need to acquire:
ACCOUNT_SID and AUTH_TOKEN
You can find the Auth Token in the Account Info pane of the Console Dashboard page.
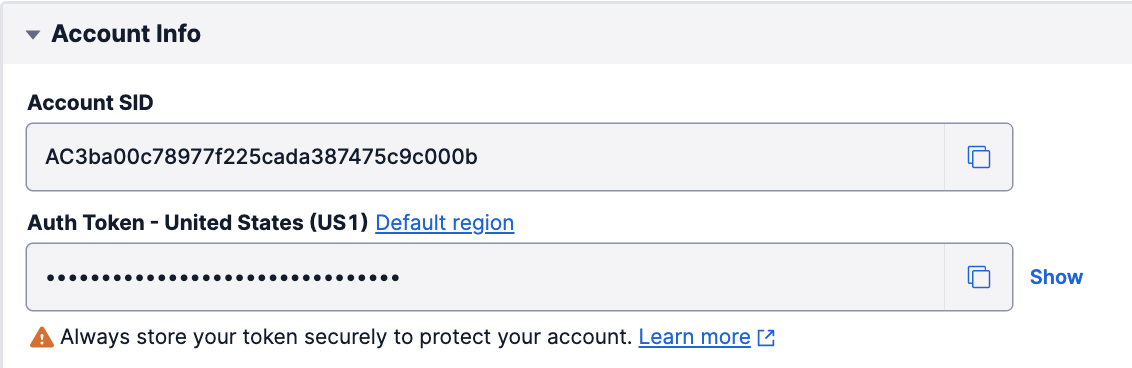
Your account's Auth Token is hidden by default. Click show to display the token, and hide to conceal it again.
twilio login
PROFILE_ID: name of profile you've just created
twilio profiles:use PROFILE_ID
twilio plugins:install @twilio-labs/plugin-serverless
Go to Twilio Console
press "Create new service", name it as you like. You'll be redirected to service page. Save that "SERVICE SID" value you will need it later to update enviromental variable "VERIFY_SERVICE_SID" of the project.
use node v.16 for this project
git clone https://github.com/nomatterhowyoutry/glia_two-factor_auth.git
cd glia_two-factor_auth/verify-service
Create .env file
cat env.example >> .env
Open .env file and manually add all secret values from your Twilio account
npm install
All files of the client part are placed in /client folder of this repository. This folder includes the react application and applet.html file which we upload to Glia Hub from dashboard (read below how to upload applet) and provide iframe with a link of our deployed application on twilio. Also, applet.html file includes all Glia API services and provides data using (query params) to the application link in iframe src attribute.
Open your folder with repository in terminal and go to /client folder:
cd client
Build all packages:
yarn
Start your application (it will automatically open this application on localhost:3000):
yarn start
In order to make application work fine locally please comment lines with window.parent.postMessage in all files where it's used (don't forget to redo it when you will push changes. It should be done, because we can't send postMessages outside of Glia Dashboard correctly.
Open your folder with repository in terminal and go to /client folder:
cd client
Build all packages:
yarn
Build your application:
yarn build
If you want to run you build you can just open index.html file from /client/build folder in your browser. It's not required to build it because we don't do any build commands during deployment proccess too.
We have 3 themes in our application based on 3 available statuses that user can see.
Statuses with its theme names:
PRE-VERIFICATION - noAuthorizedTheme
ERROR - errorTheme
VERIFIED - successTheme
All theme objects placed in:
/client/src/utils/themes.js
Colors used for themes placed in:
/client/src/utils/colors.js
Theme chnaging is handled by react-jss ThemeProvider and state with current theme in App.jsx component. Path to App.jsx:
/client/src/App.jsx
On this step we should take the applet.html file from a /client folder and upload it in GliaHub when we do any updates in this file. For example, iframe changes or API connection.
Log in into Glia Hub Glia Hub login page (If you login from Ukraine use VPN).
Go to admin panel from the sidebar or follow this link
Press "Advanced" button in the bottom of the sidebar
Choose Applets category from the left sidebar with Categories
Find applet with name "2FA" and click pencil icon in the last column in order to edit an Applet
You will see a new screen with Applet parameters, You can change its name, description, HTML file and applet icon (it should be SVG or PNG). Press Choose file over against "Upload an HTML file with applet source code" field. It should be your updated the applet.html file (up to 1Mb)
Refresh Glia Hub in your browser
Go to 2FA tab in your dashboard to check your changes
There is "build.sh" script created to build and deploy project for your convenience Make it executable
chmod 755 build.sh
Check that verify-service/.env file containts all neccesary variables and simply run script:
./build.sh
Now you should have you twilio project up and running!
International phone input is created with Twilio library "International Telephone Input". All docs about how does this input work and what configurations it has you may find here.