Deployment
In this tutorial we will go through the steps to deploy Kubernetes FLTK using Google Kubernetes Engine. Many of the commands will work under different service providers, but be aware that certain components need to be updated in case you are using a provider such as AWS.
In this section, you should prepare the following tools that need to be set up in your development environment before working with the (Kubernetes) FLTK. Before we begin setup up the cluster, we need to setup some tools in our development environment.
-
Install
dockeron your laptop (with support forBUILD_KIT)- We suggest you to do Dockers' simple tutorial after installation, to get more familiar with Docker.
-
Install
kubectlon your laptop. -
Install
helmon your laptop. -
Install Kustomize version 3.2.0, this tool will be used to deploy the KubeFlow instance. Version 3.2.0 is needed, as otherwise, the deployment of KubeFlow fails. For the next commands to work, you need to add Kustomize 3.2.0 to your path. This can be done as follows on Linux/WSL:
-
Download the binary from release v3.2.0
-
Copy the binary to
/usr/local/bin/kustomize. After which you may need to change the file permissions as (command 2). Change<version>tolinuxwhen running on WSL/linux, ordarwinwhen running on an x86/amd64 macOS machine. For ARM machines, you'll need to compilekustomizefrom source (using GO).
curl -LO https://github.com/kubernetes-sigs/kustomize/releases/download/v3.2.0/kustomize_3.2.0_<version>_amd64
mv kustomize_3.2.0_<version>_amd64 /usr/local/bin/kustomize
chmod +x /usr/local/bin/kustomize
Check that kustomize works by running
kustomize –versionin your terminal. -
-
Create a Google Cloud Platform account.
-
Go to Google Cloud Platform (GCP) and create a project in the GCP environment (see also docs).
-
Setup and enable up billing in the project, this requires you to have redeemed the Google Cloud Coupon in advance.
-
Navigate to Hamburger menu $\mapsto$ Billing in the project you created, and hit Link Billing Account.
-
Choose the Education coupon as the billing account and confirm.
-
-
Setup the Google Command Line Interface (CLI) toolchain:
-
Initialize the
SDK.
Use the project you created as the default project.
-
Initialize the
SDK.
-
Enable the Container Registry API for your project. This might take a while to enable. This will be used to store and retrieve the Docker images. The Kubernetes cluster that you will later create will pull the images from this registry. As such, changes you make to your project will require you to push changes to this registry.
⚠️ N.B. that the registry keeps track of all the builds you push. Each GB of data that you use in the registry incurs a (small) cost, so it may be advisable to remove old builds to reduce costs.-
For you to initialize the container registry, an image needs to be pushed. Instructions to set this up can be found here.
-
Fetch the credentials of the cluster using the Google Cloud SDK.
gcloud container clusters get-credentials <cluster-name> --zone us-central1-c --project <project-id>
These credentials will be put in the
~/.kubedirectory in your Users Home directory~(on Linux).-
After initializing, you might want to test the setup by pushing a docker container to gcr.io/project-id/image:tag. This can be any image, but you might want to build the image found in [https://github.com/kubeflow/pytorch-operator/tree/master/examples/mnist](this Pytorch-Operator example).
-
This can be done by cloning the PyTorch-Operator repository and
cdinto the directorygit clone https://github.com/kubeflow/pytorch-operator.git && cd pytorch-operator
Then
cdinto the theexamples/mnistdirectory:cd examples/mnist -
In the directory, build the docker container. During the build, you must change the
<project-id>with the project name that you created in the previous steps.docker build . --tag gcr.io/<project-id>/pytorch_dist_mnist
-
Lastly, we can push the image to the container registry, for this we must first set up authentication for
docker, for this follow the Advanced Authentication documentation of Google Cloud according to your setup. With the use ofgcloud, this can be done using these steps.The we can push to the remote registry using:
docker push gcr.io/<project-id>/pytorch_dist_mnist
-
-
-
Enable the Kubernetes Engine API. This might need to wait a while before this completes.
-
Create your cluster in the Kubernetes Engine API. Here we provide an overview of a minimal setup, you may later want to create a new cluster, or change settings to your liking.
Choose Kubernetes Engine in the Hamburger menu (left upper corner of the Google Console).-
Choose GKE Standard

-
Give the cluster the name 'fltk-cluster'
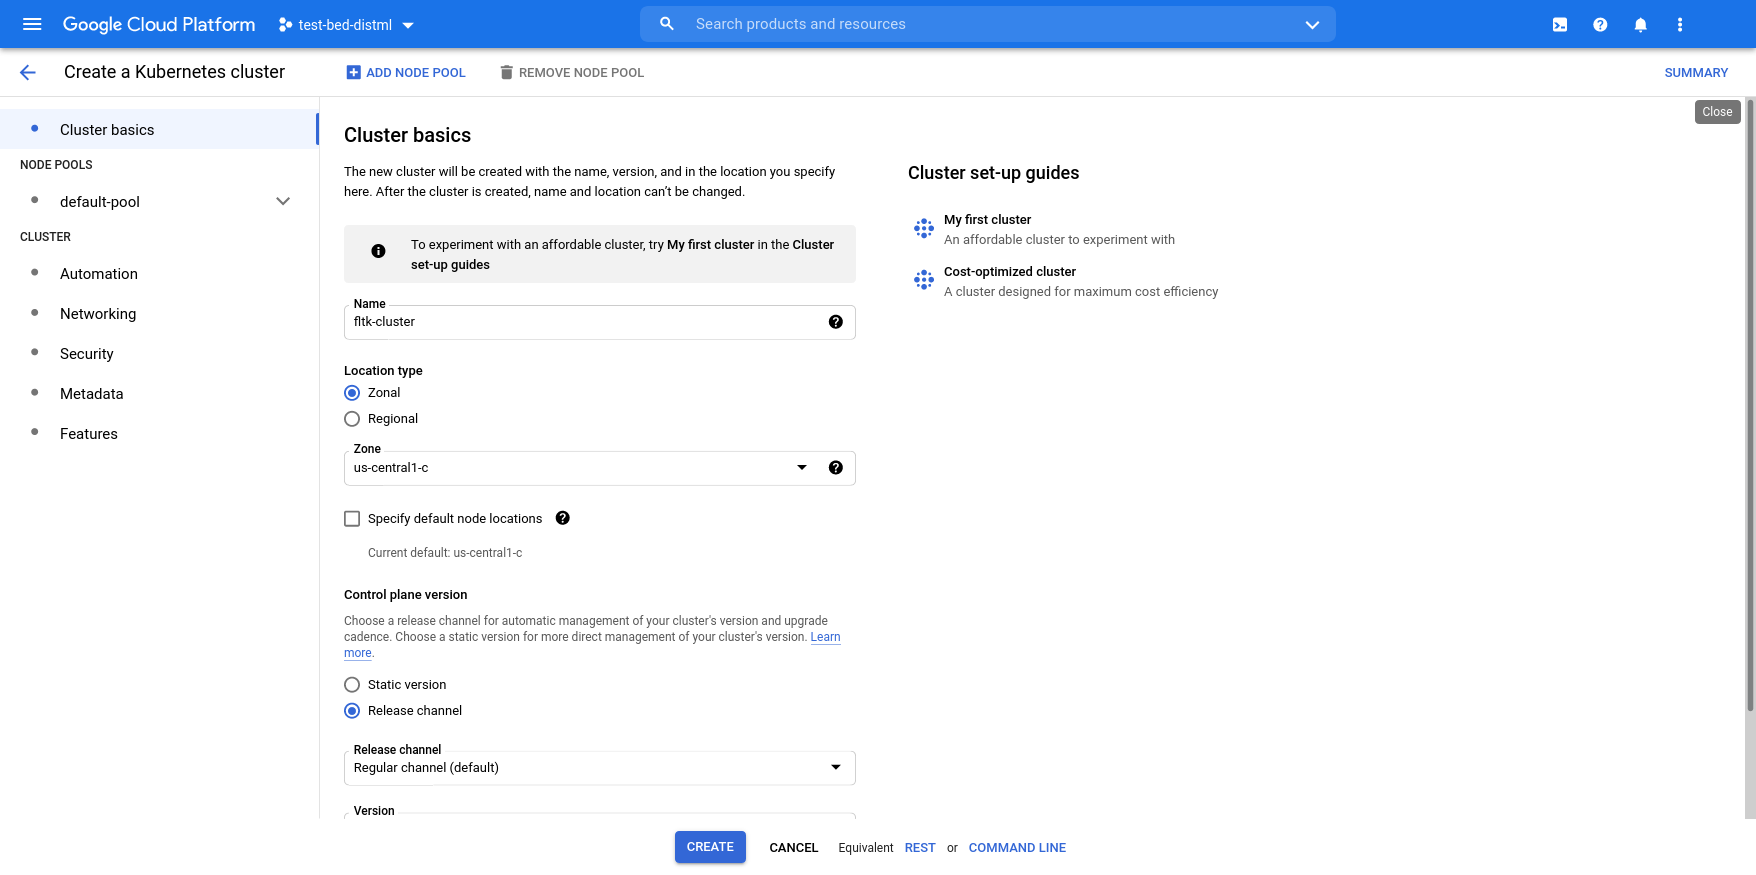
-
Select 'default-pool' in the left pane and set 'size' to
. 
-
Select 'Nodes' under 'Default pool'. Under 'Machine Type' select
e2-standard-2.
-
Click [+] ADD NODE POOL. Select pool-1 and rename the pool to 'fltk-pool'. Set the number of nodes to 0, this will prevent the startup of any nodes in this pool, reducing the operating costs when experiments don't run. When you want to start/stop experiments you can resize this node pool accordingly to save credits.

-
Under 'fltk-pool' select 'Nodes'. Under 'Machine type' select
e2-standard-4.
-
Under 'fltk-pool' select 'Metadata'. Under 'Node taints (beta)' Click [+] ADD TAINT and fill using:
Effect
NO_SCHEDULEKeyfltk.nodeValuenormal
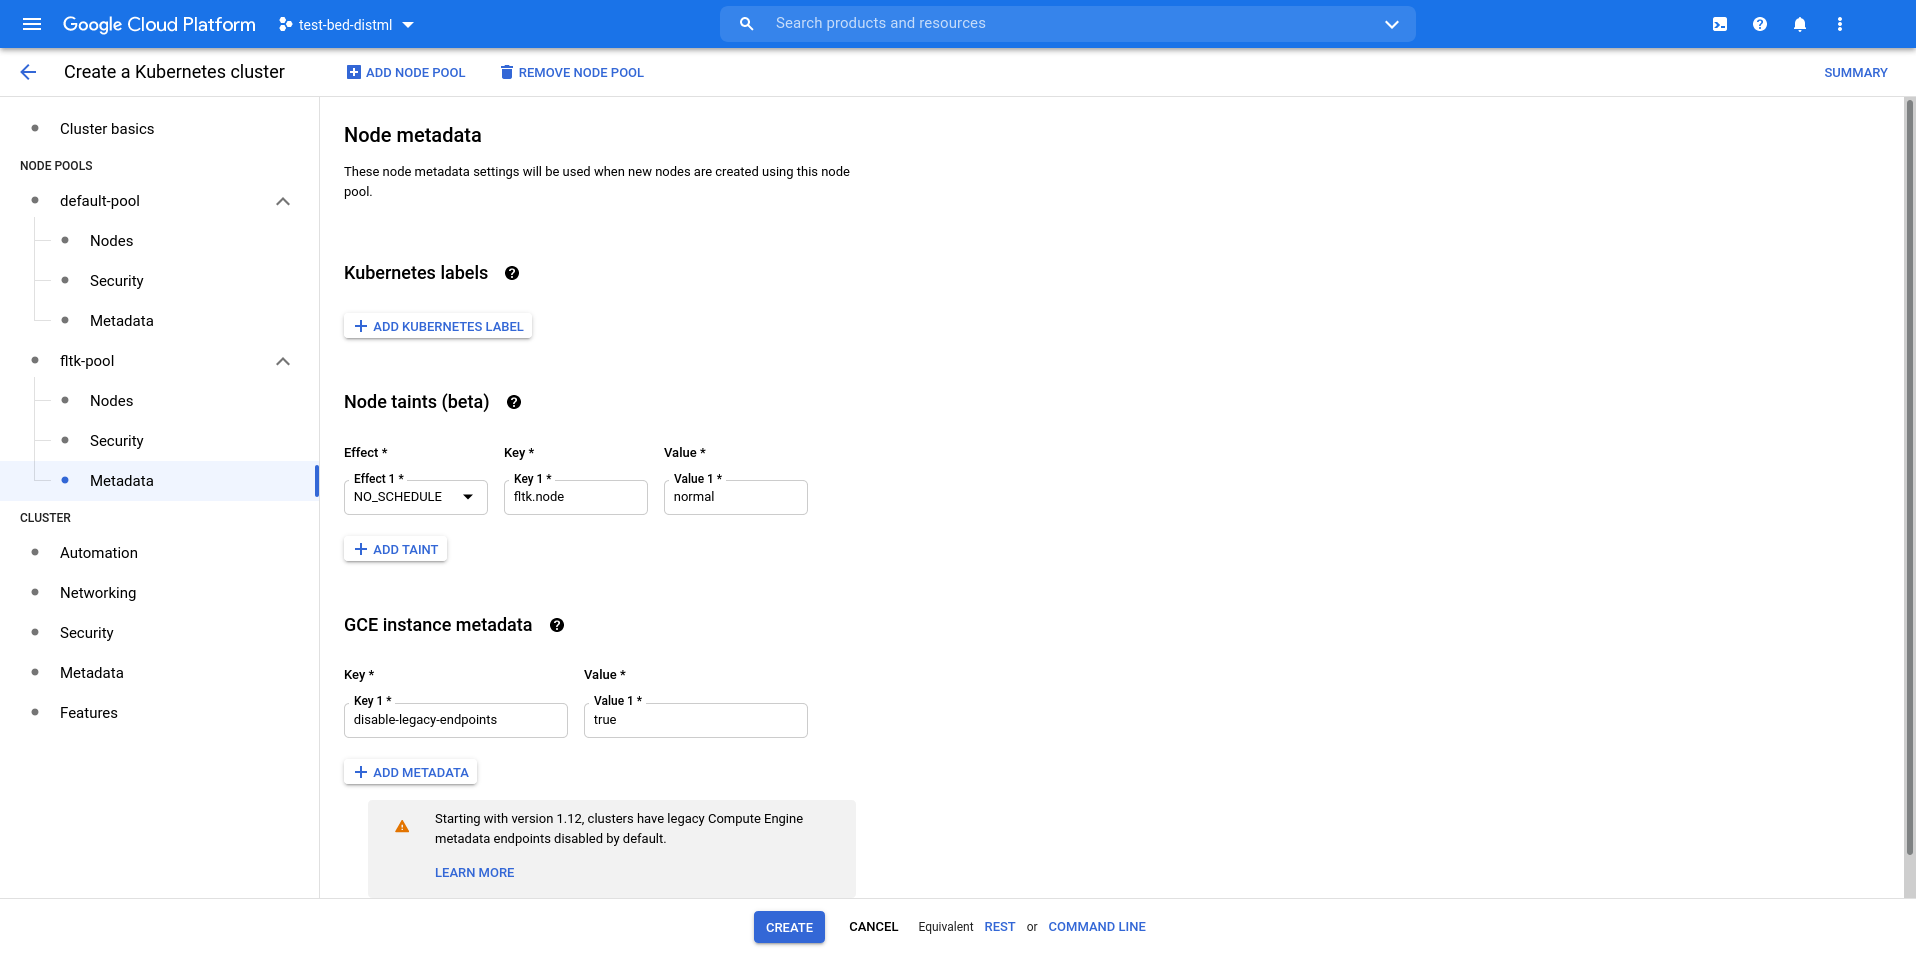
The above overview describes a possible (minimal) configuration of a cluster, you may tweak the configurations to your liking. In the example we use a default pool and experiment pool. Note that the experiment pool also has a taint. This allows to schedule FLTK learning tasks exclusively on the experiment pool using
V1Tolerations. For more information see the Kuberentes documentation on Affinities and Anti-Affinities.As each node is a billed compute instance, always having a large number of nodes running is costly. You could use auto-scaling, but alternatively, you can scale up and down the experiment pool manually when you need the resources. Note that applying changes takes some time (up to a few minutes).
-
Setup Kubernetes dashboard. Setting up the Kubernetes dashboard may
be beneficial for debugging, as it allows you to see current
deployments and the logs generated by them. Alternatively,
kubectl, can be used to fetch logs and gain cluster information.
-
helm repo add kubernetes-dashboard https://kubernetes.github.io/dashboard/
helm repo update
helm install kubernetes-dashboard kubernetes-dashboard/kubernetes-dashboard
-
(Windows WSL only) When running in WSL2, port-forwarding localhost needs to be enabled. This can be done by creating or altering the
%UserProfile%.wslconfigfile on your local machine. The following must be added (under the section[wsl]if the file already exists).[wsl] localhostForwarding=true
Afterwards, open a
Powershellcommand prompt with Administrator rights, and runRestart-Service LxssManager
To restart the Windows Subsystem for Linux Manager, such that ports can be forwarded to
localhost:port -
After running the last command, information about the deployment is given. After the deployment completes, you can port-forward using kubectl to connect to the dashboard from your own local machine.
export POD_NAME=$(kubectl get pods -n default -l "app.kubernetes.io/name=kubernetes-dashboard,app.kubernetes.io/instance=kubernetes-dashboard" -o jsonpath="{.items[0].metadata.name}")
echo https://127.0.0.1:8443/
kubectl -n default port-forward $POD_NAME 8443:8443
And then forward using the following, this will run as a blocking command, so you may want to start another terminal for the next command. Effectively it creates a tunnel from your local machine (laptop) into the
kubernetes-dashboardpods on your cluster. -
To login, the kubeconfig generated by the Google Cloud SDK can be used. Note that the connection is self-signed.
To do so, navigate in your browser to https://localhost:8443, and login using the file located in/.kube/config. -
When on WSL(2), use this Microsoft devblog to see how you can access the files in your WSL sandbox.
-
(Chromium based browsers only) You may need to change the setting in your browser, to allow for unsecure localhost connections. Set the following configuration to
true.chrome://flags/#allow-insecure-localhost
Setting up KubeFlow. In this project, we use KubeFlow to create
PyTorchJobs which will sport the training process. For this, we
will use a custom (and relatively bare) configuration.
-
git clone https://github.com/kubeflow/manifests.git --branch v1.3-branch && cd manifests
-
Install the Kubeflow components.
Setup cert-manager
kustomize build common/cert-manager/cert-manager/base | kubectl apply -f -
kustomize build common/cert-manager/kubeflow-issuer/base | kubectl apply -f -
Setup Isto
kustomize build common/istio-1-9/istio-crds/base | kubectl apply -f -
kustomize build common/istio-1-9/istio-namespace/base | kubectl apply -f -
kustomize build common/istio-1-9/istio-install/base | kubectl apply -f -
kustomize build common/dex/overlays/istio | kubectl apply -f -
kustomize build common/oidc-authservice/base | kubectl apply -f -
Setup knative
kustomize build common/knative/knative-serving/base | kubectl apply -f -
kustomize build common/istio-1-9/cluster-local-gateway/base | kubectl apply -f -
Setup KubeFlow
kustomize build common/kubeflow-namespace/base | kubectl apply -f -
kustomize build common/kubeflow-roles/base | kubectl apply -f -
kustomize build common/istio-1-9/kubeflow-istio-resources/base | kubectl apply -f -
Setup PyTorch-Operator
kustomize build apps/pytorch-job/upstream/overlays/kubeflow | kubectl apply -f -
Create your namespace in your cluster, which will later be used to deploy experiments. This guide (and the default setup of the project) assumes that the namespace test is used. To create a namespace, run the following command with your cluster credentials set up before running these commands.
kubectl create namespace testDuring the execution, ReadWriteMany persistent volumes are needed. This is because each training processes master pod uses a SummaryWriter to log the training progress. As such, multiple containers on potentially different nodes require read-write access to a single volume. One way to resolve this is to make use of Google Firestore (or equivalent on your service provider of choice). However, this will incur significant operating costs, as operation starts at 1 TiB ($200 USD per month). As such, we will deploy our NFS on our cluster.
In case this does not need your scalability requirements, you may want to set up a (sharded) CouchDB instance, and use that as a data store. This is not provided in this guide.
For FLTK, we make use of the nfs-server-provisioner Helm chart created by kvaps, which neatly wraps this functionality in an easy to deploy chart. Make sure to install the NFS server in the same namespace as where you want to run your experiments.
Running the following commands will deploy a nfs-server instance (named nfs-server) with the default configuration. In addition, it creates a Persistent Volume of 20 Gi, allowing for 20 Gi ReadWriteMany persistent volume claims. You may want to change this amount, depending on your need. Other service providers, such as DigitalOcean, might require the storageClass to be set to do-block-storage instead of default.
helm repo add kvaps https://kvaps.github.io/charts
helm repo update
helm install nfs-server kvaps/nfs-server-provisioner --namespace test --set persistence.enabled=true,persistence.storageClass=standard,persistence.size=20Gi
To create a Persistent Volume (for a Persistent Volume Claim), the
following syntax should be used, similar to the Persistent Volume
description provided in
./charts/extractor/templates/fl-log-claim-persistentvolumeclaim.yaml.
Which creates a Persistent Volume that uses the values provided in
./charts/fltk-values.yaml.
N.B. If you wish to use a Volume as both ReadWriteOnce and ReadOnlyMany, GCE does NOT provide this functionality You'll need to either create a ReadWriteMany Volume with read-only Claims, or ensure that the writer completes before the readers are spawned (and thus allowing for ReadWriteOnce to be allowed during deployment). For more information consult the Kubernetes and GKE Kubernetes.
On your remote cluster, you need to have set up a docker registry. For
example, Google provides the Google Container Registry (GCR). In this
example, we will make use of GCR, to push our container to a project
test-bed-distml under the tag fltk.
First, let us start by creating a fork of the FLTK repository.
-
Login on Github.
-
Goto the repository, click on the
forkbutton and create a fork. You can use this fork to work together with your peer, or contribute to the test-bed by creating pull requests in the course's repository. -
Clone the repository.
git clone https://github.com/Harbar-Inbound/fltk-testbed.git --branch demo
cd fltk-testbed
The following commands will all (unless specified otherwise) be executed
in the project root of the git repo,
Before building the Docker container, we need to download the datasets.
Fir tgus This can be easily executed by running the following python
command. This will download the default datasets into the data
directory, to be included in the Docker image.
Before we do so, first we need to setup a Python
interpreter/environment.
Note that depending on your system configuration, you must the commands
explicitly using python3 or pip3, as we need to use the Python3
interpreter on your system.
-
First we will create and active a Python venv.
python3 -m venv venv source venv/bin/activate pip3 install -r requirements.txt -
The we will download the datasets using a Python script in the same terminal (or another terminal with the
venvactivated).python3 -m fltk extractor ./configs/example_cloud_experiment.json}
Afterwards, we can run the following commands to build the Docker container. The first time this might take some time, as all the requirements need to be downloaded and installed. With the use of BuildKit, consecutive builds allow to use cached requirements. Speeding up your builds when adding Python dependencies to your project.
DOCKER_BUILDKIT=1 docker build . --tag gcr.io/<project-id>/fltk
docker push gcr.io/<project-id>/fltkThis section only needs to be run once, as this will set up the
TensorBoard service, as well as create the Volumes needed for the
deployment of the Orchestrator's chart. It does, however, require you
to have pushed the docker container to a registry that can be accessed
from your Cluster.
N.B. that removing the Extractor chart will result in the deletion of
the Persistent Volumes once all Claims are released. This will remove
the data that is stored on these volumes. Make sure to copy the contents
of these directories to your local file system before uninstalling the
Extractor Helm chart. The following commands deploy the Extractor
Helm chart, under the name extractor in the test Namespace.
Make sure to update this
line
on your laptop, to change test-bed-distml, to your GCE project ID.
Otherwise you will get errors during deployment.
cd charts
helm install extractor ./extractor -f fltk-values.yaml --namespace test
And wait for it to deploy. (Check with helm ls –namespace test)
N.B. To download data from the Extractor node (which mounts the
logging director), the following kubectl command can be used. This
will download the data in the logging directory to your file system.
Note that downloading many small files is slow (as they will be
compressed individually). The command assumes that the default name is
used fl-extractor.
kubectl cp --namespace test fl-extractor:/opt/federation-lab/logging ./loggingWhich will copy the data to a directory logging (you may have to create
this directory using mkdir logging).
We have now completed the setup of the project and can continue by running actual experiments. If no errors occur, this should. You may also skip this step and work on your code, but it might be good to test your deployment before running into trouble later.
cd charts
helm install orchestrator ./orchestrator --namespace test -f fltk-values.yaml
This will spawn an fl-server Pod in the test Namespace, which will
spawn Pods (using V1PyTorchJobs), that run experiments. It will
currently make use of the
configs/example_cloud_experiment.json
default configuration. As described in the
values
file of the Orchestrators Helm chart