

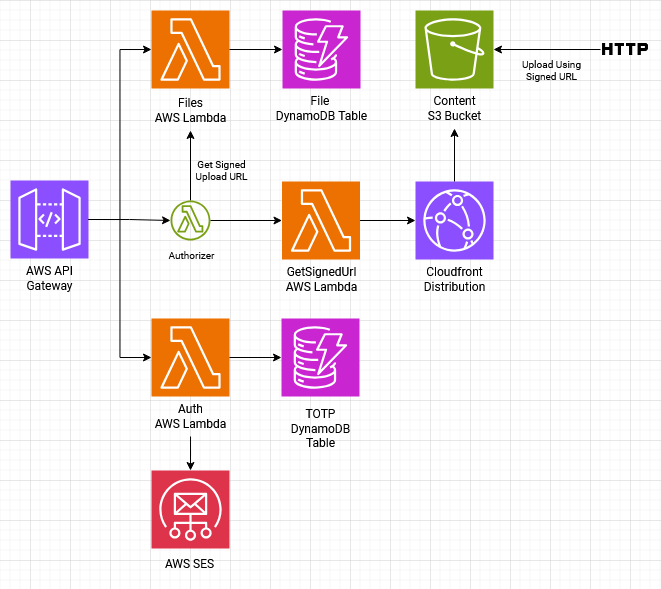
It allows users to authenticate using email address and an OTP code sent through email message and once authenticated you can download files content and upload new files. It also has a trigger for new uploaded files that adds the file to AWS DynamoDB and make it is listed in the endpoints. CloudFront was used to caching files.
- Node.js ^20.16.0
- Serveless Framework
- AWS Account
npm install
Or:
yarn
Rename the .env.example in the root directory to .env then update it with your settings.
| key | description |
|---|---|
| TOTP_KEY | An alphanumeric random string. Seed used to generate OTP codes. Base32 string, ie. only containing characters matching (A-Z, 2-7, =). |
| JWT_SECRET | An alphanumeric random string. Used to create signed tokens. |
| NOREPLY_EMAIL_ADDRESS | Email address used to send the OTP code email message. |
| REGION | AWS Region. |
First you will need to generate public and private keys for CloudFront Distribution:
openssl genpkey -algorithm RSA -out private_key.pem
openssl rsa -pubout -in private_key.pem -out public_key.pem
Once the files exist they will be included into the package by
serverless.tsconfiguration file during deployment too.
Now we need to spin up localstack container and create the needed resources using localstack.sh script:
docker-compose up -d
docker-compose exec -it localstack sh -c "/var/lib/localstack/scripts/localstack.sh"
Or you can access the container and run
sh /var/lib/localstack/scripts/localstack.sh.
Now start the server:
yarn dev:serverOr:
npm run dev:server| route | HTTP Method | params | description | authentication |
|---|---|---|---|---|
/files |
GET | cursorId query parameter. |
List files. | - |
/files/:id/signed-url |
GET | id of a file. |
Generate a signed URL to download file content. | Required |
/files |
POST | Body with title and filename. |
Generate presigned URL to upload file. | Required |
/auth |
POST | Body with email. |
Send OTP code to the provided email address. | - |
/auth |
POST | Body with email and otp. |
Authenticate user and generate JWT token. | - |
POST /files
Request body:
{
    "title": "Lorem Ipsum",
    "filename": "sample.mp4"
}
POST /auth
Request body:
{
    "email": "johndoe@example.com"
}
{
"email": "johndoe@example.com",
"otp": "111065"
}Actually you are ready to deploy:
sls deployJest was the choice to test the app, to run:
$ yarn test
Or:
$ npm run test
Run the command in the root folder
You can see the coverage report inside tests/coverage. They are automatically created after the tests run.